
Web API 應用架構設計分析:安全簽名與令牌驗證實作
上一篇對 Web API 的各種應用架構做了概括性的分析與設計。Web API 是一種應用介面框架,能建構 HTTP 服務以支撐更廣泛的用戶端(瀏覽器、手機、平板等行動裝置)。本篇接續這個主題,說明如何利用 ASP.NET Web API 設計 API 層與相關的呼叫處理。
1. Web API 的介面存取分類
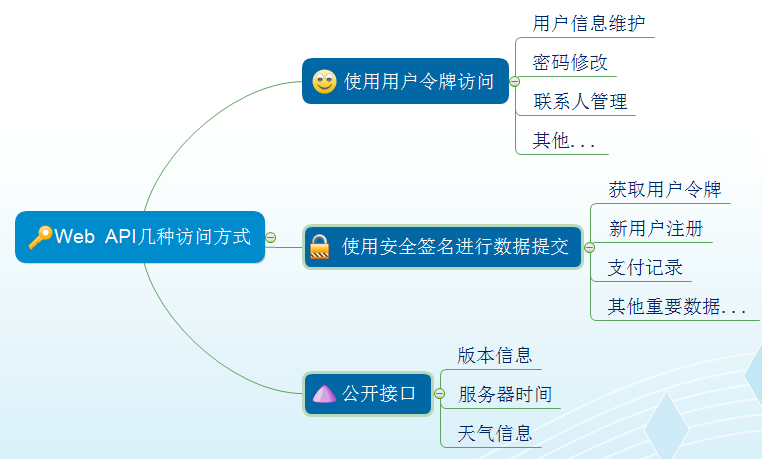
大致可以分成三類:
(1)使用者令牌(Token):透過 Web API 介面存取資料時攜帶令牌,可有效識別使用者身份,回傳與該使用者相關的資料,例如個人資訊維護、密碼修改、聯絡人管理等。
(2)安全簽名:提交的資料在 URL 中帶有依規則加密的簽名參數,伺服器收到後以相同規則重新計算並比對,確認資料未在傳輸途中被竄改,才進行處理。不同接入方式(Web/APP/Winform)可指定不同的加密金鑰,但金鑰由雙方事先約定,並不隨網路傳輸;網路上傳的是該接入端的 AppID,伺服器依 AppID 找出對應金鑰來驗證簽名。微信後台的回呼機制就是類似做法。
(3)公開介面:不需令牌也不需簽名,通常數量很少,只用來提供常規的資料顯示。
2. 安全簽名的實作
使用者註冊必須由我們認可的終端發起,也就是必須通過安全簽名驗證,後台確認有效才允許註冊,否則一旦可以偽造資料,整個系統就失去意義了。
/// <summary>
/// 註冊使用者資訊介面
/// </summary>
public interface IUserApi
{
    /// <summary>
    /// 註冊使用者處理,包括使用者名、密碼、身份證號、手機等資訊
    /// </summary>
    /// <param name="json">註冊使用者資訊</param>
    /// <param name="signature">加密簽名字串</param>
    /// <param name="timestamp">時間戳</param>
    /// <param name="nonce">隨機數</param>
    /// <param name="appid">應用接入 ID</param>
    ResultData Add(UserJson json, string signature, string timestamp,
                   string nonce, string appid);
}
取得使用者令牌同樣需要通過簽名認證,才能保證令牌發放的合法性。
/// <summary>
/// 系統認證等基礎介面
/// </summary>
public interface IAuthApi
{
    /// <summary>
    /// 註冊使用者取得訪問令牌介面
    /// </summary>
    TokenResult GetAccessToken(string username, string password,
                               string signature, string timestamp,
                               string nonce, string appid);
}
參數處理規則
1)Web API 為各接入端(APP、Web、Winform)分配應用 AppID 與通訊金鑰 AppSecret,雙方各自保存。
2)接入端請求時需攜帶 signature、timestamp、nonce、appid 四個參數,簽名由這幾個參數與加密金鑰產生。
3)Web API 收到請求後先檢查簽名是否合法,驗證通過才呼叫相關介面。
伺服器端驗證流程(參考微信做法)
1)檢查 timestamp 與系統時間的差距是否在合理範圍內,例如 10 分鐘。
2)將 appSecret、timestamp、nonce 三個參數依字典序排序。
3)把排序後的字串拼接並做 SHA1 加密。
4)將加密結果與 signature 比對,若相符則表示該請求確實來自某個應用端,且未被竄改。
/// <summary>
/// 檢查應用接入的資料完整性
/// </summary>
public CheckResult ValidateSignature(string signature, string timestamp,
                                     string nonce, string appid)
{
    CheckResult result = new CheckResult();
    result.errmsg = "數據完整性檢查不通過";

    // 依 Appid 取得接入渠道的詳細資訊
    AppInfo channelInfo = BLLFactory<App>.Instance.FindByAppId(appid);
    if (channelInfo != null)
    {
        #region 校驗簽名參數的來源是否正確
        string[] ArrTmp = { channelInfo.AppSecret, timestamp, nonce };
        Array.Sort(ArrTmp);
        string tmpStr = string.Join("", ArrTmp);

        tmpStr = FormsAuthentication.HashPasswordForStoringInConfigFile(tmpStr, "SHA1");
        tmpStr = tmpStr.ToLower();

        if (tmpStr == signature && ValidateUtil.IsNumber(timestamp))
        {
            DateTime dtTime = timestamp.ToInt32().IntToDateTime();
            double minutes = DateTime.Now.Subtract(dtTime).TotalMinutes;
            if (minutes > timspanExpiredMinutes)
            {
                result.errmsg = "簽名時間戳失效";
            }
            else
            {
                result.errmsg = "";
                result.success = true;
                result.channel = channelInfo.Channel;
            }
        }
        #endregion
    }
    return result;
}
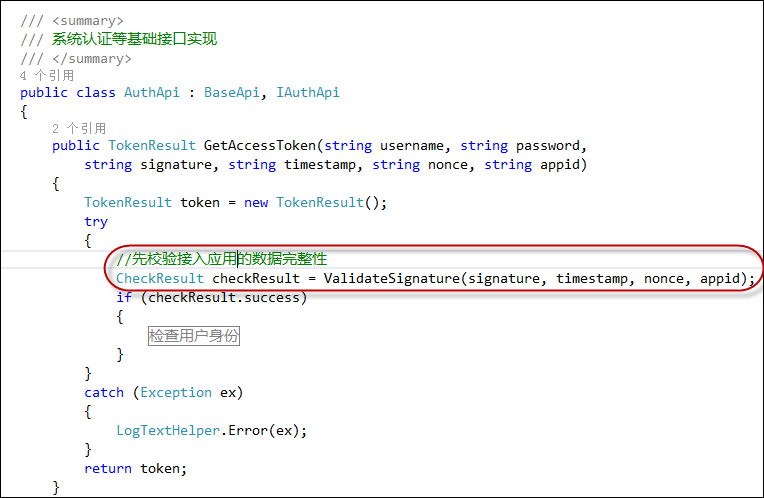
一旦簽名驗證成功,就代表資料的來源與完整性都已確認,後續與安全性相關的操作(例如發放使用者令牌)才能安心進行。
3. 安全令牌的實作
取得令牌之後,所有與該使用者相關的呼叫只要帶上這個令牌即可。令牌中承載了使用者 ID、過期時間等基礎資訊,設計思路來自 JSON Web Token(JWT),可參考 https://self-issued.info/docs/draft-ietf-oauth-json-web-token.html 以及 GitHub 上的 https://github.com/jwt-dotnet/jwt。
由於 Web API 的呼叫都是無狀態的,我們靠令牌傳遞使用者資訊,因此每次請求只需驗證令牌本身。
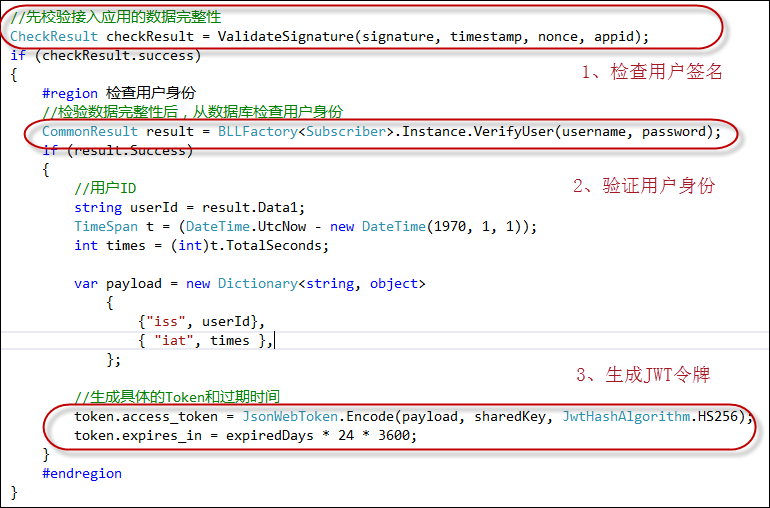
驗證時把產生令牌的過程反過來做:解出內容並檢查簽發時間是否仍在有效期內(例如約定 7 天,不必設得太短)。
/// <summary>
/// 檢查使用者的 Token 有效性
/// </summary>
public CheckResult ValidateToken(string token)
{
    CheckResult result = new CheckResult();
    result.errmsg = "令牌檢查不通過";

    if (!string.IsNullOrEmpty(token))
    {
        try
        {
            string decodedJwt = JsonWebToken.Decode(token, sharedKey);
            if (!string.IsNullOrEmpty(decodedJwt))
            {
                #region 檢查令牌物件內容
                dynamic root = JObject.Parse(decodedJwt);
                string username = root.name;
                string userid = root.iss;
                int jwtcreated = (int)root.iat;

                // 檢查令牌有效期,7 天內有效
                TimeSpan t = (DateTime.UtcNow - new DateTime(1970, 1, 1));
                int timestamp = (int)t.TotalDays;
                if (timestamp - jwtcreated > expiredDays)
                {
                    throw new ArgumentException("用戶令牌失效.");
                }

                result.success = true;
                result.errmsg = "";
                result.userid = userid;
                #endregion
            }
        }
        catch (Exception ex)
        {
            LogTextHelper.Error(ex);
        }
    }
    return result;
}
實務上訪問令牌不宜永久有效。若要處理令牌更新的問題,可以設定「只允許最新的令牌使用」,並把目前有效的令牌存進介面快取比對;使用者登出時再把快取中的項目移除即可。
4. ASP.NET Web API 的開發
介面與業務邏輯定義好之後,還需要建立一個 Web API 專案來承載。
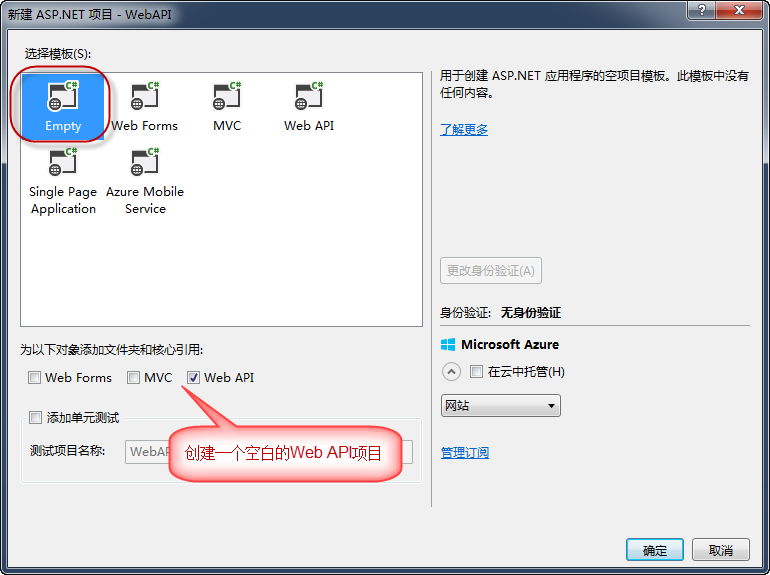
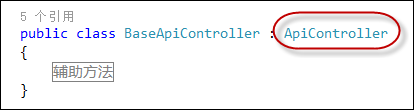
建立專案後,建議先加上一個 Web API 基底類別,方便統一控制共同行為。
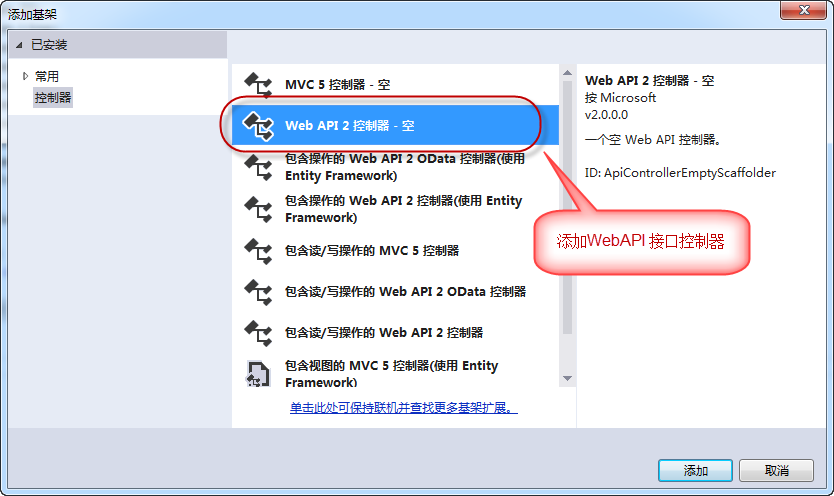
接著就能在 Controller 目錄下建立各個應用 API 控制器。
最後,為了讓所有 API 都統一回傳 JSON,需要調整 WebApiConfig:
public static class WebApiConfig
{
    public static void Register(HttpConfiguration config)
    {
        // Web API 配置和服務
        config.SetCorsPolicyProviderFactory(new CorsPolicyFactory());
        config.EnableCors();

        // Web API 路由
        config.MapHttpAttributeRoutes();
        config.Routes.MapHttpRoute(
            name: "DefaultApi",
            routeTemplate: "api/{controller}/{action}/{id}",
            defaults: new { action = "post", id = RouteParameter.Optional }
        );

        // 移除 XML 格式器,只保留 JSON
        config.Formatters.Remove(config.Formatters.XmlFormatter);
    }
}
5. 介面測試
接下來新增業務介面進行測試。建議用一個 Winform 專案逐一測試每個介面,或使用單元測試,端看個人偏好。
/// <summary>
/// 產生簽名字串
/// </summary>
private string SignatureString(string appSecret, string timestamp, string nonce)
{
string[] ArrTmp = { appSecret, timestamp, nonce };
Array.Sort(ArrTmp);
string tmpStr = string.Join("", ArrTmp);
tmpStr = FormsAuthentication.HashPasswordForStoringInConfigFile(tmpStr, "SHA1");
return tmpStr.ToLower();
}
private TokenResult GetTokenResult()
{
string timestamp = DateTime.Now.DateTimeToInt().ToString();
string nonce = new Random().NextDouble().ToString();
string signature = SignatureString(appSecret, timestamp, nonce);
string appended = string.Format("&signature={0}×tamp={1}&nonce={2}&appid={3}",
signature, timestamp, nonce, appId);
string queryUrl = url + "Auth/GetAccessToken?username=test&password=123456" + appended;
HttpHelper helper = new HttpHelper();
string token = helper.GetHtml(queryUrl);
Console.WriteLine(token);
return JsonConvert.DeserializeObject<TokenResult>(token);
}
取得令牌後,帶著它請求其他資料:
// 取得訪問令牌
TokenResult tokenResult = GetTokenResult();

string queryUrl = url + "/Contact/get?token=" + tokenResult.access_token;
HttpHelper helper = new HttpHelper();
string result = helper.GetHtml(queryUrl);
Console.WriteLine(result);
若需要 POST 資料:
var data = new
{
    name = "張三",
    certno = "123456789",
};
var postData = data.ToJson();

queryUrl = url + "/Contact/Add?token=" + tokenResult.access_token;
helper = new HttpHelper();
helper.ContentType = "application/json";
result = helper.GetHtml(queryUrl, postData, true);
Console.WriteLine(result);

// Web API 後台會自動把 POST 的 JSON 資料轉為對應物件
GET 方式可以直接用瀏覽器除錯;POST 方式則需要 Fiddler 這類工具,但最好的做法還是自己寫一個測試小工具。
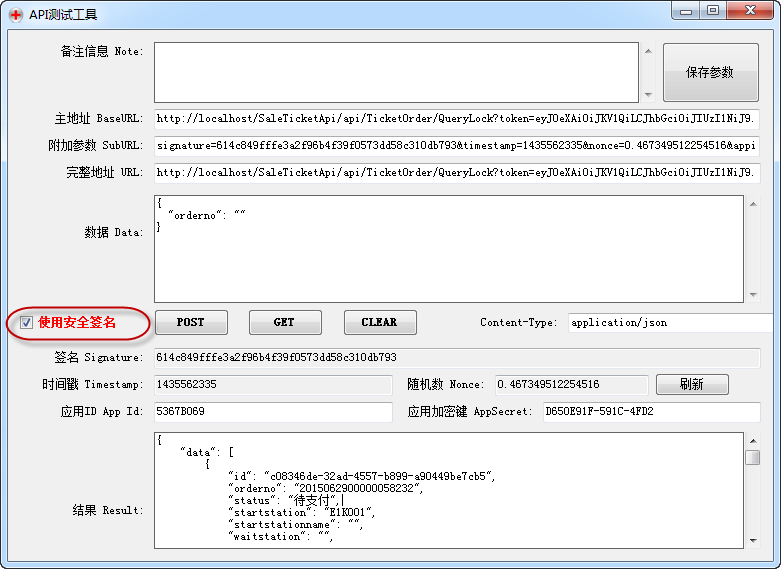
以下就是我為了測試自己的 Web API 介面而寫的除錯工具,可以自動組裝相關參數(包含安全簽名所需的欄位),並把所有參數資料保存起來,方便重複測試。
- 上一篇文章: Objective-C 中的多型(Polymorphism)觀念整理
- 下一篇文章: Objective-C 類的初始化與繼承觀念整理