
iOS 開發那些事:用 UIPageViewController 打造翻書式導航
基於分頁導航的實現
從 iOS 5 開始,我們可以使用分頁控制器 UIPageViewController 建構出類似電子書翻頁效果的應用,這類應用稱為「基於分頁的應用」。一個分頁應用會有很多相關的視圖控制器。

分頁控制器需要放在一個父視圖控制器中,其下再掛多個子視圖控制器,每個子視圖控制器對應書頁中的一頁。
這類應用會用到的類別與協議包括:UIPageViewController 類別、UIPageViewControllerDataSource 協議與 UIPageViewControllerDelegate 協議。值得注意的是,UIPageViewController 並沒有對應的視圖類別。
兩個關鍵屬性
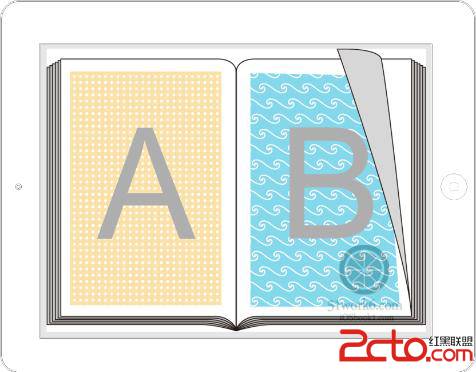
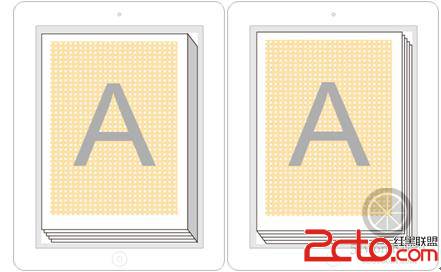
1. 雙面顯示(doubleSided):頁面翻起時,偶數頁會在背面顯示。設為 YES 時翻頁像真實書本,設為 NO(單面顯示)時,翻起處看到的背面其實是當前頁面的鏡像倒影。
2. 書脊位置(spineLocation):這個屬性是唯讀的,無法直接赋值,必須透過 UIPageViewControllerDelegate 的 pageViewController:spineLocationForInterfaceOrientation: 方法回傳。書脊位置由枚舉 UIPageViewControllerSpineLocation 定義,常見值有 Min、Mid、Max。
動手做:城市資訊應用
使用 Single View Application 模板建立名為 PageNavigation 的工程。UI 部分可以直接從 PageControlNavigation 工程複製:打開 MainStoryboard.storyboard,選中三個視圖控制器按 Command+C,再回到新工程的 storyboard 按 Command+V 貼上即可。這樣 UI 設計就完成了,剩下的交給程式碼。
ViewController.h:
#import <UIKit/UIKit.h>

@interface ViewController : UIViewController <UIPageViewControllerDataSource, UIPageViewControllerDelegate> {
    // 當前頁面的索引
    int pageIndex;
}
@property (strong, nonatomic) UIPageViewController *pageViewController;
@end
ViewController 實作了兩個協議,成員變數 pageIndex 保存目前頁碼,pageViewController 屬性保存控制器實例。
ViewController.m 的 viewDidLoad:
- (void)viewDidLoad {
    [super viewDidLoad];
    self.view.frame = CGRectMake(0.0f, 0.0f, 320.0f, 440.0f);

    self.pageViewController = [[UIPageViewController alloc]
        initWithTransitionStyle:UIPageViewControllerTransitionStylePageCurl
            navigationOrientation:UIPageViewControllerNavigationOrientationHorizontal
                        options:nil];
    self.pageViewController.delegate = self;
    self.pageViewController.dataSource = self;

    UIStoryboard *mainStoryboard = [UIStoryboard storyboardWithName:@"MainStoryboard" bundle:nil];
    UIViewController *page1ViewController = [mainStoryboard instantiateViewControllerWithIdentifier:@"page1"];

    // 第一個視圖作為 PageViewController 首頁
    NSArray *viewControllers = @[page1ViewController];
    [self.pageViewController setViewControllers:viewControllers
                                      direction:UIPageViewControllerNavigationDirectionForward
                                       animated:YES
                                     completion:NULL];

    [self addChildViewController:self.pageViewController];
    [self.view addSubview:self.pageViewController.view];

    pageIndex = 0;
}
initWithTransitionStyle:navigationOrientation:options: 用來建立實例。翻轉樣式由 UIPageViewControllerTransitionStyle 定義,有 PageCurl(翻書)與 Scroll(滑屏)兩種。翻頁方向則由 UIPageViewControllerNavigationOrientation 控制,Forward 為由左而右(或由下而上),Reverse 反之。
另外,NSArray *viewControllers = @[page1ViewController] 等同於 [NSArray arrayWithObject:page1ViewController, nil]。setViewControllers:direction:animated:completion: 決定首頁顯示幾個視圖,這與書脊類型有關:Min 或 Max 顯示一個,Mid 則顯示兩個。addChildViewController: 則是把分頁控制器掛到父控制器之下。
資料源協議的實作
- (UIViewController *)pageViewController:(UIPageViewController *)pageViewController
     viewControllerBeforeViewController:(UIViewController *)viewController {
    pageIndex--;
    if (pageIndex < 0) {
        pageIndex = 0;
        return nil;
    }
    UIStoryboard *mainStoryboard = [UIStoryboard storyboardWithName:@"MainStoryboard" bundle:nil];
    NSString *pageId = [NSString stringWithFormat:@"page%i", pageIndex + 1];
    return [mainStoryboard instantiateViewControllerWithIdentifier:pageId];
}

- (UIViewController *)pageViewController:(UIPageViewController *)pageViewController
      viewControllerAfterViewController:(UIViewController *)viewController {
    pageIndex++;
    if (pageIndex > 2) {
        pageIndex = 2;
        return nil;
    }
    UIStoryboard *mainStoryboard = [UIStoryboard storyboardWithName:@"MainStoryboard" bundle:nil];
    NSString *pageId = [NSString stringWithFormat:@"page%i", pageIndex + 1];
    return [mainStoryboard instantiateViewControllerWithIdentifier:pageId];
}
抵達首頁或末頁時回傳 nil,分頁控制器就知道該停止翻頁了。
委託協議:設定書脊位置
- (UIPageViewControllerSpineLocation)pageViewController:(UIPageViewController *)pageViewController
            spineLocationForInterfaceOrientation:(UIInterfaceOrientation)orientation {
    self.pageViewController.doubleSided = NO;
    return UIPageViewControllerSpineLocationMin;
}
由於 spineLocation 唯讀,只能在此方法中設定。它可以依螢幕方向動態調整,實作如下:
- (UIPageViewControllerSpineLocation)pageViewController:(UIPageViewController *)pageViewController
            spineLocationForInterfaceOrientation:(UIInterfaceOrientation)orientation {
    UIStoryboard *mainStoryboard = [UIStoryboard storyboardWithName:@"MainStoryboard" bundle:nil];
    UIViewController *page1ViewController = [mainStoryboard instantiateViewControllerWithIdentifier:@"page1"];
    UIViewController *page2ViewController = [mainStoryboard instantiateViewControllerWithIdentifier:@"page2"];

    if (orientation == UIInterfaceOrientationLandscapeLeft ||
        orientation == UIInterfaceOrientationLandscapeRight) {
        // 橫向時書脊置中,首頁顯示兩頁
        NSArray *viewControllers = @[page1ViewController, page2ViewController];
        [self.pageViewController setViewControllers:viewControllers
                                          direction:UIPageViewControllerNavigationDirectionForward
                                           animated:YES
                                         completion:NULL];
        self.pageViewController.doubleSided = NO;
        return UIPageViewControllerSpineLocationMid;
    }

    // 直向時書脊靠左,首頁顯示一頁
    NSArray *viewControllers = @[page1ViewController];
    [self.pageViewController setViewControllers:viewControllers
                                      direction:UIPageViewControllerNavigationDirectionForward
                                       animated:YES
                                     completion:NULL];
    self.pageViewController.doubleSided = NO;
    return UIPageViewControllerSpineLocationMin;
}
以上是一個基本實現,實際專案還要依需求調整。若改用平鋪導航,UIPageViewController 往往不需要支援螢幕旋轉,書脊位置也不會設在中間。
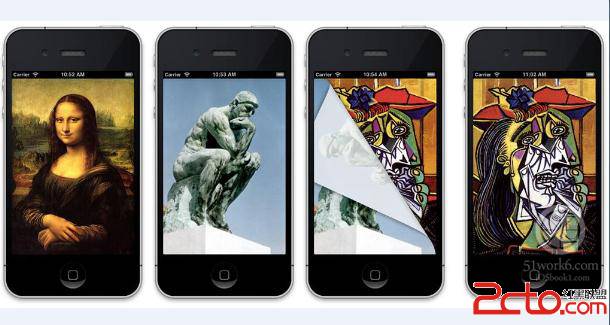
程式寫完,來看效果:
- 上一篇文章: 開源中國 iOS 客戶端學習:把時間戳轉成「幾分鐘前」
- 下一篇文章: iOS 如何用 URL Scheme 直接啟動 FaceTime