
UITableView 常用互動:刪除、拖曳排序、插入與勾選標記
編輯:iOS 相關資訊
列表的編輯能力多半靠幾個 delegate 方法撐起來。以下把刪除、移動、插入與勾選四種常見互動整理成可直接套用的片段。
一、刪除一列
實作 commitEditingStyle:forRowAtIndexPath:,系統就會自動出現左滑的刪除按鈕:
- (void)tableView:(UITableView *)tableView
    commitEditingStyle:(UITableViewCellEditingStyle)editingStyle
     forRowAtIndexPath:(NSIndexPath *)indexPath {
    if (editingStyle == UITableViewCellEditingStyleDelete) {
        NSUInteger row = indexPath.row;
        [self.editArray removeObjectAtIndex:row];   // 先同步資料來源
        [tableView deleteRowsAtIndexPaths:[NSArray arrayWithObject:indexPath]
                       withRowAnimation:UITableViewRowAnimationTop];
    }
}
順序很重要:一定要先改自己的資料陣列,再呼叫 deleteRows,否則表格重新查詢 row 數時會與實際資料不符而崩潰。
二、拖曳重新排列
先讓列進入編輯狀態(例如把 editingStyle 回傳為 Delete 或設定 setEditing:animated:),再實作移動方法:
-(void)tableView:(UITableView *)tableView
    moveRowAtIndexPath:(NSIndexPath *)sourceIndexPath
           toIndexPath:(NSIndexPath *)destinationIndexPath {
    if (sourceIndexPath != destinationIndexPath) {
        id object = [self.editArray objectAtIndex:sourceIndexPath.row];
        [self.editArray removeObjectAtIndex:sourceIndexPath.row];
        if (destinationIndexPath.row > [self.editArray count]) {
            [self.editArray addObject:object];
        } else {
            [self.editArray insertObject:object atIndex:destinationIndexPath.row];
        }
    }
}
取出、移除、再插到目標位置,這三步是排序的標準套路。邊界判斷是為了避免目標索引超出陣列範圍。
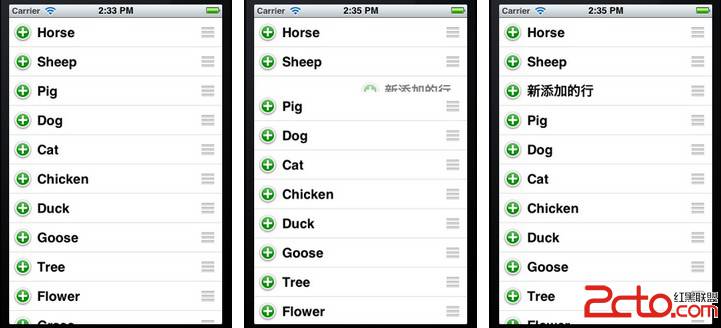
三、插入新的一列
插入與刪除共用同一個方法,只是走 else 分支:
else {
    NSArray *insertIndexPaths = [NSArray arrayWithObjects:indexPath, nil];
    [self.list insertObject:@"新添加的行" atIndex:row];
    [tableView insertRowsAtIndexPaths:insertIndexPaths
                   withRowAnimation:UITableViewRowAnimationRight];
}
若要讓左側出現「+」新增按鈕,把 editingStyleForRowAtIndexPath 回傳的值改為 UITableViewCellEditingStyleInsert 即可。
四、點擊時切換勾選
利用 cell 的 accessoryType 做視覺回饋,是最省力的多選呈現方式:
- (void)tableView:(UITableView *)tableView didSelectRowAtIndexPath:(NSIndexPath *)indexPath {
    UITableViewCell *oneCell = [tableView cellForRowAtIndexPath:indexPath];
    if (oneCell.accessoryType == UITableViewCellAccessoryNone) {
        oneCell.accessoryType = UITableViewCellAccessoryCheckmark;
    } else {
        oneCell.accessoryType = UITableViewCellAccessoryNone;
    }
    [tableView deselectRowAtIndexPath:indexPath animated:YES];
}
deselectRow 會讓選取的高亮淡出,避免勾選後還留著藍色底色。
幾個實務提醒
第一,所有增刪移的動作都必須「資料與畫面成對處理」,只做一半就是崩潰的來源。第二,若使用了 NSFetchRequest 或 Core Data 這類外部資料源,記得在動畫方法中同步更新,並處理 NSFetchedResultsController 的 delegate。第三,勾選狀態建議存在資料模型(例如每列自己的 BOOL 屬性)裡,而不是依賴 cell 的 accessoryType,因為 cell 會被回收重用,滾動一圈後狀態就可能錯亂。