
iOS 圓形旋轉托盤實作解析:分層設計、角度吸附與動畫還原
編輯:iOS 相關資訊
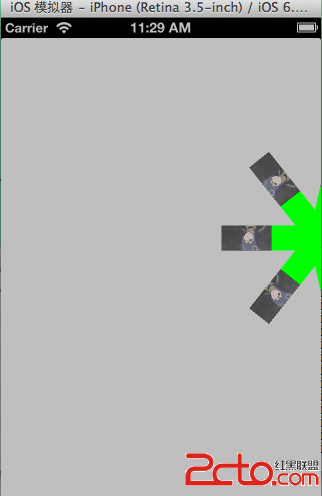
圓形旋轉選單(俗稱轉盤)在 iOS 上沒有系統控件可用,得自己算角度、做吸附、處理動畫。以下示範的實作拆成四層,職責分明,值得照著理解一遍。
整體架構
- DJItemBtn:單個托盤項,本質是一個 anchorPoint 設在左側中點的 UIView,靠 3D 旋轉把自己擺到圓周上。
- DJRotateView:托盤本體,負責依項目數量均分圓周、建立各個 DJItemBtn 並套用旋轉。
- HLRotateMenuView:互動核心,處理觸控拖動、角度累積、松手後的吸附對齊。
- HLRotateMenu:最外層,管理收合/展開動畫與中心按鈕。
整個元件透過 NSNotificationCenter 在層間傳遞事件(例如 calculateDegress 通知與 reduction 還原通知),並以 DJItemBtnDelegate 回報點擊。
單項視圖:DJItemBtn
關鍵只有一行——把 anchorPoint 設成 (0, 0.5),也就是左側中點。這樣旋轉時該視圖會繞著左中點轉,自然形成圓周分佈的效果。
#define CC_DEGREES_TO_RADIANS(__ANGLE__) ((__ANGLE__) * 0.01745329252f)  // PI / 180
#define CC_RADIANS_TO_DEGREES(__ANGLE__) ((__ANGLE__) * 57.29577951f)

@implementation DJItemBtn

- (id)initWithFrame:(CGRect)frame {
    self = [super initWithFrame:frame];
    if (self) {
        self.backgroundColor = [UIColor greenColor];
        self.layer.anchorPoint = CGPointMake(0, 0.5);   // 旋轉軸心:左側中點

        UIImageView *imageView = [[UIImageView alloc]
            initWithImage:[UIImage imageNamed:@"xiaonan1.jpg"]];
        imageView.frame = CGRectMake(frame.size.width / 2, 0, 50, 25);
        [self addSubview:imageView];

        imageView.userInteractionEnabled = YES;
        UITapGestureRecognizer *tap =
            [[UITapGestureRecognizer alloc] initWithTarget:self action:@selector(clickBtn)];
        [imageView addGestureRecognizer:tap];
    }
    return self;
}

- (void)clickBtn {
    [[NSNotificationCenter defaultCenter]
        postNotificationName:@"calculateDegress" object:nil];
    [_delegate djItemMethod:self.tag];
    NSLog(@"%d", self.tag);
}

@end
托盤本體:DJRotateView
這裡做的是最單純的圓周分佈:以項目數量去除 360 度得到夾角,再對每個項目套用遞增的旋轉。
@implementation DJRotateView

- (id)initWithView:(CGRect)frame addtarget:(id)delegate {
    self = [super initWithFrame:frame];
    if (self) {
        float segment = 7.0;
        double degree = 360 / segment;
        float rotate = CC_DEGREES_TO_RADIANS(degree);

        for (float i = 1.0; i <= 7.0; i++) {
            DJItemBtn *djItemBtn = [[DJItemBtn alloc]
                initWithFrame:CGRectMake(frame.size.width / 2 - 50,
                                         frame.size.height / 2 * 0.87,
                                         100, 25)];
            djItemBtn.delegate = delegate;
            [djItemBtn setTag:i];

            // 依序乘上倍數,把項目均勻轉到圓周各點
            djItemBtn.layer.transform = CATransform3DMakeRotation(rotate * (float)i, 0, 0, 1);

            [self addSubview:djItemBtn];
        }
    }
    return self;
}

@end
互動核心:HLRotateMenuView
這一層要解決三件事:判斷手指是否在托盤上、把移動量換算成角度、以及松手後吸附到最近的項目。
角度換算
先取得觸控點相對於托盤中心的向量,再用 atan2f 求角度:
float djDistance(const CGPoint v1, const CGPoint v2) {
    float tempX = v1.x - v2.x;
    float tempY = v1.y - v2.y;
    return sqrtf(tempX * tempX + tempY * tempY);
}

- (CGPoint)cgpSub:(CGPoint)v1:(CGPoint)v2 {
    CGPoint point;
    point.x = v1.x - v2.x;
    point.y = v1.y - v2.y;
    return point;
}

- (float)toAngle:(CGPoint)v {
    return atan2f(v.x, v.y);
}
初始化與觸控
- (id)initWithView:(CGRect)frame addtarget:(id)delegate {
    self = [super initWithFrame:frame];
    if (self) {
        self.djrotateView = [[DJRotateView alloc]
            initWithView:CGRectMake(0, 0, frame.size.width, frame.size.height)
               addtarget:delegate];
        [self addSubview:self.djrotateView];

        djSegmentNum = 7;
        djDegressBtn = 360 / djSegmentNum;      // 每個項目之間的夾角
        degressNum   = 180 - djDegressBtn * 1;  // 目前角度
        currentDegree = 180 - djDegressBtn * 1;
        beforeDegree  = 180 - djDegressBtn * 2; // 前一次角度

        [self setRotate:180 - djDegressBtn * 2];

        [[NSNotificationCenter defaultCenter] addObserver:self
            selector:@selector(calculateDegress)
                name:@"calculateDegress" object:nil];
    }
    return self;
}

- (void)touchesBegan:(NSSet *)touches withEvent:(UIEvent *)event {
    UITouch *touch = [touches anyObject];
    self.latestLocation = [touch locationInView:self];

    // 以距離判斷是否落在托盤範圍內
    float distance = djDistance(self.latestLocation, self.djrotateView.center);
    self.selectBool = (distance < 150);

    // 點到中央按鈕附近則觸發收合
    if (distance < 28) {
        [[NSNotificationCenter defaultCenter]
            postNotificationName:@"reduction" object:nil];
    }
}

- (void)touchesMoved:(NSSet *)touches withEvent:(UIEvent *)event {
    if (self.selectBool) {
        UITouch *touch = [touches anyObject];

        CGPoint previousLocation = [touch previousLocationInView:self];
        CGPoint previouscgp = [self cgpSub:previousLocation:self.djrotateView.center];
        previousDegress = CC_RADIANS_TO_DEGREES([self toAngle:previouscgp]);

        CGPoint nowLocation = [touch locationInView:self];
        CGPoint nowcgp = [self cgpSub:nowLocation:self.djrotateView.center];
        nowDegress = CC_RADIANS_TO_DEGREES([self toAngle:nowcgp]);

        // 兩次角度差即為本次旋轉量(取負號是為了配合座標系方向)
        angle = -(nowDegress - previousDegress);
        degressNum += angle;
        [self setRotate:angle];
    }
}

- (void)touchesEnded:(NSSet *)touches withEvent:(UIEvent *)event {
    [self calculateDegress];
}
吸附演算法
松手時,需要把當前角度對齊到最近的項目夾角。做法是先算出偏離了幾個格,再補上不足半格的餘量。
- (void)calculateDegress {
    // 先把超過 360 度的部分收斂掉
    if (degressNum / 360 >= 1 || degressNum / 360 <= -1) {
        // 取整數圈數後扣除
    }

    // 偏離了幾個完整夾角
    float fDegree = (degressNum - beforeDegree) / djDegressBtn;
    int tempSubAngle = fDegree / 1;

    // 不足一格的角度差
    float offAngle = (degressNum - beforeDegree) - (djDegressBtn * tempSubAngle);

    // 依正負方向決定要補回多少,讓結果落在最近的格子上
    if (offAngle > 0) {
        if (offAngle < djDegressBtn / 2) {
            offAngle = -offAngle;
        } else {
            offAngle = djDegressBtn - offAngle;
        }
    } else {
        if (offAngle > -djDegressBtn / 2) {
            offAngle = -offAngle;
        } else {
            offAngle = -djDegressBtn - offAngle;
        }
    }

    degressNum += offAngle;
    [self setRotateAnimation:offAngle];
}
動畫與非動畫版本的差別只在是否包在動畫區塊裡:
- (void)setRotate:(float)degress {
    rotate = CC_DEGREES_TO_RADIANS(degress);
    CGAffineTransform transform = self.djrotateView.transform;
    transform = CGAffineTransformRotate(transform, rotate);
    self.djrotateView.transform = transform;
}

- (void)setRotateAnimation:(float)degress {
    [UIView beginAnimations:nil context:nil];
    [UIView setAnimationDuration:0.2];

    rotate = CC_DEGREES_TO_RADIANS(degress);
    CGAffineTransform transform = self.djrotateView.transform;
    transform = CGAffineTransformRotate(transform, rotate);
    self.djrotateView.transform = transform;

    [UIView commitAnimations];
}
外層容器:HLRotateMenu
最外層只負責收合與展開。收起時托盤透明度為 0、frame 偏移;展開時反過來。
#define IMAGE_WIDTH  35
#define IMAGE_HEIGHT 40

- (id)initWithView:(CGRect)frame addtarget:(id)delegate {
    self = [super initWithFrame:frame];
    if (self) {
        self.hlRotateMenuView = [[HLRotateMenuView alloc]
            initWithView:CGRectMake(100, 0, frame.size.width, frame.size.height)
               addtarget:delegate];
        self.hlRotateMenuView.alpha = 0.0;
        [self addSubview:self.hlRotateMenuView];

        self.btnImage = [[UIImageView alloc] initWithImage:[UIImage imageNamed:@"changmen.jpg"]];
        self.btnImage.frame = CGRectMake(frame.size.width / 2 - 20,
                                         frame.size.height / 2 - 15,
                                         IMAGE_WIDTH, IMAGE_HEIGHT);
        self.btnImage.userInteractionEnabled = YES;
        UITapGestureRecognizer *tap =
            [[UITapGestureRecognizer alloc] initWithTarget:self action:@selector(btnClick)];
        [self.btnImage addGestureRecognizer:tap];
        [self addSubview:self.btnImage];

        [[NSNotificationCenter defaultCenter] addObserver:self
            selector:@selector(reduction) name:@"reduction" object:nil];
    }
    return self;
}

- (void)btnClick {
    [UIView animateWithDuration:0.3 animations:^{
        self.btnImage.alpha = 0.0;
        self.hlRotateMenuView.alpha = 1.0;
        self.btnImage.frame = CGRectMake(self.hlRotateMenuView.frame.size.width / 2 - 35,
                                         self.hlRotateMenuView.frame.size.height / 2,
                                         IMAGE_WIDTH, IMAGE_HEIGHT);
        self.hlRotateMenuView.frame = CGRectMake(0, 0, 200, 200);
    }];
}

// 還原
- (void)reduction {
    [UIView animateWithDuration:0.3 animations:^{
        self.btnImage.alpha = 1.0;
        self.hlRotateMenuView.alpha = 0.0;
        self.btnImage.frame = CGRectMake(self.hlRotateMenuView.frame.size.width / 2 - 20,
                                         self.hlRotateMenuView.frame.size.height / 2,
                                         IMAGE_WIDTH, IMAGE_HEIGHT);
        self.hlRotateMenuView.frame = CGRectMake(100, 0, 200, 200);
    }];
}
呼叫端
- (void)viewDidLoad {
    [super viewDidLoad];

    self.hlRotateMenu = [[HLRotateMenu alloc]
        initWithView:CGRectMake(self.view.frame.size.width - 100, 100, 200, 200)
           addtarget:self];
    [self.view addSubview:self.hlRotateMenu];
}

// DJItemBtnDelegate:托盤項被點擊時的回呼
- (void)djItemMethod:(int)btnTag {
    NSLog(@"%d", btnTag);
}
幾點值得借鏡的設計
這個範例寫於 2013 年,用 ARC 之前的寫法與通知中心到處串接,以今天的標準看略顯粗糙。但三個思路仍然值得學:
- 用 anchorPoint 做圓周分佈:把旋轉軸移到邊緣,均分角度就能得到漂亮的放射狀排列,比逐個算 sin/cos 座標簡單得多。
- 角度吸附要考慮方向:offAngle 的正負決定該補加還是扣減,這段邏輯是整個元件最容易寫錯的地方。
- 分層要乾淨:DJItemBtn 不知道自己被誰裝;DJRotateView 只管排列;HLRotateMenuView 只管手勢;HLRotateMenu 只管收合。各層之間用通知鬆耦合,替換任一層都不影響其他。