
Auto Layout 實戰:讓 UITableViewCell 高度隨內容自動撐開
可變高度的 TableView Cell 幾乎每個專案都會遇到。在 Auto Layout 普及之前,我們得靠 sizeWithFont:constrainedToSize:lineBreakMode: 這類方法手算文字高度,再在 heightForRowAtIndexPath 裡回傳。這種做法不但繁瑣,一旦 Label 用了 CoreText 或 UIKit 做多字體富文本排版,就幾乎無解——只能自己分段量算,處處是坑。
自 iOS 6 引入 Auto Layout、特別是 iOS 8 開放 Cell 高度自適應之後,這件事的複雜度大幅下降。以下用一個真實需求說明完整做法:頁面上半部顯示預約保養的門店資訊與用戶勾選的項目,下半部是該門店的優惠券列表。下半部高度固定,上半部則因為品項數量、門店名稱地址長度不定,必須動態撐開。
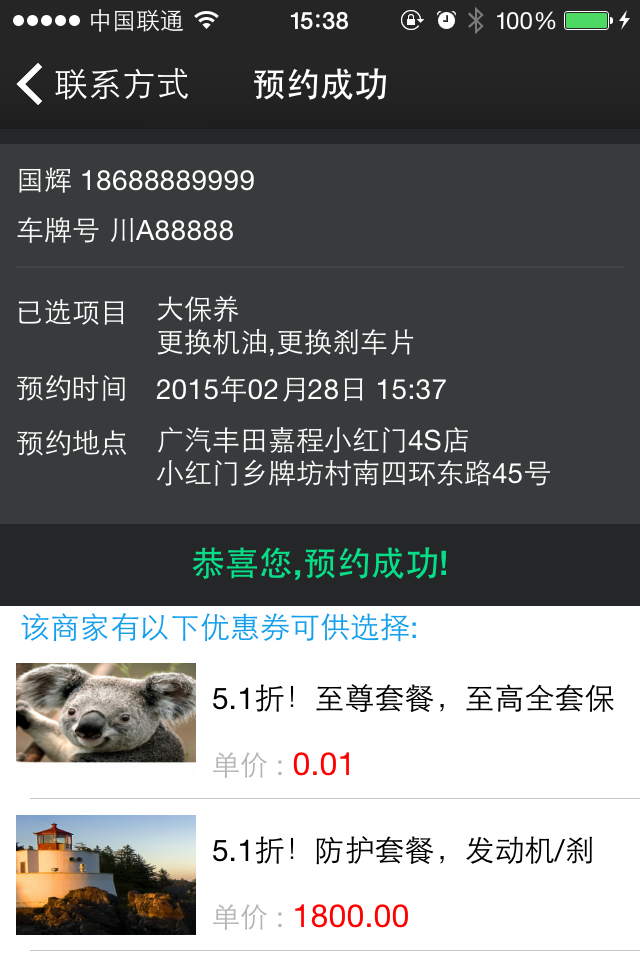
第一步:建立「合理」的約束
先建立自訂 Cell(本例為 AppointmentedInfoCell,使用 XIB)。所謂合理的約束,有兩層含意:一是約束本身要完整無歧義;二是要正確處理壓縮抗力(Content Compression Resistance)與抗拉伸(Content Hugging)的優先級。

UILabel、UIButton 這類系統控件天生具備內建尺寸(intrinsic content size),會依內容自動決定大小。要讓這個特性生效,關鍵有兩點:
- 內建尺寸在垂直方向的優先級必須是最高的 1000,不能被一條更高優先級的高度約束壓過。一旦你手動加了固定高度且優先級更高,內建尺寸就形同失效。
- 內建尺寸要能「傳導」到外層,也就是每個子控件都必須與 contentView 建立約束:最上方控件接 contentView.top,最下方控件接 contentView.bottom,同列左側控件做左對齊,同行右側控件做頂對齊,其餘依序建立垂直間距。
官方對 intrinsic content size 的說明大意是:自訂視圖通常顯示著排版系統無法感知的內容,覆寫此方法可讓自訂視圖依內容表達期望尺寸;且此尺寸必須與自身的 frame 無關,因為系統無法在高度變化時反過來動態改變寬度。
特別提醒:子控件與 contentView 四邊的約束至關重要。少了任何一條,contentView 就無法跟著 subviews 一起伸縮,高度計算自然失敗。
另外,IB 中 Label 的預設尺寸與內容不符時會出現警告(例如寬度 200 卻只放兩個 14 號字)。這類黃色警告可以忽略,不必強迫症發作去消掉它。
第二步:計算行高(iOS 8 以上)
iOS 8 起,系統直接提供了 Cell 高度自適應能力,過去需要手動量測的工作交給系統即可:
_tableView.rowHeight = UITableViewAutomaticDimension;
_tableView.estimatedRowHeight = 70.0;
這裡有兩個重點。第一,estimatedRowHeight 必須大於 0,它的作用是讓列表在初次排版時有個合理的估算值,避免 contentSize 劇烈跳動造成視覺上的大範圍抖動。第二,它並不是最終高度——Cell 真正要顯示時,系統會依 contentView 寬度(等於 tableView 寬度扣掉 Section Index、accessoryView 等佔用)與約束關係算出精確值,之後 contentSize 與 bounds 都會同步更新。
若各行高度差異很大,可以為每一行提供不同的估算值:
- (void)tableView:(UITableView *)tableView
    estimatedHeightForRowAtIndexPath:(NSIndexPath *)indexPath;
至於精確值,只要回傳自動維度即可:
- (CGFloat)tableView:(UITableView *)tableView
    heightForRowAtIndexPath:(NSIndexPath *)indexPath {
    return UITableViewAutomaticDimension;
}
第三步:iOS 7 的向下相容做法
如果你仍需支援 iOS 7,就只能自己算。核心思路是:準備一個離屏的 Cell 樣本,用它套用資料後量出 contentView 的壓縮尺寸。
// 註冊 NIB
UINib *cellNib = [UINib nibWithNibName:@"AppointmentedInfoCell" bundle:nil];
[self.tableView registerNib:cellNib
      forCellReuseIdentifier:@"AppointmentedInfoCell"];

// 建立離屏樣本 Cell(每種 Cell 只需一個,不浪費記憶體)
_baseCell = [cellNib instantiateWithOwner:nil options:nil][0];

// 統一的資料綁定方法,height 與 cell 兩處共用
- (void)configureCell:(AppointmentedInfoCell *)cell
           atIndexPath:(NSIndexPath *)indexPath {
    // 更新 contentView 上的各子控件
}

- (UITableViewCell *)tableView:(UITableView *)tableView
         cellForRowAtIndexPath:(NSIndexPath *)indexPath {
    AppointmentedInfoCell *cell =
        [tableView dequeueReusableCellWithIdentifier:@"AppointmentedInfoCell"
                                        forIndexPath:indexPath];
    [self configureCell:cell atIndexPath:indexPath];
    return cell;
}

- (CGFloat)tableView:(UITableView *)tableView
    heightForRowAtIndexPath:(NSIndexPath *)indexPath {
    [self configureCell:_baseCell atIndexPath:indexPath];
    [_baseCell layoutSubviews];
    CGFloat height = [_baseCell.contentView
        systemLayoutSizeFittingSize:UILayoutFittingCompressedSize].height;
    return height + 1;  // 留出分割線的 1px
}
之所以要 +1,是因為分割線會佔掉一個像素,contentView 必須比 row 略矮。
樣本 Cell 的實例化寫法各家不同,除了上面的 NIB 方式,常見的還有:
static NSString *CellIdentifier = @"AppointmentedInfoCell";
AppointmentedInfoCell *cell =
    (AppointmentedInfoCell *)[tableView dequeueReusableCellWithIdentifier:CellIdentifier];
if (cell == nil) {
    NSArray *nib = [[NSBundle mainBundle] loadNibNamed:CellIdentifier
                                                 owner:self options:nil];
    cell = [nib objectAtIndex:0];
}
也有人以 dispatch_once 確保樣本只建立一次:
static AppointmentedInfoCell *baseCell;
static dispatch_once_t onceToken;
dispatch_once(&onceToken, ^{
    baseCell = [[AppointmentedInfoCell alloc]
        initWithStyle:UITableViewCellStyleDefault
      reuseIdentifier:MyTableViewCellIdentifier];
});
小結
歸納起來,Auto Layout 下的動態行高只有三個關鍵:約束完整且四边封閉、內建尺寸優先級正確、以及 iOS 7 上手動呼叫 systemLayoutSizeFittingSize:。理解這三點,之後無論 Cell 裡放的是純文字、圖片還是自訂排版視圖,都能一以貫之。