
【投稿】iOS 旋轉載入動畫:從三顆小球拆解實作細節
本文為投稿文章,作者:鄭欽洪
一、前言
最近一直在讀 KITTEN 寫的《A Guide to iOS Animation》,可以說是 iOS 動畫開發的聖經之一,幾乎手不釋卷。書裡有個載入動畫,但沒有附上實作解析,所以我在這裡補上原理說明,並加入一些自己的變化。Github 地址見文末。
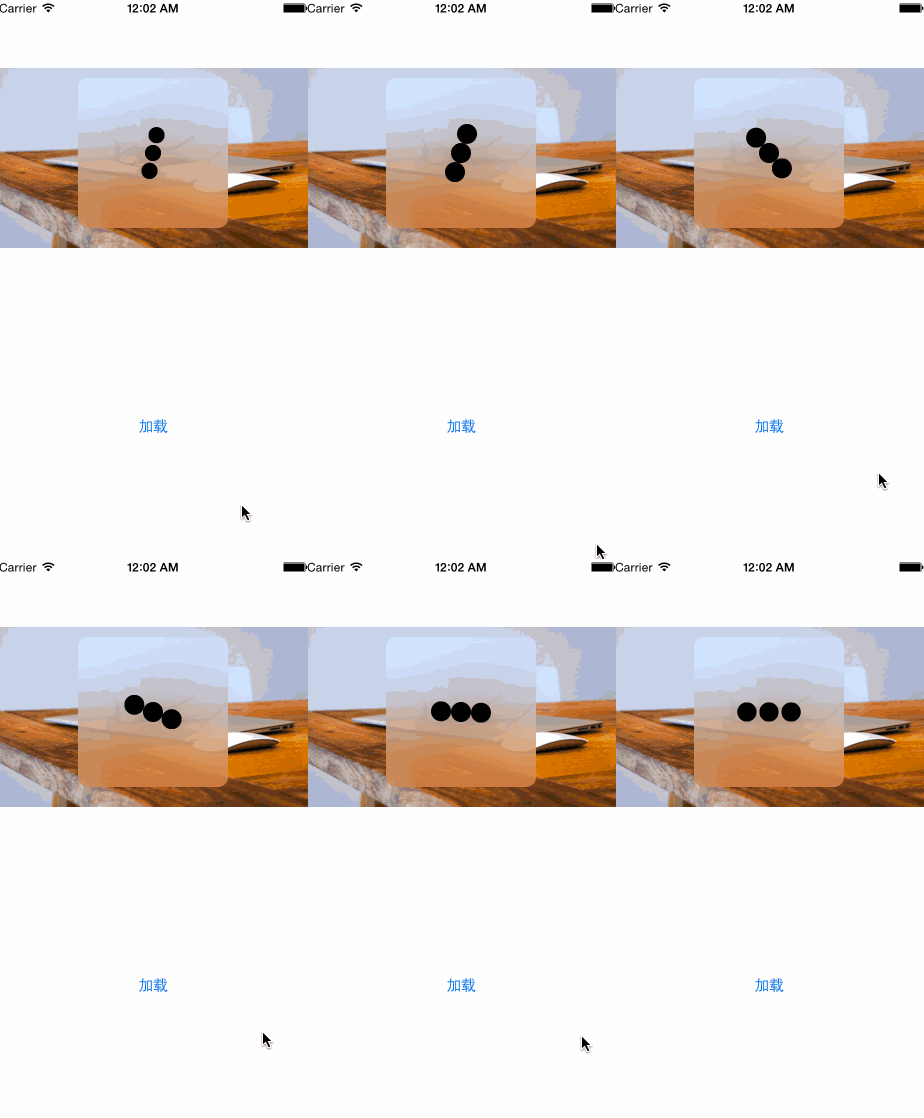
看圖可以發現,畫面裡是三顆球在交換位置:中間那顆基本待在原地,另外兩顆沿著固定軌跡做旋轉位移。接下來看程式碼怎麼寫。
二、三顆球的旋轉動畫
a. 先畫出三顆半徑、顏色都相同的圓。這裡用到 layer 的 cornerRadius:在正方形裡,只要把 cornerRadius 設成 height / 2,就能得到一個正圓。
UIView *ball_1 = [[UIView alloc] initWithFrame:CGRectMake(centerPoint.x - BALL_RADIUS, centerPoint.y,
                                                         BALL_RADIUS, BALL_RADIUS)];
ball_1.layer.cornerRadius = BALL_RADIUS / 2;   // 變成圓形
ball_1.backgroundColor = self.ballColor;
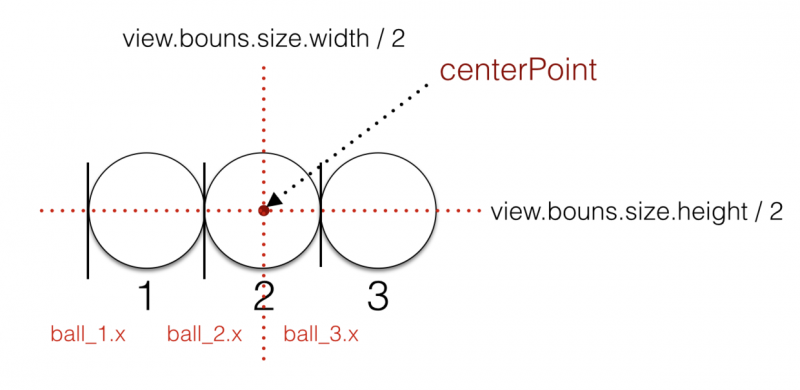
b. 依 x 座標把三顆圓並排擺好。先看一下三顆圓各自的 x 值關係:
CGFloat centerPointY = HEIGHT / 2 - BALL_RADIUS * 0.5;
CGFloat centerPointX = WIDTH / 2;
CGPoint centerPoint = CGPointMake(centerPointX, centerPointY);

UIView *ball_1 = [[UIView alloc] initWithFrame:CGRectMake(centerPoint.x - BALL_RADIUS, centerPoint.y,
                                                         BALL_RADIUS, BALL_RADIUS)];
ball_1.layer.cornerRadius = BALL_RADIUS / 2;
ball_1.backgroundColor = self.ballColor;
[self addSubview:ball_1];
self.ball_1 = ball_1;

UIView *ball_2 = [[UIView alloc] initWithFrame:CGRectMake(centerPoint.x - BALL_RADIUS * 0.5, centerPoint.y,
                                                         BALL_RADIUS, BALL_RADIUS)];
ball_2.layer.cornerRadius = BALL_RADIUS / 2;
ball_2.backgroundColor = self.ballColor;
[self addSubview:ball_2];
self.ball_2 = ball_2;

UIView *ball_3 = [[UIView alloc] initWithFrame:CGRectMake(centerPoint.x + BALL_RADIUS * 0.5, centerPoint.y,
                                                         BALL_RADIUS, BALL_RADIUS)];
ball_3.layer.cornerRadius = BALL_RADIUS / 2;
ball_3.backgroundColor = self.ballColor;
[self addSubview:ball_3];
self.ball_3 = ball_3;
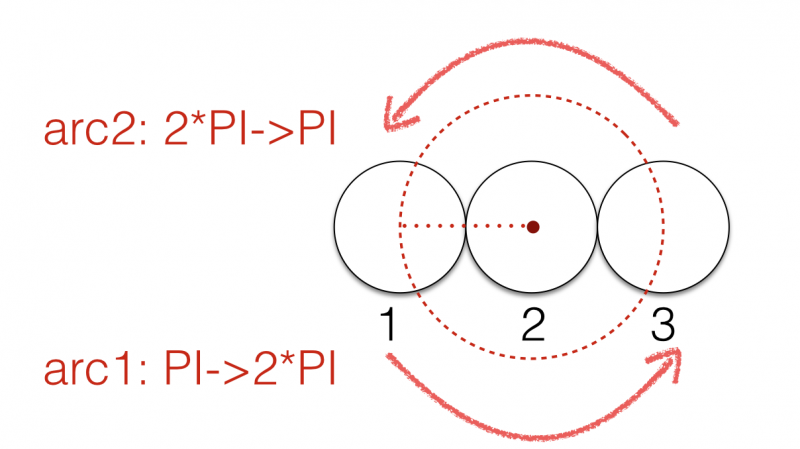
c. 讓球繞著圓周跑。從 GIF 可以看到,球是沿著一個圓形軌跡運動的。這裡用 UIBezierPath 畫圓:從 180 度到 360 度畫一段弧,再從 0 度到 180 度畫另一段,兩段接起來剛好是個完整的圓。
// 2.1 第一顆球的軌跡
UIBezierPath *path_ball_1 = [UIBezierPath bezierPath];
[path_ball_1 moveToPoint:centerBall_1];
[path_ball_1 addArcWithCenter:centerPoint radius:BALL_RADIUS
                    startAngle:M_PI endAngle:2 * M_PI clockwise:NO];

UIBezierPath *path_ball_1_1 = [UIBezierPath bezierPath];
[path_ball_1_1 addArcWithCenter:centerPoint radius:BALL_RADIUS
                       startAngle:0 endAngle:M_PI clockwise:NO];
[path_ball_1 appendPath:path_ball_1_1];   // 把兩段弧接成一個圓
接著用 Core Animation 讓球沿軌跡移動:
// 2.2 第一顆球的動畫
CAKeyframeAnimation *animation_ball_1 = [CAKeyframeAnimation animationWithKeyPath:@"position"];
animation_ball_1.path = path_ball_1.CGPath;
animation_ball_1.removedOnCompletion = NO;
animation_ball_1.fillMode = kCAFillModeForwards;
animation_ball_1.calculationMode = kCAAnimationCubic;
animation_ball_1.repeatCount = 1;
animation_ball_1.duration = 1.4;
animation_ball_1.delegate = self;
animation_ball_1.autoreverses = NO;
animation_ball_1.timingFunction = [CAMediaTimingFunction functionWithName:kCAMediaTimingFunctionEaseInEaseOut];
[self.ball_1.layer addAnimation:animation_ball_1 forKey:@"animation"];
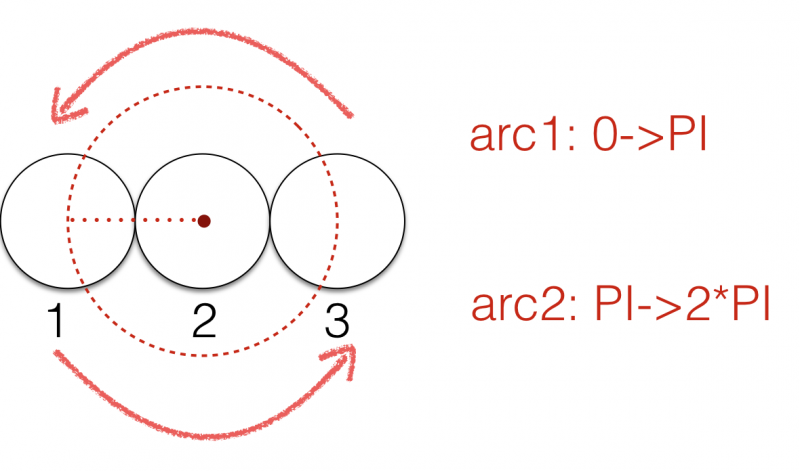
d. 第三顆球同理。它的軌跡由 0 度到 180 度、以及 180 度到 360 度兩段弧組成。這裡有個小細節:不需要再把它設成動畫的代理,因為球 1 已經擔任代理,重複設定會導致代理事件被觸發兩次。
// 2.3 第三顆球的軌跡
UIBezierPath *path_ball_3 = [UIBezierPath bezierPath];
[path_ball_3 moveToPoint:centerBall_2];
[path_ball_3 addArcWithCenter:centerPoint radius:BALL_RADIUS
                    startAngle:0 endAngle:M_PI clockwise:NO];

UIBezierPath *path_ball_3_1 = [UIBezierPath bezierPath];
[path_ball_3_1 addArcWithCenter:centerPoint radius:BALL_RADIUS
                       startAngle:M_PI endAngle:M_PI * 2 clockwise:NO];
[path_ball_3 appendPath:path_ball_3_1];

// 2.4 第三顆球的動畫
CAKeyframeAnimation *animation_ball_3 = [CAKeyframeAnimation animationWithKeyPath:@"position"];
animation_ball_3.path = path_ball_3.CGPath;
animation_ball_3.removedOnCompletion = NO;
animation_ball_3.fillMode = kCAFillModeForwards;
animation_ball_3.calculationMode = kCAAnimationCubic;
animation_ball_3.repeatCount = 1;
animation_ball_3.duration = 1.4;
animation_ball_3.autoreverses = NO;
animation_ball_3.timingFunction = [CAMediaTimingFunction functionWithName:kCAMediaTimingFunctionEaseInEaseOut];
[self.ball_3.layer addAnimation:animation_ball_3 forKey:@"rotation"];
三、動畫優化
到這裡,球 1 與球 3 繞圓旋轉的位移動畫就完成了。看一下目前的效果:
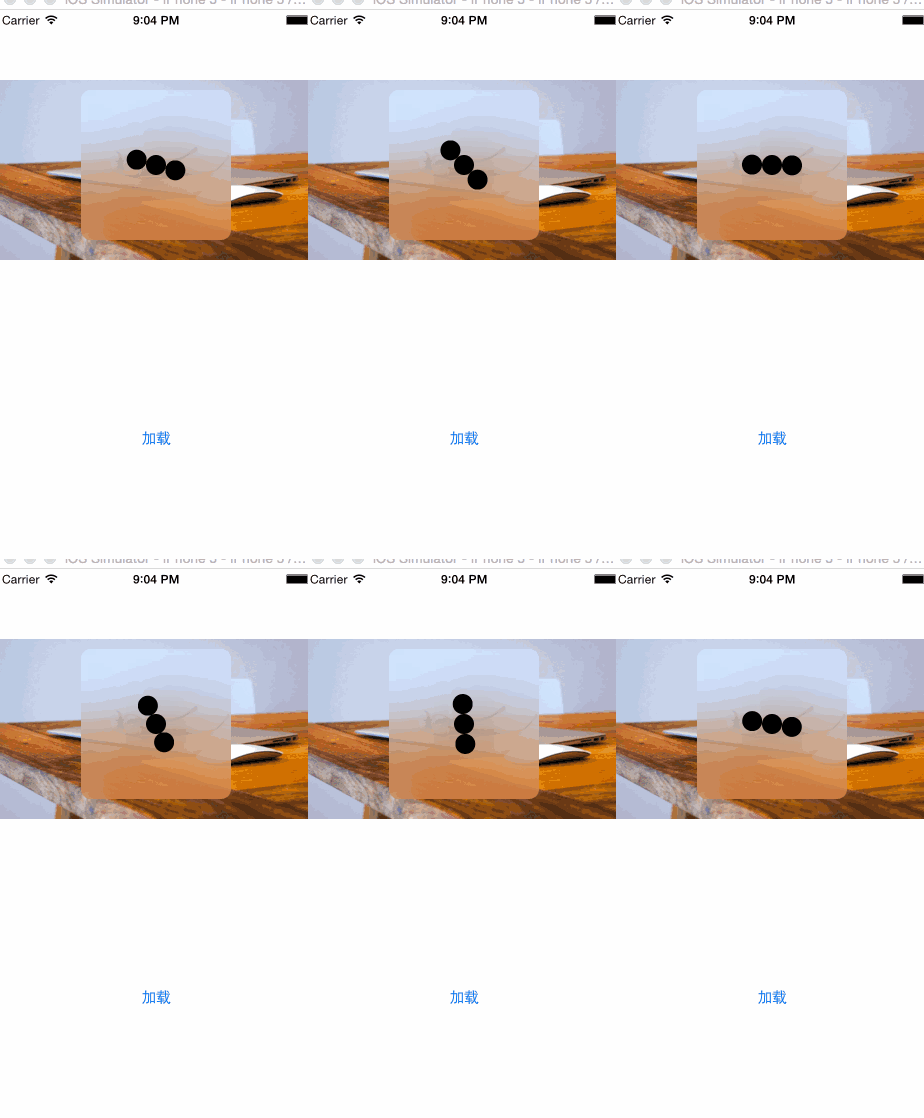
問題顯而易見:這只是單純的旋轉位移,跟原始設計稿差得還遠。對照一下,我們還少了什麼?
- 旋轉時,球 1 與球 3 會各自往兩側位移一段距離
- 往外位移的過程中,球半徑會同步縮小
- 球回到原位時,尺寸也跟著恢復原樣
要補上這三段變化,我們需要成為旋轉動畫的代理(也就是把球 1 動畫的 delegate 設為 self),在 animationDidStart: 裡一次處理三件事。
a. 動畫開始時,球 1 與球 3 先向外位移。位移量怎麼算,看圖:
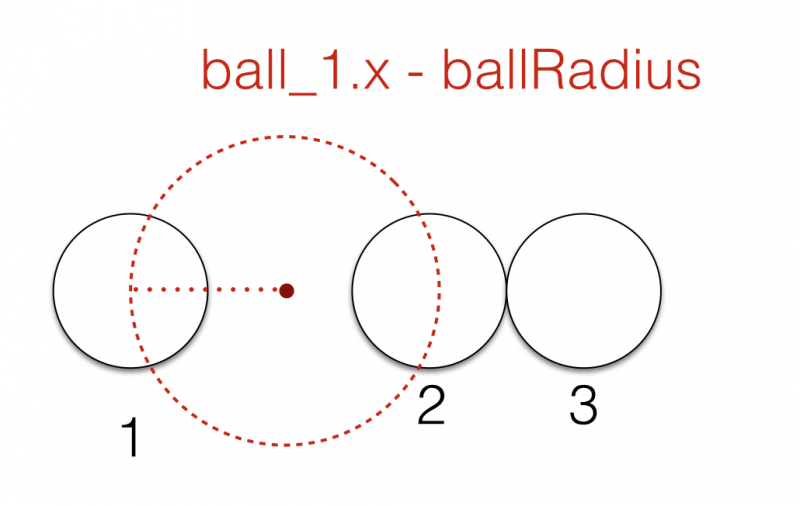
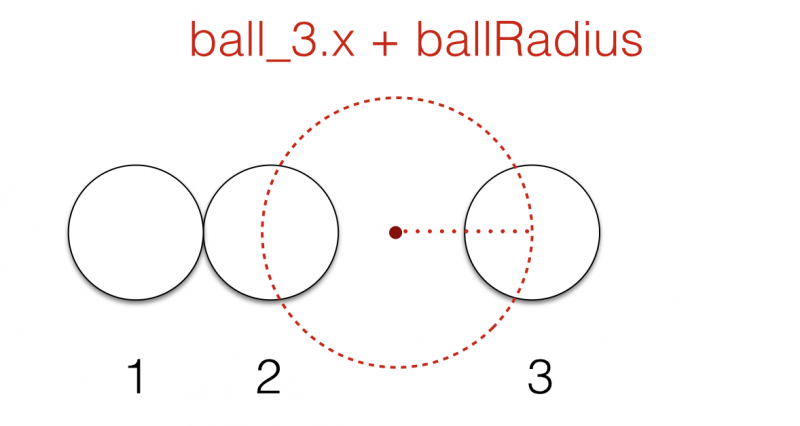
self.ball_1.transform = CGAffineTransformMakeTranslation(-BALL_RADIUS, 0);
self.ball_3.transform = CGAffineTransformMakeTranslation(BALL_RADIUS, 0);
b. 位移的同時縮小尺寸。三顆球都要縮,下面的圖是套上位移與縮放之後的軌跡模樣。
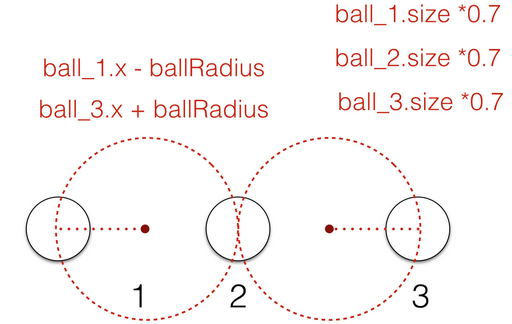
self.ball_1.transform = CGAffineTransformScale(self.ball_1.transform, 0.7, 0.7);
self.ball_3.transform = CGAffineTransformScale(self.ball_3.transform, 0.7, 0.7);
self.ball_2.transform = CGAffineTransformScale(self.ball_2.transform, 0.7, 0.7);
c. 過一段時間後,讓三顆球的位置與尺寸回到動畫前的狀態。這三段變化用 UIView 的動畫 API 串起來剛好:
[UIView animateWithDuration:0.3
                      delay:0.1
                    options:UIViewAnimationOptionCurveEaseOut | UIViewAnimationOptionBeginFromCurrentState
                 animations:^{
    self.ball_1.transform = CGAffineTransformMakeTranslation(-BALL_RADIUS, 0);
    self.ball_1.transform = CGAffineTransformScale(self.ball_1.transform, 0.7, 0.7);

    self.ball_3.transform = CGAffineTransformMakeTranslation(BALL_RADIUS, 0);
    self.ball_3.transform = CGAffineTransformScale(self.ball_3.transform, 0.7, 0.7);

    self.ball_2.transform = CGAffineTransformScale(self.ball_2.transform, 0.7, 0.7);
} completion:^(BOOL finished) {
    [UIView animateWithDuration:0.3
                          delay:0.1
                        options:UIViewAnimationOptionCurveEaseIn | UIViewAnimationOptionBeginFromCurrentState
                     animations:^{
        self.ball_1.transform = CGAffineTransformIdentity;
        self.ball_3.transform = CGAffineTransformIdentity;
        self.ball_2.transform = CGAffineTransformIdentity;
    } completion:NULL];
}];
d. 讓它循環播放。在動畫代理的 animationDidStop:finished: 裡再次呼叫動畫啟動方法,動畫就會自動接著跑下一輪。
- (void)animationDidStop:(CAAnimation *)anim finished:(BOOL)flag {
    [self rotationAnimation];
}
四、加上毛玻璃效果
使用系統自帶的 UIVisualEffectView 建立毛玻璃層,鋪滿整個視圖當作背景(關於 UIVisualEffectView 的更多介紹,可參考《最近開發遇到的一些 UI 問題》)。
UIVisualEffectView *bgView = [[UIVisualEffectView alloc] initWithEffect:[UIBlurEffect effectWithStyle:UIBlurEffectStyleLight]];
bgView.alpha = 0.9f;
bgView.frame = CGRectMake(0, 0, WIDTH, HEIGHT);
bgView.layer.cornerRadius = BALL_RADIUS / 2;
bgView.clipsToBounds = YES;
[self addSubview:bgView];
五、後記
最近正在從 Objective-C 轉向 Swift,期間也蒐集了不少很不錯的 Swift 動畫寫法,希望學完之後能整理成 Objective-C 版本,並把整個過程分享出來。做動畫的過程中遇到不少幾何與物理上的問題,實在汗顏高中數學早就還給老師了,幾何部分常常要想很久;但自己就是愛折騰,希望能在這塊有更多突破。
- 上一篇文章: iOS 9 學習系列:動手接入 Apple Pay
- 下一篇文章: 【投稿】iOS 開發總結:那些值得養成的程式碼規範