
iOS 開發實作:打造可重複使用的圖庫自訂控制器
編輯:iOS 開發綜合
在 iOS 專案裡,「拍照」與「從相簿選圖」幾乎是每個 App 都會碰到的需求。如果每次都在各個畫面重複撰寫相機與相簿的邏輯,程式碼很快就會變得凌亂難以維護。本文帶你一步步封裝出一個可重複使用的圖庫控制器,透過 delegate 回傳結果,讓它輕鬆嵌入任何需要上傳圖片的自訂元件中。
整體思路
核心做法是把相機與相簿的選圖邏輯抽離到獨立類別,並定義一份代理協議,選好圖片後透過 delegate 把結果回傳給呼叫方。如此一来,任何遵循該協議的元件都能取得使用者挑選的照片。
一、定義代理協議
先建立一個專門負責回傳圖片按鈕的協議,讓代理在選圖完成後能被通知。
 // PhotoButtonDelegate.h
 #import <Foundation/Foundation.h>
 @class ImageAndPhotos;
 @protocol PhotoButtonDelegate <NSObject>
 -(void) setPhotoButton:(ImageAndPhotos *) imgAndP;
 @end
二、實作 ImageAndPhotos 類別
這個類別封裝了相機、相簿的呼叫流程,並透過 UIActionSheet 讓使用者選擇拍照或瀏覽相簿。標頭檔如下:
 // ImageAndPhotos.h
 #import <Foundation/Foundation.h>
 #import "PhotoButtonDelegate.h"
 @interface ImageAndPhotos : NSObject <UIAlertViewDelegate,UIActionSheetDelegate,UIImagePickerControllerDelegate,UINavigationControllerDelegate>
 @property (nonatomic, strong) UIViewController *controller;
 @property (nonatomic, strong) UIImage *img;
 @property (nonatomic, strong) UIButton *btn;
 @property (nonatomic, weak) id<PhotoButtonDelegate> delegate;
 -(id)initWithControler:(UIViewController *) crtler AndButton:(UIButton *) button;
 @end
實作檔負責處理實際的選圖流程,包括判斷裝置是否支援相機、拍攝後自動存入相簿,以及透過 delegate 回傳結果:
 // ImageAndPhotos.m
 #import "ImageAndPhotos.h"
 @implementation ImageAndPhotos
 -(id)initWithControler:(UIViewController *) crtler AndButton:(UIButton *) button {
     if (self = [super init]) {
         self.controller = crtler;
         self.btn = button;
         [self CameraEvent];
     }
     return self;
 }
 -(void)CameraEvent {
     [self.btn addTarget:self action:@selector(showActionSheet) forControlEvents:UIControlEventTouchUpInside];
 }
 -(void) showActionSheet {
     UIActionSheet *actionSheet = [[UIActionSheet alloc] initWithTitle:nil delegate:self cancelButtonTitle:@"取消" destructiveButtonTitle:nil otherButtonTitles:@"拍照",@"我的相冊", nil];
     [actionSheet showInView:self.controller.view];
 }
 // 實現 UIActionSheetDelegate 協議中監聽按鈕的方法
 -(void) actionSheet:(UIActionSheet *)actionSheet clickedButtonAtIndex:(NSInteger)buttonIndex {
     if (buttonIndex == 0) {
         [self addCamera];
     } else if(buttonIndex == 1) {
         [self addPhoto];
     }
 }
 -(void)addCamera {
     // 判斷是否可以打開相機
     if ([UIImagePickerController isSourceTypeAvailable:UIImagePickerControllerSourceTypeCamera]) {
         UIImagePickerController *picker = [[UIImagePickerController alloc] init];
         picker.delegate = self;
         picker.allowsEditing = YES;
         picker.sourceType = UIImagePickerControllerSourceTypeCamera;
         [self.controller presentViewController:picker animated:YES completion:^{ }];
     } else {
         [self showAlertView];
     }
 }
 -(void) addPhoto {
     // 相冊可用模擬器打開,相機則不行
     if ([UIImagePickerController isSourceTypeAvailable:UIImagePickerControllerSourceTypePhotoLibrary]) {
         UIImagePickerController *picker = [[UIImagePickerController alloc] init];
         picker.delegate = self;
         picker.allowsEditing = YES;
         picker.sourceType = UIImagePickerControllerSourceTypePhotoLibrary;
         [self.controller presentViewController:picker animated:YES completion:nil];
     } else {
         [self showAlertView];
     }
 }
 -(void)showAlertView {
     UIAlertView *alert = [[UIAlertView alloc] initWithTitle:@"提示" message:@"你沒有攝像頭" delegate:self cancelButtonTitle:@"確定" otherButtonTitles:nil];
     [alert show];
 }
 // 選中圖片後呼叫,拍照時即為拍攝完成的相片
 -(void) imagePickerController:(UIImagePickerController *)picker didFinishPickingMediaWithInfo:(NSDictionary *)info {
     self.img = [info objectForKey:UIImagePickerControllerEditedImage];
     if (picker.sourceType == UIImagePickerControllerSourceTypeCamera) {
         UIImageWriteToSavedPhotosAlbum(self.img, nil, nil, nil);
     }
     [self.controller dismissViewControllerAnimated:YES completion:^{
         if ([self.delegate respondsToSelector:@selector(setPhotoButton:)]) {
             [self.delegate setPhotoButton:self];
         }
     }];
 }
 -(void)imagePickerControllerDidCancel:(UIImagePickerController *)picker {
     [self.controller dismissViewControllerAnimated:YES completion:nil];
 }
 @end
三、在自訂元件中套用
以下以一個可捲動上傳圖片的 ScrollView 為例。先建立自訂檢視類別:
 // UIBaseScrollView.h
 #import "UIBaseVIew.h"
 #import "ImageAndPhotos.h"
 @interface UIBaseScrollView : UIBaseVIew<PhotoButtonDelegate>
 @property (nonatomic, strong) NSMutableArray *arrayImgs;
 @property (nonatomic, strong) UIScrollView *scroll;
 @property (nonatomic, strong) ImageAndPhotos *imgChange;
 @property (nonatomic, strong) UIButton *btnImg;
 @property (nonatomic, strong) UIImageView *imgV;
 -(id)initWithFrame:(CGRect)frame CurrenContr:(UIViewController *) crtl;
 @end
實作檔中,每次選好圖片就動態加入一個 UIImageView,並自動往後推移「新增」按鈕的位置,同時調整 ScrollView 的內容寬度:
 // UIBaseScrollView.m
 #import "UIBaseScrollView.h"
 @implementation UIBaseScrollView
 -(id)initWithFrame:(CGRect)frame CurrenContr:(UIViewController *) crtl {
     if (self = [super initWithFrame:frame]) {
         self.scroll = [[UIScrollView alloc] initWithFrame:CGRectMake(0, 0, self.frame.size.width, self.frame.size.height)];
         self.btnImg = [[UIButton alloc] initWithFrame:CGRectMake(10, 10, frame.size.height-20, frame.size.height-20)];
         [self.btnImg setImage:[UIImage imageNamed:@"tizhong_photo_increase_bj"] forState:UIControlStateNormal];
         self.imgChange = [[ImageAndPhotos alloc] initWithControler:crtl AndButton:self.btnImg];
         self.scroll.showsHorizontalScrollIndicator = YES;
         self.imgChange.delegate = self;
         [self.scroll addSubview:self.btnImg];
         [self addSubview:self.scroll];
     }
     return self;
 }
 -(void)setPhotoButton:(ImageAndPhotos *)imgAndP {
     if (imgAndP.img) {
         self.imgV = [[UIImageView alloc] initWithFrame: self.btnImg.frame ];
         self.imgV.image = imgAndP.img;
         self.imgV.backgroundColor = [UIColor yellowColor];
         [self.scroll addSubview:self.imgV];
         self.btnImg.frame = CGRectMake(CGRectGetMaxX(self.imgV.frame)+10, self.imgV.frame.origin.y, self.imgV.frame.size.width, self.imgV.frame.size.height);
         self.scroll.contentSize = CGSizeMake(CGRectGetMaxX(imgAndP.btn.frame)+10, 0);
         if (CGRectGetMaxX(self.btnImg.frame) > self.scroll.frame.size.width) {
             self.scroll.contentOffset = CGPointMake(self.btnImg.frame.origin.x-10, 0);
         }
     }
 }
 @end
最後在控制器中建立這個元件即可:
UIBaseScrollView *det5 = [[UIBaseScrollView alloc] initWithFrame:CGRectMake(20, CGRectGetMaxY(det4.frame)+20, WIDTH-40, 80) CurrenContr:self];
執行結果如下:
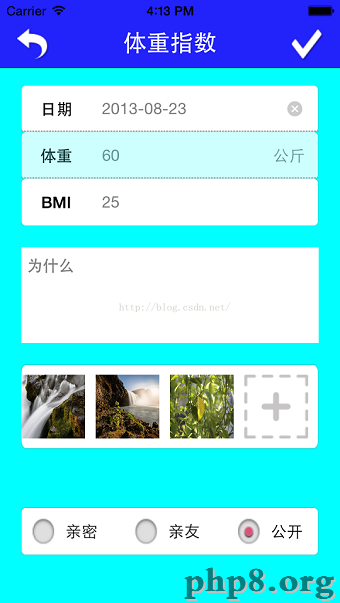
小結
若想在控制器中直接使用這個相冊類別,做法也很類似,只要讓所屬控制器遵循代理協議並實作回傳方法即可。透過這種封裝方式,圖庫相關邏輯就能在整個專案中靈活重用。