
iOS 手勢裁切圖片並存入相簿的實作
編輯:iOS 開發綜合
本文示範如何用拖拽手勢框選出圖片的矩形區域,裁切後再存進相簿,並包含確認提示的互動流程。
一、效果與操作步驟
- 拖曳時在畫面上畫出一個矩形框,代表裁切範圍。
- 手勢結束後彈出提示,詢問是否要保存。
- 選擇「是」即寫入相簿,可到相簿中確認結果。
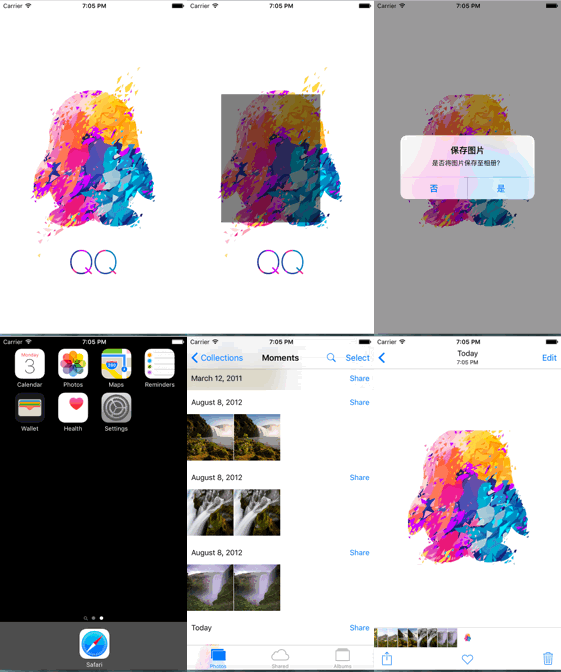
二、實作思路
- 在控制器視圖上放一個
imageView顯示原圖。 - 加入 pan 手勢。
- 過程中持續追蹤起點與終點,即時更新裁切框的 frame。
- 手勢結束時,用圖形上下文把框內區域渲染成新圖片,再提示是否保存;選擇「否」則不做任何處理。
三、實作步驟
先在 storyboard 上擺好 imageView 並建立關聯:
@property (weak, nonatomic) IBOutlet UIImageView *imageView;
用屬性保存目前的裁切框:
@property (nonatomic, weak) UIView *clipView;
以懶載入建立裁切框。因為尚未設定 frame,建立當下不會顯示:
- (UIView *)clipView {
    if (_clipView == nil) {
        UIView *view = [[UIView alloc] init];
        _clipView = view;
        view.backgroundColor = [UIColor blackColor];
        view.alpha = 0.5;
        [self.view addSubview:_clipView];
    }
    return _clipView;
}
註冊手勢:
/** 建立手勢:位置每次改變都會回呼 pan:,並把手勢本身作為參數傳入 */
UIPanGestureRecognizer *pan =
    [[UIPanGestureRecognizer alloc] initWithTarget:self action:@selector(pan:)];
[self.view addGestureRecognizer:pan];
另外用屬性記錄手勢的起點:
@property (nonatomic, assign) CGPoint startPoint;
接著在三個階段分別處理:開始時記錄起點;移動時更新終點並同步裁切框;結束時進行裁切與提示。
- (void)pan:(UIPanGestureRecognizer *)pan {
    CGPoint endPoint = CGPointZero;

    if (pan.state == UIGestureRecognizerStateBegan) {
        // 記錄起點
        self.startPoint = [pan locationInView:self.view];

    } else if (pan.state == UIGestureRecognizerStateChanged) {
        // 依起點與當前終點計算矩形
        endPoint = [pan locationInView:self.view];
        CGFloat w = endPoint.x - self.startPoint.x;
        CGFloat h = endPoint.y - self.startPoint.y;
        self.clipView.frame = CGRectMake(self.startPoint.x, self.startPoint.y, w, h);

    } else if (pan.state == UIGestureRecognizerStateEnded) {
        // 以 imageView 的尺寸開啟圖形上下文
        UIGraphicsBeginImageContextWithOptions(self.imageView.bounds.size, NO, 0);

        // 建立與裁切框等大的路徑並裁剪,超出的部分不顯示
        UIBezierPath *path = [UIBezierPath bezierPathWithRect:self.clipView.frame];
        [path addClip];

        // 把圖片渲染進目前的上下文
        CGContextRef context = UIGraphicsGetCurrentContext();
        [self.imageView.layer renderInContext:context];

        // 取出裁切後的圖片並關閉上下文
        UIImage *image = UIGraphicsGetImageFromCurrentImageContext();
        UIGraphicsEndImageContext();

        // 清掉裁切框
        [self.clipView removeFromSuperview];
        self.clipView = nil;

        // 把結果回寫到 imageView
        self.imageView.image = image;

        // 詢問是否存檔
        UIAlertView *alertView = [[UIAlertView alloc]
            initWithTitle:@"保存圖片"
                  message:@"是否將圖片保存至相冊?"
                 delegate:self
        cancelButtonTitle:@"否"
        otherButtonTitles:@"是", nil];
        [alertView show];
    }
}
最後在 alertView 的 delegate 中決定是否寫入相簿(按下「是」時 index 為 1):
- (void)alertView:(nonnull UIAlertView *)alertView
clickedButtonAtIndex:(NSInteger)buttonIndex {
    if (buttonIndex == 1) {
        UIImageWriteToSavedPhotosAlbum(self.imageView.image, nil, nil, nil);
        // 此處未設定保存完成後的回呼
    }
}
實務提醒:新版專案建議改用 UIAlertController 取代已棄用的 UIAlertView;同時別忘了在 Info.plist 補上「加入照片相簿」的用途說明字串,否則寫入時會被系統拒絕。