
iOS 購物分類模組的完整實作方案
編輯:iOS 開發綜合
本文以一個購物應用的分類模組為例,完整分享從啟動、UI 框架搭建到網路資料封裝的實作思路,供大家參考動手實作。
啟動:建立主視圖控制器
程式的起點在 AppDelegate,我們在這裡建立並掛载主視圖控制器:
- (BOOL)application:(UIApplication *)application didFinishLaunchingWithOptions:(NSDictionary *)launchOptions {
    self.window = [[UIWindow alloc] initWithFrame:[[UIScreen mainScreen] bounds]];
    self.window.backgroundColor = [UIColor whiteColor];
    [self.window makeKeyAndVisible];

    Basetabarcontroller *base = [[Basetabarcontroller alloc] init];
    self.window.rootViewController = base;
    return YES;
}
UI 框架設計
主視圖控制器 Basetabarcontroller 基於 UITabBarController,作為整個應用的骨架。它的實作主要做兩件事:建立分類視圖控制器 ClassViewController,並把它包裝進一個 UINavigationController 中,同時設定底部 Tab 的標題與圖示。
- (void)viewDidLoad {
    [super viewDidLoad];
    self.tabBar.tintColor = [UIColor redColor];

    ClassViewController *classList = [[ClassViewController alloc] init];
    [self addChildViewController:classList title:@"分類" image:@""];

    UIButton *menuBtn = [UIButton buttonWithType:UIButtonTypeCustom];
    menuBtn.frame = CGRectMake(0, 0, 20, 18);
    [menuBtn setBackgroundImage:[UIImage imageNamed:@"1.png"] forState:UIControlStateNormal];
    [menuBtn addTarget:self action:@selector(openOrCloseLeftList) forControlEvents:UIControlEventTouchUpInside];
    self.navigationItem.leftBarButtonItem = [[UIBarButtonItem alloc] initWithCustomView:menuBtn];
}

- (void)addChildViewController:(UIViewController *)childController title:(NSString *)title image:(NSString *)image {
    UINavigationController *childVC = [[UINavigationController alloc] initWithRootViewController:childController];
    childVC.tabBarItem.title = title;
    childVC.tabBarItem.image = [UIImage imageNamed:image];
    childVC.navigationBar.barTintColor = [UIColor whiteColor];
    [self addChildViewController:childVC];
}
分類頁面:混合滾動與網格佈局
核心的分類視圖控制器 ClassViewController 幾個亮點值得留意。首先,它用 UISegmentedControl 在標題欄上做「攻略 / 詳情」的切換;其次,用一個水平滾動的 UIScrollView 承載多個頁面(透過 directionalLockEnabled 鎖定方向、contentSize 設為兩倍寬來實現左右分頁);最後,用 UICollectionView 搭配自訂的 FlowLayout 呈現商品網格。
- (void)viewDidLoad {
    [super viewDidLoad];

    // 標題欄的搜尋按鈕
    UIBarButtonItem *searchItem = [[UIBarButtonItem alloc]
        initWithBarButtonSystemItem:UIBarButtonSystemItemSearch target:self action:@selector(searchBarButtonItemAction)];
    self.navigationItem.rightBarButtonItem = searchItem;

    // 分段控制器
    _segement = [[UISegmentedControl alloc] initWithItems:@[@"攻略", @"詳情"]];
    _segement.frame = CGRectMake(90, 20, kwidth-180, 30);
    _segement.selectedSegmentIndex = 0;
    [_segement addTarget:self action:@selector(changevalue:) forControlEvents:UIControlEventValueChanged];
    self.navigationItem.titleView = _segement;

    // 承載多頁的水平滾動視圖
    self.scrollview = [[UIScrollView alloc] initWithFrame:CGRectMake(0, 0, kwidth, KHeight)];
    _scrollview.directionalLockEnabled = YES;
    _scrollview.contentSize = CGSizeMake(kwidth*2, KHeight);
    _scrollview.delegate = self;
    [self.view addSubview:self.scrollview];

    // 網格佈局
    UICollectionViewFlowLayout *flow = [[UICollectionViewFlowLayout alloc] init];
    flow.minimumInteritemSpacing = 20;   // 列距
    flow.minimumLineSpacing = 40;        // 行距
    flow.sectionInset = UIEdgeInsetsMake(0, 20, 20, 20);
    CGFloat itemWidth = (self.view.frame.size.width - 2*20 - 3*20) / 4.0;
    flow.itemSize = CGSizeMake(itemWidth, itemWidth);
    flow.scrollDirection = UICollectionViewScrollDirectionVertical;

    _collection = [[UICollectionView alloc] initWithFrame:[UIScreen mainScreen].bounds collectionViewLayout:flow];
    _collection.backgroundColor = [UIColor whiteColor];
    _collection.dataSource = self;
    _collection.delegate = self;
    [_collection registerClass:[ClassCollectionViewCell class] forCellWithReuseIdentifier:@"mycell"];
    [self.scrollview addSubview:_collection];
}
網路資料封裝
網路層基於 AFNetworking,封裝了 POST、GET 與圖片上傳三個通用介面。透過統一的 serverUrl 前綴管理,並對請求逾時、序列化方式做了統一設定,讓業務層呼叫起來更乾淨:
@interface LORequestManger : NSObject

+ (void)POST:(NSString *)URL params:(NSDictionary *)params
     success:(void (^)(id response))success
     failure:(void (^)(AFHTTPRequestOperation *operation, NSError *error))Error;

+ (void)GET:(NSString *)URL
    success:(void (^)(id response))success
    failure:(void (^)(AFHTTPRequestOperation *operation, NSError *error))Error;

+ (void)UPLOADIMAGE:(NSString *)URL params:(NSDictionary *)params
       uploadImage:(UIImage *)image
           success:(void (^)(id response))success
           failure:(void (^)(AFHTTPRequestOperation *operation, NSError *error))Error;

@end
以 POST 為例,實作時會先建立請求管理者、設定逾時時間,並自動判斷 URL 是否已帶 http 前綴,若無則拼上伺服器位址:
+ (void)POST:(NSString *)URL params:(NSDictionary *)params
     success:(void (^)(id response))success
     failure:(void (^)(AFHTTPRequestOperation *operation, NSError *error))Error {
    AFHTTPRequestOperationManager *manager = [AFHTTPRequestOperationManager manager];
    manager.requestSerializer.timeoutInterval = 30;

    NSString *postStr = URL;
    if (![URL hasPrefix:@"http"]) {
        postStr = [NSString stringWithFormat:@"%@%@", serverUrl, URL];
    }
    [manager POST:postStr parameters:[params mutableCopy]
         success:^(AFHTTPRequestOperation *operation, id responseObject) {
             success((NSDictionary *)responseObject);
         } failure:^(AFHTTPRequestOperation *operation, NSError *error) {
             Error(operation, error);
         }];
}
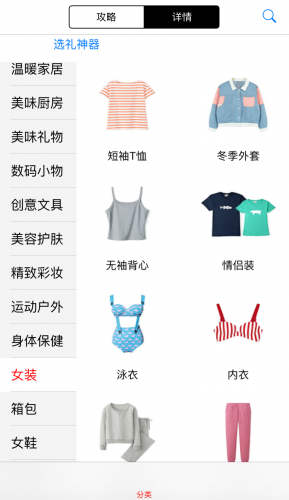
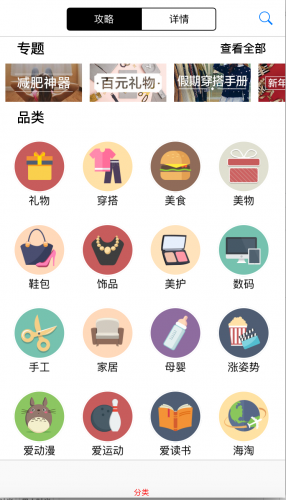
透過以上啟動、框架、UI 與網路封裝的組合,一個功能完整的購物分類模組就搭建完成了。希望這套實作思路能為你的專案帶來參考價值。
- 上一篇文章: iOS 開發中 UIScrollView 滾動視圖的用法與踩坑記錄
- 下一篇文章: 詳解 iOS 多執行緒技術 GCD 的使用