
詳解 iOS 開發中 autoresizing 尺寸自動適應屬性的用法
前言:現在早已不像以前只有一個螢幕尺寸,目前最少需要適配三個尺寸。過去我們可以用硬坐標設定各控件的位置,但現在必須做適配。也許你會說可以用兩套甚至多套 UI,但那樣既不高效也不符合設計原則。iOS 有兩大自動布局利器:autoresizing 和 autolayout(autolayout 是 iOS 6 之後新增的)。autoresizing 是 UIView 的屬性,一直存在,使用簡單,但沒有 autolayout 那麼強大。如果你的界面比較簡單、要求沒那麼高,完全可以使用 autoresizing 來做自動布局。以下針對 autoresizing 進行討論。
零、autoresizing 使用前說明
UIViewAutoresizing 是一個枚舉類型,預設是 UIViewAutoresizingNone,也就是不做任何處理。
typedef NS_OPTIONS(NSUInteger, UIViewAutoresizing) {
    UIViewAutoresizingNone                     = 0,
    UIViewAutoresizingFlexibleLeftMargin       = 1 << 0,
    UIViewAutoresizingFlexibleWidth            = 1 << 1,
    UIViewAutoresizingFlexibleRightMargin      = 1 << 2,
    UIViewAutoresizingFlexibleTopMargin        = 1 << 3,
    UIViewAutoresizingFlexibleHeight           = 1 << 4,
    UIViewAutoresizingFlexibleBottomMargin     = 1 << 5
};
各屬性解釋如下圖:
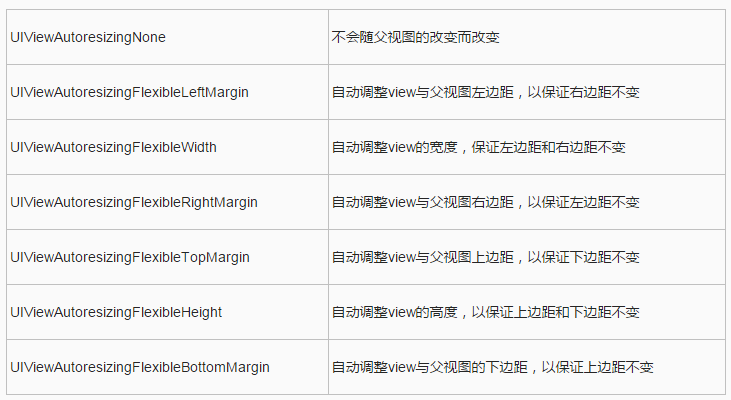
這裡要特別說明:如果平常習慣用 Storyboard/Xib 設定 autoresizing,突然改用程式碼設定,很容易出現理解上的錯誤。比如 UIViewAutoresizingFlexibleTopMargin,可能會被誤認為是「頂部距離不變」,其實是「底部距離不變」。解決辦法很簡單:只要記住用程式碼設定的含義和 Storyboard 是相反的即可。
autoresizing 組合使用:枚舉中的值可以用「|」隔開,同時擁有多個功能,針對不同場景做不同變化。例如:
UIViewAutoresizingFlexibleWidth | UIViewAutoresizingFlexibleBottomMargin
意思是:view 的寬度按照父視圖的寬度比例縮放,距離父視圖頂部距離不變。其他組合類似,就不一一列舉了。
注意:
1)view 的 autoresizesSubviews 屬性為 YES 時(預設為 YES),autoresizing 才會生效。
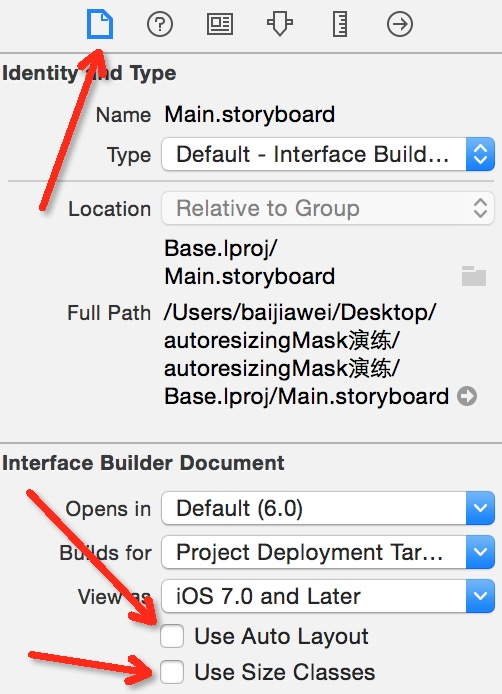
2)從 Xcode 6 開始,Storyboard 與 Xib 預設啟用自動布局,因此我們需要手動調整才能使用 autoresizing,具體操作如下圖:
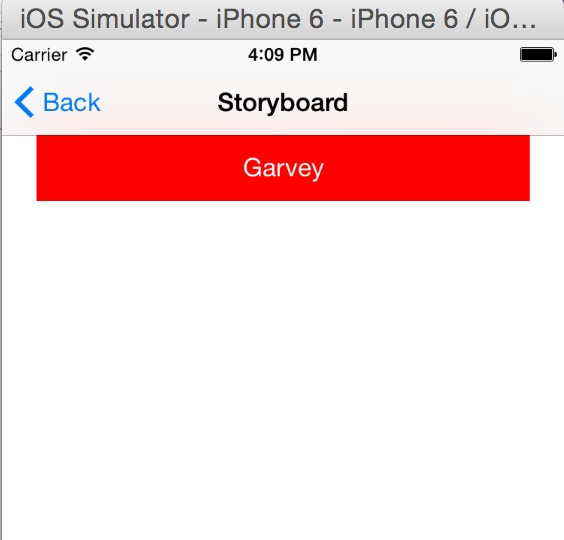
下面寫一個簡單的例子,幫助你更直觀地理解,本文最後會附上 Demo 下載地址。
Demo 目標:
1)頂部距離父視圖距離不變;
2)寬度按父視圖比例進行拉伸;
3)view 與父視圖的左邊距和右邊距不變。
一、使用程式碼(Code)控制 autoresizingMask
下面是專案用到的宏:
#define topSpace 64
#define kMargin 20

#define kTopViewHeight 44
#define kTopViewWidth 300

#define kTextLabelWidth 200
#define kTextLabelHeight 30
還沒做適配之前的程式碼:
// 以 iPhone4(320, 480)為基礎,設置各控件的位置
// 注意:必須所有控件都按照 iPhone4(320, 480)為基礎初始化一次,不然按比例縮放時會發生錯誤!
UIView *topView = [[UIView alloc] initWithFrame:CGRectMake(kMargin, topSpace, kTopViewWidth, kTopViewHeight)];
CGFloat textLabelTop = (topView.frame.size.width - kTextLabelWidth) / 2;
CGFloat textLabelWidth = (topView.frame.size.height - kTextLabelHeight) / 2;
UILabel *textLabel = [[UILabel alloc] initWithFrame:CGRectMake(textLabelTop, textLabelWidth, kTextLabelWidth, kTextLabelHeight)];

// 設置文字及居中
[textLabel setText:@"Garvey"];
[textLabel setTextAlignment:NSTextAlignmentCenter];

// 分別設置樣式
[topView setBackgroundColor:[UIColor redColor]];
[textLabel setTextColor:[UIColor whiteColor]];

// 添加視圖
[topView addSubview:textLabel];
[self.view addSubview:topView];
顯示如下:
使用 autoresizing 進行界面適配:
// 以 iPhone4(320, 480)為基礎,設置各控件的位置
// 注意:必須所有控件都按照 iPhone4(320, 480)為基礎初始化一次,不然按比例縮放時會發生錯誤!
UIView *topView = [[UIView alloc] initWithFrame:CGRectMake(kMargin, kTopSpace, kTopViewWidth, kTopViewHeight)];
CGFloat textLabelTop = (topView.frame.size.width - kTextLabelWidth) / 2;
CGFloat textLabelWidth = (topView.frame.size.height - kTextLabelHeight) / 2;
UILabel *textLabel = [[UILabel alloc] initWithFrame:CGRectMake(textLabelTop, textLabelWidth, kTextLabelWidth, kTextLabelHeight)];

// 設置文字及居中
[textLabel setText:@"Garvey"];
[textLabel setTextAlignment:NSTextAlignmentCenter];

// 分別設置樣式
[topView setBackgroundColor:[UIColor redColor]];
[textLabel setTextColor:[UIColor whiteColor]];

// 設置文字控件的寬度按照上一級視圖(topView)的比例進行縮放
[textLabel setAutoresizingMask:UIViewAutoresizingFlexibleWidth];
// 設置 View 控件的寬度按照父視圖的比例進行縮放,距離父視圖頂部、左邊距和右邊距的距離不變
[topView setAutoresizingMask:UIViewAutoresizingFlexibleWidth | UIViewAutoresizingFlexibleBottomMargin | UIViewAutoresizingFlexibleRightMargin | UIViewAutoresizingFlexibleLeftMargin];

// 添加視圖
[topView addSubview:textLabel];
[self.view addSubview:topView];

// 注意:重新設置 topView 位置的程式碼,必須要寫在添加視圖的後面,不然 autoresizing 的位置計算會出錯!
CGFloat topViewWidth = kUIScreen.size.width - kMargin * 2;
[topView setFrame:CGRectMake(kMargin, kTopSpace, topViewWidth, kTopViewHeight)];
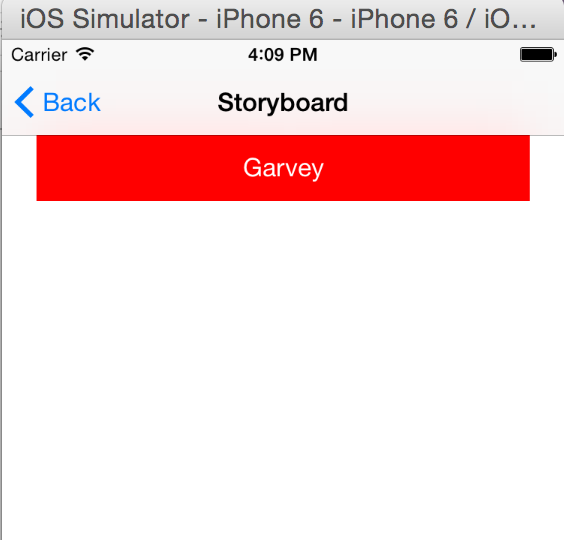
最後顯示:
二、在 Storyboard 控制 autoresizingMask
無論在 Storyboard 還是用程式碼實現,autoresizingMask 本質上就是六條線。在 Storyboard 中使用需要先把 Autolayout 禁用掉,如下圖:
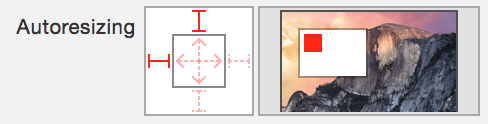
圖中共有六條線(上下左右到外圍的距離線和內部的兩條線)。如果上下左右的線中的某一條被選中,表示距離父控件邊界的距離不變。比如選中左和上的線,表示藍色 view 距離 self.view 的左邊界和上邊界的距離不變。如果同時選中上下左右的線,行為會和只選上左線一樣(即預設行為)。
如果想讓子控件尺寸跟隨父控件尺寸改變而改變,就需要用到內部的兩條線。內部的線表示允許控件在水平和垂直方向上可拉伸;不選中內部的線,表示不希望控件可拉伸,也就是固定大小。也就是說:周圍的線選中表示固定距離,內部的線選中表示允許拉伸。
如果用程式碼設置 autoresizingMask,會發現一個 view 的 autoresizingMask 屬性是一個枚舉:
UIViewAutoresizingNone                     = 0,
UIViewAutoresizingFlexibleLeftMargin        = 1 << 0,
UIViewAutoresizingFlexibleWidth             = 1 << 1,
UIViewAutoresizingFlexibleRightMargin       = 1 << 2,
UIViewAutoresizingFlexibleTopMargin         = 1 << 3,
UIViewAutoresizingFlexibleHeight            = 1 << 4,
UIViewAutoresizingFlexibleBottomMargin      = 1 << 5
除了第一個是 None,剩下的六個就對應 Storyboard 中的六條線。其中:
UIViewAutoresizingFlexibleWidth
UIViewAutoresizingFlexibleHeight
正好對應 Storyboard 中內部的兩條線:可拉伸的寬度和高度。
剩下的需要注意:
UIViewAutoresizingFlexibleLeftMargin
UIViewAutoresizingFlexibleRightMargin
UIViewAutoresizingFlexibleTopMargin
UIViewAutoresizingFlexibleBottomMargin
在 Storyboard 中,如果選的周圍的線,表示距離固定。比如選中了左邊的線,表示想要左邊的距離固定,所以在程式碼中應該選擇 UIViewAutoresizingFlexibleRightMargin,即表示右邊的距離不固定,那麼默認左邊的距離固定。
最後要說明 autoresizingMask 的缺點:它只能保證父控件和子控件間的關係,無法保證同級控件間的關係,也就是說有些需求 autoresizingMask 是無法實現的。更複雜的布局需求,建議把精力放在 Autolayout 上。
- 上一篇文章: iOS App 開發中的備忘錄模式(Memento)實作全解析
- 下一篇文章: iOS 實現裁剪框與圖片剪裁功能