
自訂 UITableViewCell 完全實戰:從 XIB 布局到動態行高
系統預設的 cell 樣式只有四種,稍微講究一點的設計稿就會超出範圍。這時候就必須自訂。本文從一個類似通訊錄列表的實例出發,把 XIB 布局、資料綁定、重複利用、動態行高到 UILabel 高度計算整個流程走一遍。
一、目標:做出一列「頭像 + 三行文字」
我們要的效果是左側一張頭像,右側三行文字(暱稱、個性簽名、地區)。

步驟 1:建立專案
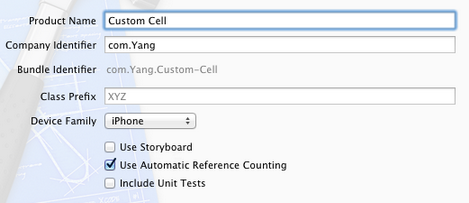
開啟 Xcode,新增一個 Single View Application,命名為 Custom Cell。
步驟 2:匯入圖片資源
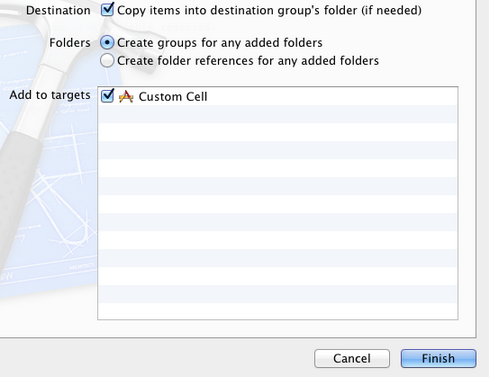
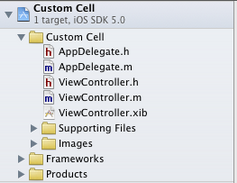
準備 14 張 50×50 的 png 圖片,命名為 1、2……14,放進一個名為 Images 的資料夾,拖進專案時記得勾選 Copy items into destination。
步驟 3:建立 UITableViewCell 子類別
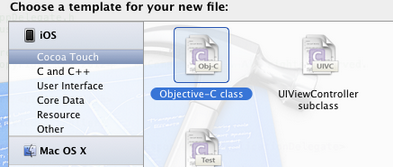
選中 Custom Cell 目錄,File → New → New File,左側選 Cocoa Touch,右側選 Objective-C class。
類名輸入 CustomCell,Subclass of 選 UITableViewCell,完成後得到 CustomCell.h 與 CustomCell.m。

步驟 4:建立 CustomCell.xib
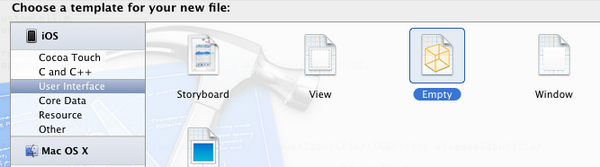
同樣走 New File,左側選 User Interface,右側選 Empty。
步驟 5:在 XIB 中布局
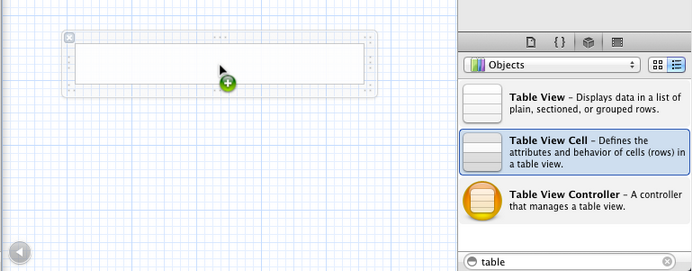
從元件庫拖一個 Table View Cell 到畫面上。選中它,在 Identity Inspector 把 Class 設為 CustomCell;再到 Size Inspector 把高度調成 60。
步驟 6:加入子控制項並建立 Outlet
左側放一個 50×50 的 ImageView,右側放三個 Label,最上面那行字級設 14,其餘兩個設 12。
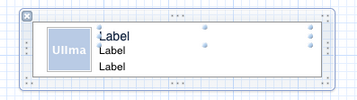
接著把 ImageView 與三個 Label 拉線到 CustomCell.h,名稱分別為 imageView、nameLabel、decLabel、locLabel,對應頭像、暱稱、個性簽名與地區。
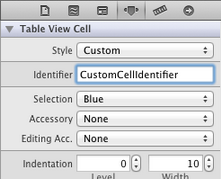
最後選中 Table View Cell,在 Attribute Inspector 把 Identifier 設為 CustomCellIdentifier——這個值稍後在 dequeue 時會用到。
步驟 7:在 CustomCell.h 宣告屬性
@property (copy, nonatomic) UIImage *image;
@property (copy, nonatomic) NSString *name;
@property (copy, nonatomic) NSString *dec;
@property (copy, nonatomic) NSString *loc;
步驟 8:實作 setter,讓賦值自動更新畫面
@synthesize image;
@synthesize name;
@synthesize dec;
@synthesize loc;

- (void)setImage:(UIImage *)img {
    if (![img isEqual:image]) {
        image = [img copy];
        self.imageView.image = image;
    }
}

- (void)setName:(NSString *)n {
    if (![n isEqualToString:name]) {
        name = [n copy];
        self.nameLabel.text = name;
    }
}

- (void)setDec:(NSString *)d {
    if (![d isEqualToString:dec]) {
        dec = [d copy];
        self.decLabel.text = dec;
    }
}

- (void)setLoc:(NSString *)l {
    if (![l isEqualToString:loc]) {
        loc = [l copy];
        self.locLabel.text = loc;
    }
}
這相當於覆寫了各組 setter。好處是呼叫端只要一行 cell.name = xxx,UI 就同步更新,不必在 cellForRow 裡寫一大串配置程式碼。
步驟 9:準備資料來源
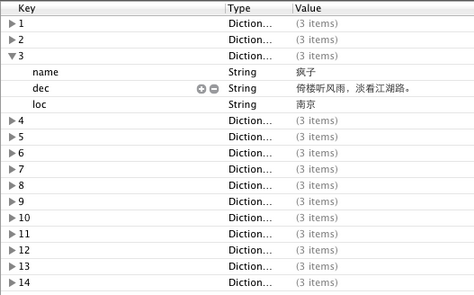
建立 friendsInfo.plist,依序填入每筆資料的 name、dec、loc 欄位。注意每個節點的型別要選對,字串就是 String。
步驟 10:在 ViewController.xib 放 Table View
拖一個 Table View 到視圖上,把它的 delegate 與 dataSource 都指向 File's Owner。
步驟 11:撰寫 ViewController
#import <UIKit/UIKit.h>

@interface ViewController : UIViewController <UITableViewDelegate, UITableViewDataSource>
@property (strong, nonatomic) NSArray *dataList;
@property (strong, nonatomic) NSArray *imageList;
@end
#import "CustomCell.h"

@synthesize dataList;
@synthesize imageList;

- (void)viewDidLoad {
    [super viewDidLoad];

    // 載入 plist 資料與圖片
    NSBundle *bundle = [NSBundle mainBundle];
    NSURL *plistURL = [bundle URLForResource:@"friendsInfo" withExtension:@"plist"];
    NSDictionary *dictionary = [NSDictionary dictionaryWithContentsOfURL:plistURL];

    NSMutableArray *tmpDataArray = [[NSMutableArray alloc] init];
    NSMutableArray *tmpImageArray = [[NSMutableArray alloc] init];

    for (int i = 0; i < [dictionary count]; i++) {
        NSString *key = [[NSString alloc] initWithFormat:@"%i", i + 1];
        NSDictionary *tmpDic = [dictionary objectForKey:key];
        [tmpDataArray addObject:tmpDic];

        NSString *imageUrl = [[NSString alloc] initWithFormat:@"%i.png", i + 1];
        UIImage *image = [UIImage imageNamed:imageUrl];
        [tmpImageArray addObject:image];
    }

    self.dataList = [tmpDataArray copy];
    self.imageList = [tmpImageArray copy];
}

- (void)viewDidUnload {
    self.dataList = nil;
    self.imageList = nil;
}
#pragma mark - Table Data Source

- (NSInteger)tableView:(UITableView *)tableView numberOfRowsInSection:(NSInteger)section {
    return [self.dataList count];
}

- (UITableViewCell *)tableView:(UITableView *)tableView cellForRowAtIndexPath:(NSIndexPath *)indexPath {
    static NSString *CustomCellIdentifier = @"CustomCellIdentifier";

    // 只註冊一次 nib
    static BOOL nibsRegistered = NO;
    if (!nibsRegistered) {
        UINib *nib = [UINib nibWithNibName:@"CustomCell" bundle:nil];
        [tableView registerNib:nib forCellReuseIdentifier:CustomCellIdentifier];
        nibsRegistered = YES;
    }

    CustomCell *cell = [tableView dequeueReusableCellWithIdentifier:CustomCellIdentifier];

    NSUInteger row = [indexPath row];
    NSDictionary *rowData = [self.dataList objectAtIndex:row];

    cell.name = [rowData objectForKey:@"name"];
    cell.dec = [rowData objectForKey:@"dec"];
    cell.loc = [rowData objectForKey:@"loc"];
    cell.image = [self.imageList objectAtIndex:row];

    return cell;
}

#pragma mark - Table Delegate

- (CGFloat)tableView:(UITableView *)tableView heightForRowAtIndexPath:(NSIndexPath *)indexPath {
    return 60.0;
}

// 回傳 nil 表示這一列不可被選中
- (NSIndexPath *)tableView:(UITableView *)tableView willSelectRowAtIndexPath:(NSIndexPath *)indexPath {
    return nil;
}
執行後即可看到自訂樣式的列表。

二、Cell 重複利用的意義與寫法
重用的目的是省記憶體。如果有一千列資料而不做重用,每次滑動都要 alloc 大量新物件,不僅耗記憶體,畫面也會因為配置延遲而出現卡頓與閃動。
關鍵在於建立 cell 時使用帶 reuseIdentifier 的初始化方法,而不是單純的 initWithFrame:
- (UITableViewCell *)tableView:(UITableView *)tableView cellForRowAtIndexPath:(NSIndexPath *)indexPath {
    static NSString *CellIdentifier = @"Cell";

    // 先嘗試從重用佇列取出
    UITableViewCell *cell = [tableView dequeueReusableCellWithIdentifier:CellIdentifier];

    if (cell == nil) {
        // 佇列裡沒有,才建立新的
        cell = [[UITableViewCell alloc] initWithStyle:UITableViewCellStyleDefault reuseIdentifier:CellIdentifier];
    } else {
        NSLog(@"cell 重用啦");
    }

    return cell;
}
identifier 用一個固定的字串即可,相同 identifier 的 cell 會互相流入同一個重用池。
三、動態調整 cell 高度
這個問題比較棘手,但 delegate 裡的這個方法是必經之路:
- (CGFloat)tableView:(UITableView *)tableView heightForRowAtIndexPath:(NSIndexPath *)indexPath
實測可行的方式是:在建立或重用 cell 時設定它的 frame,例如 cell.frame = CGRectMake(0, 0, 320, 450);,然後在同一個 delegate 方法裡把 cell 取出來讀取高度:
- (CGFloat)tableView:(UITableView *)tableView heightForRowAtIndexPath:(NSIndexPath *)indexPath {
    UITableViewCell *myCell = [self tableView:tableView cellForRowAtIndexPath:indexPath];
    if (myCell == nil) {
        return 0;
    }
    return myCell.frame.size.height;
}
不過要說清楚:這個寫法有明顯副作用。直接呼叫 cellForRowAtIndexPath: 會額外配置一個 cell 物件,等於同一列被建立了兩次,純粹是浪費。更好的做法是另外把算好的高度快取起來(例如存在一個 height 陣列或 cell 的私有屬性中),在 heightForRow 裡直接查表,避免重複配置。
四、依內容計算 UILabel 的實際尺寸
動態行高的基礎,是能算出文字渲染後到底需要多大空間。先設定字型,再用 boundingRectWithSize 求尺寸:
NSDictionary *attrDic = @{NSFontAttributeName: [UIFont systemFontOfSize:12.0f]};

CGSize labelSize = [text boundingRectWithSize:CGSizeMake(320, 990)
                                     options:NSStringDrawingUsesLineFragmentOrigin | NSStringDrawingUsesFontLeading
                                  attributes:attrDic
                                     context:nil].size;

CGRect labelRect = CGRectMake(0, 0, labelSize.width, labelSize.height);
這裡的 CGSizeMake(320, 990) 是「可用空間上限」,系統會在這個範圍內換行並回報實際所需尺寸。拿到 labelRect 之後,cell 的高度就能由內容推算出來了。
五、含可變高度 UILabel 的完整 Cell
把上面的計算放進 cellForRow,就能做到每一列高度依內容伸縮。若還有其他控制項(例如 UIButton),做法相同:建立時 frame 先給 CGRectZero,之後各自算出尺寸再累加。
- (UITableViewCell *)tableView:(UITableView *)tableView cellForRowAtIndexPath:(NSIndexPath *)indexPath {

    static NSString *CellIdentifier = @"Cell";
    UITableViewCell *cell = [tableView dequeueReusableCellWithIdentifier:CellIdentifier];

    if (cell == nil) {
        cell = [[UITableViewCell alloc] initWithStyle:UITableViewCellStyleDefault reuseIdentifier:CellIdentifier];

        UILabel *label = [[UILabel alloc] initWithFrame:CGRectZero];
        label.tag = 1;
        label.lineBreakMode = NSLineBreakByCharWrapping;
        label.numberOfLines = 0;   // 0 代表不限行數
        label.opaque = NO;
        label.font = [UIFont systemFontOfSize:12.0f];
        label.backgroundColor = [UIColor grayColor];
        [cell.contentView addSubview:label];

        UIButton *tmpButton = [[UIButton alloc] initWithFrame:CGRectZero];
        tmpButton.tag = 2;
        tmpButton.backgroundColor = [UIColor cyanColor];
        [tmpButton setTitle:@"nihao" forState:UIControlStateNormal];
        [tmpButton setTitleColor:[UIColor whiteColor] forState:UIControlStateHighlighted];
        [tmpButton addTarget:self action:@selector(tmpButtonHandler:) forControlEvents:UIControlEventTouchUpInside];
        [cell.contentView addSubview:tmpButton];
    } else {
        NSLog(@"cell 重用啦");
    }

    // 重用時內容是上一列的,必須重新填值並重算版面
    UILabel *tmpLabel = (UILabel *)[cell viewWithTag:1];
    NSString *text = [tmpArray objectAtIndex:indexPath.row];
    tmpLabel.text = text;

    UIButton *tmpButton = (UIButton *)[cell viewWithTag:2];

    NSDictionary *attrDic = @{NSFontAttributeName: [UIFont systemFontOfSize:12.0f]};
    CGSize labelSize = [text boundingRectWithSize:CGSizeMake(320, 990)
                                         options:NSStringDrawingUsesLineFragmentOrigin | NSStringDrawingUsesFontLeading
                                      attributes:attrDic
                                         context:nil].size;

    CGRect labelRect = CGRectMake(0, 0, labelSize.width, labelSize.height);
    [tmpLabel setFrame:labelRect];

    [tmpButton setFrame:CGRectMake(0, labelSize.height + 1, 100, 50)];

    // cell 高度 = 兩個子控制項之和
    [cell setFrame:CGRectMake(0, 0, labelSize.width, labelSize.height + 50 + 1)];

    return cell;
}
為什麼版面設定放在 if / else 之後?
因為不管是剛建立的 cell,還是從重用佇列取出來的 cell,內容都必須重新填一次、尺寸都必須重算一次。這兩段邏輯完全相同,寫在 if-else 外面可以避免重複,也避免哪天改了其中一邊而忘記改另一邊。
補充:現代做法
上述範例反映了那個年代的寫法(@synthesize、viewDidUnload、手動 frame 計算)。若你今天在寫新專案,有兩件事值得優先採用:一是Auto Layout 與 Self-Sizing Cells,只要給予正確的約束,UITableViewAutomaticDimension 就能自動算出行高,不必再手動量文字;二是用 viewWithTag 找子控制項並不可靠,改用 IBOutlet 屬性或 registerNib: 搭配宣告式取值會安全得多。