
iOS 頁面切換動畫大全:CATransition 十六種轉場效果實作
編輯:iOS 開發綜合
頁面之間硬切太生硬,加上轉場動畫就能立刻拉開質感。iOS 提供了 CATransition 這個方便的工具,一行設定就能換一種效果。本文把常見的轉場類型整理成一份可直接取用的清單。
一、封裝 CATransition 動畫
先把重複的樣板收進一個方法裡,之後只要傳入 type 與 subtype 就能切換效果:
#pragma mark CATransition 動畫實作
- (void)transitionWithType:(NSString *)type WithSubtype:(NSString *)subtype ForView:(UIView *)view {
    // 建立 CATransition 物件
    CATransition *animation = [CATransition animation];

    // 設定動畫時間
    animation.duration = DURATION;

    // 設定運動類型
    animation.type = type;

    if (subtype != nil) {
        // 設定子類型(方向)
        animation.subtype = subtype;
    }

    // 設定運動節奏
    animation.timingFunction = UIViewAnimationOptionCurveEaseInOut;

    [view.layer addAnimation:animation forKey:@"animation"];
}
CATransition 常用屬性說明
- duration:動畫持續時間,單位為秒。
- type:轉場類型,決定「怎麼換」,清單見下文。
- subtype:與 type 搭配使用,指定方向(上、下、左、右),並非所有 type 都需要。
- timingFunction:動畫的節奏曲線,決定起點與終點之間的插值計算方式。通俗地說,它控制動畫是勻速、先慢後快、先快後慢,還是先慢再快再慢。
系統預設五種節奏:
kCAMediaTimingFunctionLinear:線性,即勻速kCAMediaTimingFunctionEaseIn:先慢後快kCAMediaTimingFunctionEaseOut:先快後慢kCAMediaTimingFunctionEaseInEaseOut:先慢後快再慢kCAMediaTimingFunctionDefault:實際表現為中段較快
二、用 UIView 的動畫區塊封裝
CATransition 能做的效果有限,有些轉場(例如翻頁)得改用 UIView 的動畫 API:
#pragma mark 以 UIView 動畫實作轉場
- (void)animationWithView:(UIView *)view WithAnimationTransition:(UIViewAnimationTransition)transition {
    [UIView animateWithDuration:DURATION animations:^{
        [UIView setAnimationCurve:UIViewAnimationCurveEaseInOut];
        [UIView setAnimationTransition:transition forView:view cache:YES];
    }];
}
這裡的 cache:YES 值得留意:它會先將畫面快取成點陣圖再進行動畫,通常較順,但若轉場期間內容有變動就會出現殘影。
三、加上背景圖,方便觀察效果
#pragma mark 為 view 加上背景圖
- (void)addBgImageWithImageName:(NSString *)imageName {
    self.view.backgroundColor = [UIColor colorWithPatternImage:[UIImage imageNamed:imageName]];
}
四、用 Tag 區分按鈕,驅動不同動畫
在 view 上放多顆按鈕,各自設定不同的 tag,然後在 viewController 裡綁定同一個方法。點哪一顆,就播放哪一種轉場。
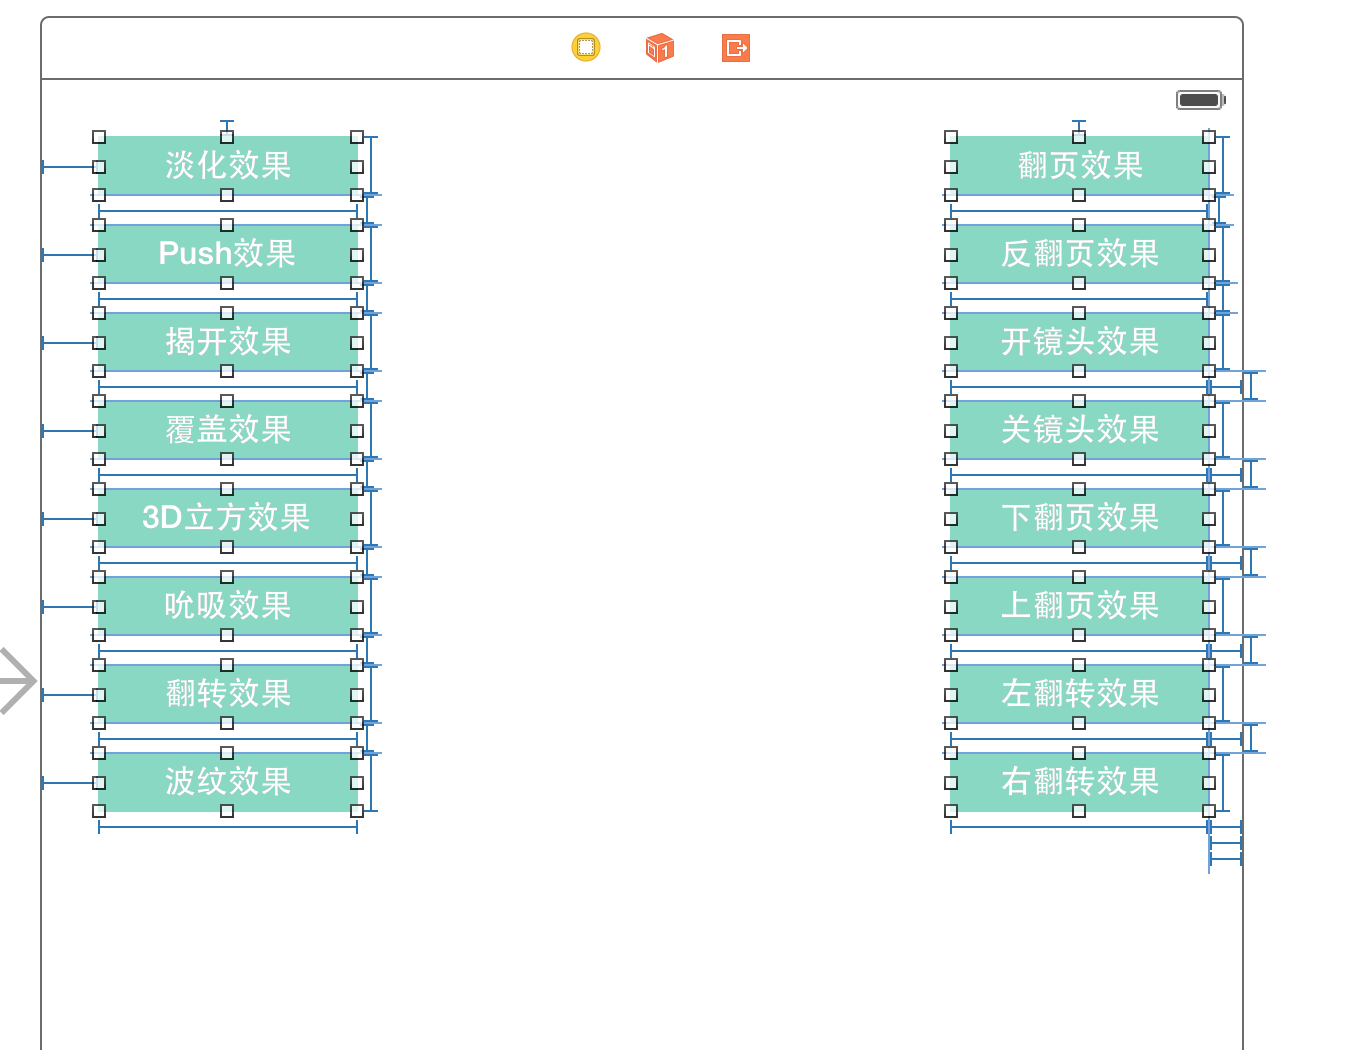
1. 定義枚舉標示動畫類型
typedef enum : NSUInteger {
    Fade = 0,                  // 淡入淡出
    Push,                      // 推擠
    Reveal,                    // 揭開
    MoveIn,                    // 覆蓋
    Cube,                      // 立方體
    SuckEffect,                // 吮吸
    OglFlip,                   // 翻轉
    RippleEffect,              // 波紋
    PageCurl,                  // 翻頁
    PageUnCurl,                // 反翻頁
    CameraIrisHollowOpen,      // 開鏡頭
    CameraIrisHollowClose,     // 關鏡頭
    CurlDown,                  // 下翻頁
    CurlUp,                    // 上翻頁
    FlipFromLeft,              // 左翻轉
    FlipFromRight              // 右翻轉
} AnimationType;
2. 從 sender 取出 tag
UIButton *button = sender;
AnimationType animationType = button.tag;
3. 每次點擊輪替方向
NSString *subtypeString;
switch (_subtype) {
    case 0: subtypeString = kCATransitionFromLeft;   break;
    case 1: subtypeString = kCATransitionFromBottom; break;
    case 2: subtypeString = kCATransitionFromRight;  break;
    case 3: subtypeString = kCATransitionFromTop;    break;
    default: break;
}
_subtype += 1;
if (_subtype > 3) {
    _subtype = 0;
}
4. 依序分派到各自的動畫
switch (animationType) {
    case Fade:
        [self transitionWithType:kCATransitionFade WithSubtype:subtypeString ForView:self.view];
        break;

    case Push:
        [self transitionWithType:kCATransitionPush WithSubtype:subtypeString ForView:self.view];
        break;

    case Reveal:
        [self transitionWithType:kCATransitionReveal WithSubtype:subtypeString ForView:self.view];
        break;

    case MoveIn:
        [self transitionWithType:kCATransitionMoveIn WithSubtype:subtypeString ForView:self.view];
        break;

    case Cube:
        [self transitionWithType:@"cube" WithSubtype:subtypeString ForView:self.view];
        break;

    case SuckEffect:
        [self transitionWithType:@"suckEffect" WithSubtype:subtypeString ForView:self.view];
        break;

    case OglFlip:
        [self transitionWithType:@"oglFlip" WithSubtype:subtypeString ForView:self.view];
        break;

    case RippleEffect:
        [self transitionWithType:@"rippleEffect" WithSubtype:subtypeString ForView:self.view];
        break;

    case PageCurl:
        [self transitionWithType:@"pageCurl" WithSubtype:subtypeString ForView:self.view];
        break;

    case PageUnCurl:
        [self transitionWithType:@"pageUnCurl" WithSubtype:subtypeString ForView:self.view];
        break;

    case CameraIrisHollowOpen:
        [self transitionWithType:@"cameraIrisHollowOpen" WithSubtype:subtypeString ForView:self.view];
        break;

    case CameraIrisHollowClose:
        [self transitionWithType:@"cameraIrisHollowClose" WithSubtype:subtypeString ForView:self.view];
        break;

    // 以下四種需改用 UIView 動畫 API
    case CurlDown:
        [self animationWithView:self.view WithAnimationTransition:UIViewAnimationTransitionCurlDown];
        break;
    case CurlUp:
        [self animationWithView:self.view WithAnimationTransition:UIViewAnimationTransitionCurlUp];
        break;
    case FlipFromLeft:
        [self animationWithView:self.view WithAnimationTransition:UIViewAnimationTransitionFlipFromLeft];
        break;
    case FlipFromRight:
        [self animationWithView:self.view WithAnimationTransition:UIViewAnimationTransitionFlipFromRight];
        break;
}
各效果預覽
淡入淡出(Fade)

推擠(Push)
新畫面把舊畫面推走,導航返回時最常見的一種。
揭開(Reveal)

覆蓋(MoveIn)

立方體(Cube)

吮吸(SuckEffect)

翻轉(OglFlip)

波紋(RippleEffect)

翻頁與反翻頁(PageCurl / PageUnCurl)


相機光圈(CameraIrisHollowOpen / Close)

選用的建議
效果多,不代表都該用。実務上真正耐看的是 Fade、Push、MoveIn 這幾種;Cube、SuckEffect、RippleEffect 這類華麗效果適合用在少數關鍵節點,全程濫用反而讓人眼花。同一個 App 內的轉場風格最好保持一致,這比效果多寡更能體現設計功力。
- 上一篇文章: iOS 儲存照片到系統相冊與自建相簿的完整做法
- 下一篇文章: 深入 hitTest:withEvent::事件穿透與重疊視圖的攔截技巧