
導航列返回按鈕客製化:隱藏文字與改寫點擊行為
原本專案一直用系統預設的返回按鈕,直到需求變成「把箭頭旁邊的文字拿掉,同時改寫點擊行為」才發現事情沒那麼單純。
先把文字藏起來
最直接的做法是自己做一個 bar button item 塞給 leftBarButtonItem,但這樣箭頭會跟系統長得不一樣,位置也對不上。後來找到比較乾淨的方式:在控制器中設定 backBarButtonItem 的標題為空字串,它的下一級頁面就會出現一個只有箭頭沒有文字的返回鈕。
UIBarButtonItem *backBtn = [[UIBarButtonItem alloc] initWithTitle:@""
    style:UIBarButtonItemStylePlain target:nil action:nil];
self.navigationItem.backBarButtonItem = backBtn;
想批次處理,可以建一個根控制器寫這段,其他頁面繼承它即可。但只要需求升級成「自訂返回的點擊事件」,這招就卡住了——在這裡設定 target 與 action 不會生效。而且會附帶一個副作用:實際可點擊的範圍永遠比看起來的大,箭頭右邊約 30pt 內都能觸發。
先看導航列的視圖結構
導航列的視圖不是跟 viewController.view 一起載入的,所以在 viewDidLoad 或 viewWillAppear 裡觀察不到完整結構,得在 viewDidAppear 之後才有。在有返回鈕的頁面中打斷點,於控制台執行:
po [[UIWindow keyWindow] recursiveDescription]
會得到類似這樣的輸出:
<UIWindow: 0x8d6f970; frame = (0 0; 320 480); ...>
  | <UILayoutContainerView ...>
    | <UINavigationTransitionView ...>
      | <UIViewControllerWrapperView ...>
        | <UIView ...>
      | <UINavigationBar: 0x8d75c40; frame = (0 20; 320 44); userInteractionEnabled = NO; ...>
        | <_UINavigationBarBackground ...>
        | <UINavigationItemView: 0x8ab6400; frame = (124 8; 163 27); ...>
          | <UILabel ...>
        | <UINavigationItemButtonView: 0x8ab6c80; frame = (8 6; 41 30); userInteractionEnabled = NO; ...>
          | <UILabel: 0x8ab6f10; frame = (-981 -995; 91 22); text = ''; ...>
        | <_UINavigationBarBackIndicatorView: 0x8d87560; frame = (8 12; 12.5 20.5); ...>
搭配 Xcode 的 Debug View Hierarchy 或 Reveal 看會更清楚:
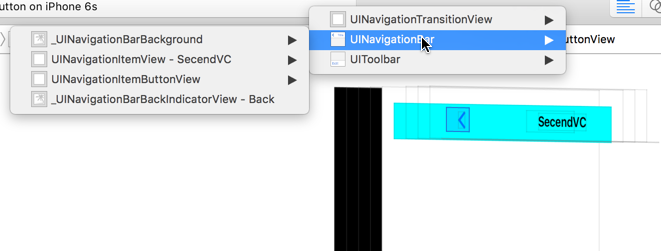
UINavigationBar 裡主要有四個角色:
_UINavigationBarBackground:(UIImageView) 導航列背景圖,不建議直接改。
UINavigationItemView:(UIView) 承載標題。
UINavigationItemButtonView:(UIView) 承載左側視圖,不能移除、改大小或顏色,只能隱藏;它決定了點擊區域的大小。
_UINavigationBarBackIndicatorView:(UIImageView) 就是那個箭頭圖,圖片不可替換。
問題的根源就在 UINavigationItemButtonView。再看一次它的輸出:
| <UINavigationItemButtonView: 0x8ab6c80; frame = (8 6; 41 30); userInteractionEnabled = NO; ...>
|   | <UILabel: 0x8ab6f10; frame = (-981 -995; 91 22); text = ''; ...>
這個 view 的 frame 應該是在系統的 draw 流程中定案的,改它會觸發重繪而被打回原尺寸,因此它的寬度只跟上面那個 label 的文字有關,其他基本不可變。我們把 label 文字設成空,view 尺寸與可點範圍卻沒跟著縮小——這就解釋了「點擊範圍比看到的大」。
另外注意它的 userInteractionEnabled 是 NO。既然它自己不接收事件,真正響應點擊的應該是它背後某個元件(視圖樹與程式碼裡都找不到),這也說明為什麼設定 target/action 沒有效果。
解法:把 UINavigationItemButtonView 變成可互動
由於這個 view 固定是 navigationBar subviews 的第三個,直接取用即可(用遍歷反而會有時序延遲)。在 viewDidAppear 中把 userInteractionEnabled 打開,再貼上自訂的按鈕或手勢:
UIView *nav_back = [self.navigationController.navigationBar.subviews objectAtIndex:2];
if ([nav_back isKindOfClass:NSClassFromString(@"UINavigationItemButtonView")]) {
    nav_back.userInteractionEnabled = YES;

    // 也可以改用 tap 手勢
    // UITapGestureRecognizer *tap = [[UITapGestureRecognizer alloc] initWithTarget:self action:@selector(backAction:)];
    // [nav_back addGestureRecognizer:tap];

    // 想精確控制點擊範圍,就在上面放一個指定大小的按鈕
    UIButton *backButton = [UIButton buttonWithType:UIButtonTypeCustom];
    backButton.frame = CGRectMake(0, 0, 20, 21);
    [backButton addTarget:self action:@selector(customMethod) forControlEvents:UIControlEventTouchUpInside];
    [nav_back addSubview:backButton];
}
整理成 UIViewController 分類
把上面兩件事(清空標題 + 掛上自訂按鈕)用 Method Swizzling 包進分類,專案裡不必逐頁寫:
// UIViewController+CustomBackButton.h
#import <UIKit/UIKit.h>

@interface UIViewController (CustomBackButton)
- (void)customNavBackButtonMethod;
@end

// UIViewController+CustomBackButton.m
#import "UIViewController+CustomBackButton.h"
#import <objc/runtime.h>

@implementation UIViewController (CustomBackButton)

+ (void)load {
    static dispatch_once_t onceToken;
    dispatch_once(&onceToken, ^{
        Class class = [self class];

        SEL originalSelector  = @selector(viewDidLoad);
        SEL swizzledSelector  = @selector(mm_viewDidLoad);
        SEL originalSelector1 = @selector(viewDidAppear:);
        SEL swizzledSelector1 = @selector(mm_viewDidAppear);

        Method originalMethod  = class_getInstanceMethod(class, originalSelector);
        Method swizzledMethod  = class_getInstanceMethod(class, swizzledSelector);
        Method originalMethod1  = class_getInstanceMethod(class, originalSelector1);
        Method swizzledMethod1  = class_getInstanceMethod(class, swizzledSelector1);

        BOOL didAddMethod = class_addMethod(class, originalSelector,
            method_getImplementation(swizzledMethod), method_getTypeEncoding(swizzledMethod));
        BOOL didAddMethod1 = class_addMethod(class, originalSelector1,
            method_getImplementation(swizzledMethod1), method_getTypeEncoding(swizzledMethod1));

        if (didAddMethod) {
            class_replaceMethod(class, swizzledSelector,
                method_getImplementation(originalMethod), method_getTypeEncoding(originalMethod));
        } else {
            method_exchangeImplementations(originalMethod, swizzledMethod);
        }

        if (didAddMethod1) {
            class_replaceMethod(class, swizzledSelector1,
                method_getImplementation(originalMethod1), method_getTypeEncoding(originalMethod1));
        } else {
            method_exchangeImplementations(originalMethod1, swizzledMethod1);
        }
    });
}

#pragma mark - Method Swizzling

- (void)mm_viewDidLoad {
    [self mm_viewDidLoad];
    UIBarButtonItem *backButtonItem = [[UIBarButtonItem alloc] initWithTitle:@""
        style:UIBarButtonItemStylePlain target:nil action:nil];
    [self.navigationItem setBackBarButtonItem:backButtonItem];
}

- (void)mm_viewDidAppear {
    [self mm_viewDidAppear];
    UIView *nav_back = [self.navigationController.navigationBar.subviews objectAtIndex:2];
    if ([nav_back isKindOfClass:NSClassFromString(@"UINavigationItemButtonView")]) {
        nav_back.userInteractionEnabled = YES;
        UIButton *backButton = [UIButton buttonWithType:UIButtonTypeCustom];
        backButton.frame = CGRectMake(0, 0, 20, 21);
        [backButton addTarget:self action:@selector(customNavBackButtonMethod)
             forControlEvents:UIControlEventTouchUpInside];
        [nav_back addSubview:backButton];
    }
}

- (void)customNavBackButtonMethod {
    [self.navigationController popViewControllerAnimated:YES];
}

@end
檔案加入專案後即生效:所有 viewController 在 viewDidLoad 時把返回鈕文字清空,在 viewDidAppear 時貼上自訂按鈕來接 pop 事件。需要客製返回行為的頁面,只要在該頁覆寫 customNavBackButtonMethod 就好。
最後要提醒:這套做法依賴私有類名 UINavigationItemButtonView 與 subviews 的固定順序,兩者都不是公開 API,系統版本更新後有失效風險。若專案 iOS 版本門檻允許,改用 interactivePopGestureRecognizer 或自繪整套導航列會更穩妥。