
用 UIDatePicker 打造彈出式時間選擇器
UIDatePicker 是專門用來挑選日期與時間的元件,外型是轉輪狀,由 Apple 針對日曆場景設計:
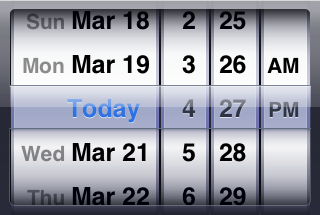
除了它,還有一個更通用的轉輪元件 UIPickerView——差別在於 UIDatePicker 顯示的是現成日曆,而 UIPickerView 顯示什麼完全由你自己決定。本文先談 UIDatePicker,UIPickerView 留待下一篇。
基本用法:建立與取值
1. 開啟 Xcode,建立一個 Single View Application,命名為 UIDatePicker Test。

2. 打開 ViewController.xib,從物件庫拖一個 UIDatePicker 到視圖上。

3. 再拖一個 Button 上來,把標題改成 Select。點下去會跳出一個 Alert,用來顯示使用者選的結果。

4. 建立連線:開啟 Assistant Editor,按住 Control 把 UIDatePicker 拖進 ViewController.h,建立名稱為 datePicker 的 Outlet;接著用同樣方式為按鈕建立名為 buttonPressed 的 Action,事件類型維持預設的 Touch Up Inside。


5. 選取 UIDatePicker,在 Attribute Inspector 中設定 Maximum Date,例如 2100-12-31。

進階實作:自訂 LGDatePickerView
接下來做一個更完整的彈出式時間選擇器,成品如下:

半透明背景與點擊關閉
用一個鋪滿螢幕的 UIControl 當遮罩,綁定取消事件:
- (id)init {
    self = [super init];
    if (self) {
        // 半透明背景,並綁定取消方法
        UIControl *control = [[UIControl alloc] initWithFrame:SCREEN_BOUNDS];
        control.backgroundColor = [UIColor colorWithRed:0.0/255.0 green:0.0/255.0 blue:0.0/255.0 alpha:0.5f];
        [self addSubview:control];
        [control addTarget:self action:@selector(actionCancel:) forControlEvents:UIControlEventTouchUpInside];
    }
    return self;
}

- (void)actionCancel:(id)sender {
    [self removeFromSuperview];
}
確定 / 取消按鈕
自己塞一個 UIView 放兩個 UIButton 當然可行,但更省事的是用 UIToolbar:
// 工具列
UIToolbar *toolbar = [[UIToolbar alloc] initWithFrame:CGRectMake(0, SCREEN.height - 250, SCREEN.width, 50)];
toolbar.autoresizingMask = UIViewAutoresizingFlexibleTopMargin | UIViewAutoresizingFlexibleWidth;
UIBarButtonItem *itemCancelDone = [[UIBarButtonItem alloc] initWithTitle:@"確定"
    style:UIBarButtonItemStylePlain target:self action:@selector(actionConfirm:)];
UIBarButtonItem *itemCancel = [[UIBarButtonItem alloc] initWithTitle:@"取消"
    style:UIBarButtonItemStylePlain target:self action:@selector(actionCancel:)];
UIBarButtonItem *space = [[UIBarButtonItem alloc] initWithBarButtonSystemItem:UIBarButtonSystemItemFlexibleSpace
    target:nil action:nil];
[toolbar setItems:[NSArray arrayWithObjects:itemCancel, space, itemCancelDone, nil]];
[control addSubview:toolbar];
點擊確定時,把選到的時間透過 delegate 拋出去,然後關閉自己:
- (void)actionConfirm:(id)sender {
    if ([self.delegate respondsToSelector:@selector(datePickerView:didSelectTime:)]) {
        [self.delegate datePickerView:self didSelectTime:self.datePicker.date];
    }
    [self removeFromSuperview];
}
定義代理
在 LGDatePickerView.h 中宣告協議:
@protocol LGDatePickerViewDelegate <NSObject>

- (void)datePickerView:(LGDatePickerView *)datepicker didSelectTime:(NSDate *)time;

@end
建立 UIDatePicker 實例
先在標頭檔宣告屬性,再在初始化方法中建立並加上去:
@property (nonatomic, strong) UIDatePicker *datePicker;
UIDatePicker *datePicker = [[UIDatePicker alloc] init];
datePicker.backgroundColor = [UIColor whiteColor];
datePicker.datePickerMode = UIDatePickerModeCountDownTimer;
datePicker.date = [NSDate date];
datePicker.frame = CGRectMake(0, SCREEN.height - 200, SCREEN.width, 220);
[control addSubview:datePicker];
self.datePicker = datePicker;
使用方式
LGDatePickerView *datePicker = [[LGDatePickerView alloc] init];
datePicker.delegate = self;
datePicker.datePicker.date = [NSDate date];
datePicker.frame = self.view.bounds;
[self.view addSubview:datePicker];
整個元件的耦合都靠 delegate 收斂,外部只需要實作一個方法就能拿到結果,是相當乾淨的封裝方式。若日後要換成 UIPickerView 或加上「今天」快捷鍵,只要沿用同樣的 delegate 契約即可,呼叫端完全不用改。