
iOS 兩個控制器之間的資料雙向傳遞:順傳與逆傳完整實作
編輯:iOS 開發綜合
本文示範兩個檢視器之間的雙向資料傳遞。假設有控制器 A 與控制器 B:
· 順傳(A → B):直接建立目標控制器物件,把資料賦值給它的屬性即可。
· 逆傳(B → A):一般使用代理(delegate),此時 A 是 B 的 delegate——A 負責「監聽」,B 負責「通知」。
順傳之所以簡單,是因為 A 手上握有 B 的實例;逆傳之所以需要代理,是因為 B 不該、也無從得知是誰叫它出來的。
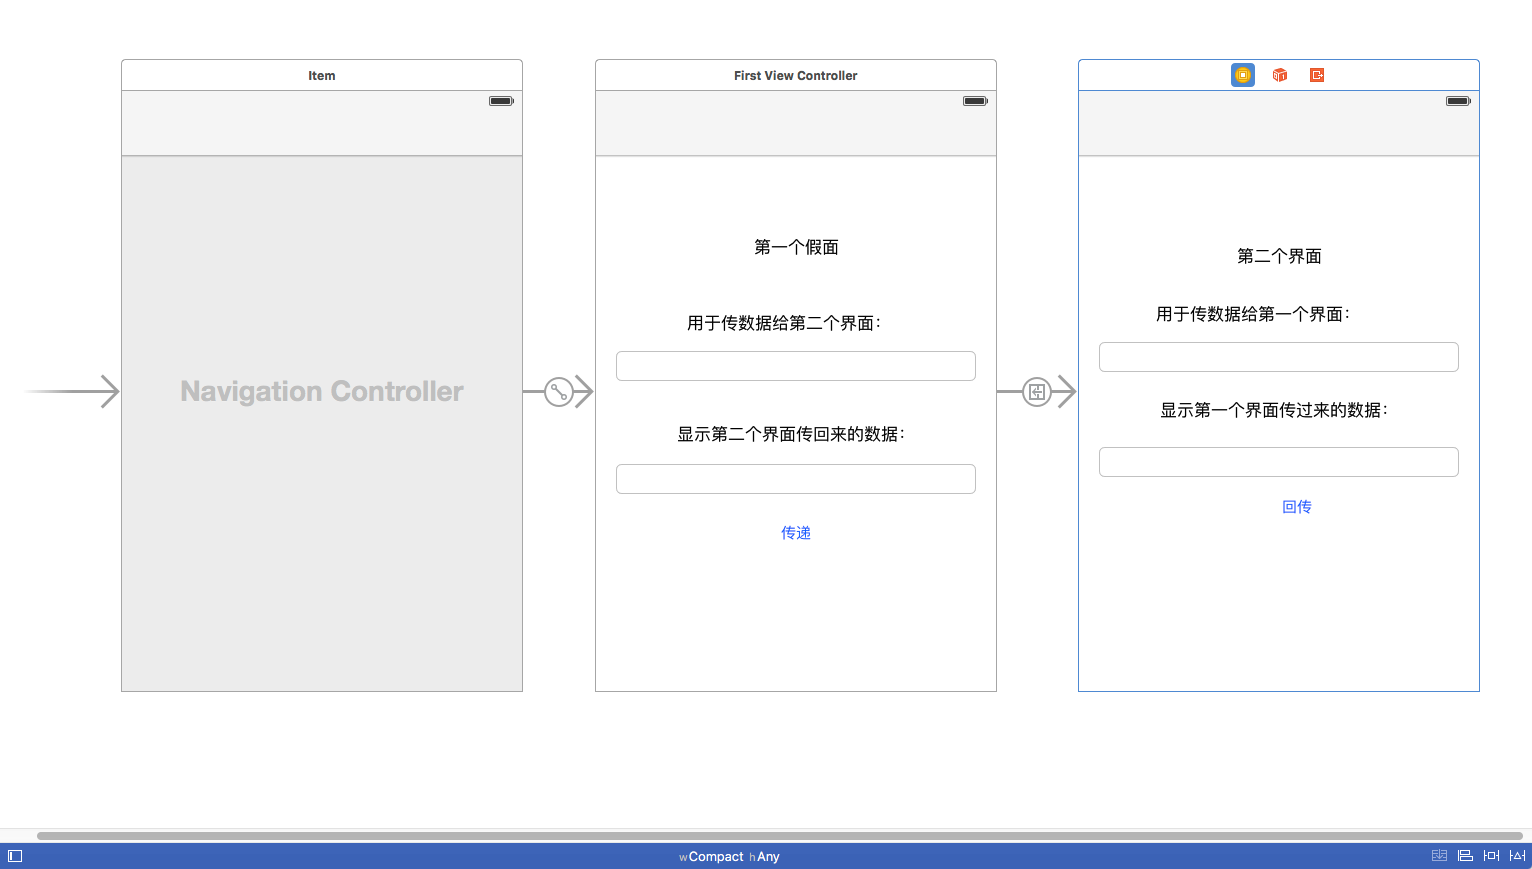
FirstViewController.h
#import <UIKit/UIKit.h>

@interface FirstViewController : UIViewController
@end
FirstViewController.m
#import "FirstViewController.h"
#import "SecondViewController.h"

@interface FirstViewController () <SecondViewControllerDelegate>

/** 寫入資料,稍後順傳給第二個畫面 */
@property (weak, nonatomic) IBOutlet UITextField *first2Second;

/** 顯示第二個畫面逆傳回來的資料 */
@property (weak, nonatomic) IBOutlet UITextField *displayWithSecond;

@end

@implementation FirstViewController

- (void)viewDidLoad {
    [super viewDidLoad];
}

#pragma mark - 順傳:跳轉時自動呼叫

- (void)prepareForSegue:(UIStoryboardSegue *)segue sender:(id)sender {
    SecondViewController *vc = (SecondViewController *)segue.destinationViewController;

    if (self.first2Second.text.length > 0) {
        vc.name = self.first2Second.text;      // 把資料交給 B
    }

    vc.delegate = self;                        // 把自己設為 B 的代理
}

#pragma mark - 逆傳:實作 B 的協議方法

-(void)secondViewControllerDidDit:(SecondViewController *)viewController
                          andName:(NSString *)name {
    self.displayWithSecond.text = name;        // 接收 B 傳回的資料
}

@end
這裡用 prepareForSegue:sender: 是因為界面設計在 Storyboard 裡。若是純程式碼跳轉,改在建立 B 的實例之後、呼叫 push 之前設定即可,概念完全相同。
SecondViewController.h
#import <UIKit/UIKit.h>

@class SecondViewController;

@protocol SecondViewControllerDelegate <NSObject>

/** 通知外部:資料已備好 */
-(void)secondViewControllerDidDit:(SecondViewController *)viewController
                          andName:(NSString *)name;

@end

@interface SecondViewController : UIViewController

@property (nonatomic, strong) NSString *name;                        // 接收 A 傳來的資料
@property (nonatomic, weak) id<SecondViewControllerDelegate> delegate;

@end
這裡有個關鍵細節:delegate 屬性必須宣告為 weak。A 持有 B(透過 navigation controller 的堆疊),B 又強引用 A,就會形成循環引用,兩者都無法被釋放。
SecondViewController.m
#import "SecondViewController.h"

@interface SecondViewController ()

/** 寫入資料,稍後逆傳回第一個畫面 */
@property (weak, nonatomic) IBOutlet UITextField *second2First;

/** 顯示第一個畫面傳來的資料 */
@property (weak, nonatomic) IBOutlet UITextField *displayWithFirst;

/** 點擊後返回上一頁 */
- (IBAction)second2First:(UIButton *)sender;

@end

@implementation SecondViewController

- (void)viewDidLoad {
    [super viewDidLoad];
    self.displayWithFirst.text = self.name;    // 顯示 A 傳來的資料
}

- (IBAction)second2First:(UIButton *)sender {
    if (self.second2First.text.length > 0) {
        // 先確認對方有實作這個方法再呼叫,避免 crash
        if ([self.delegate respondsToSelector:@selector(secondViewControllerDidDit:andName:)]) {
            [self.delegate secondViewControllerDidDit:self andName:self.second2First.text];
        }
    }
    [self.navigationController popViewControllerAnimated:YES];
}

@end
呼叫 delegate 之前先用 respondsToSelector: 確認,是一個值得養成的好習慣。若把協議方法標為 @optional,這個檢查就是必要的;即使是 @required,加上它也能避免 delegate 被設為 nil 之外的意外情況。
最後補充:如果你的逆傳場景比較單純(例如只是回傳一個值),用 block 或 closure 往往比 delegate 更輕巧,也不必額外定義協議。而若是「多個畫面都關心同一份狀態」,那其實已經不是傳值的問題,而該考慮單例、通知或更進一步的狀態管理方案了。
以上就是本文的全部內容,希望能給大家一個參考。