
UIViewController 完全指南:生命週期、Segue 傳值與模態跳轉
一、引言
作為 MVC 中的 C,Controller 一直是 iOS 開發裡最吃重的角色。它是視圖與資料之間的橋樑,負責把資料有條理地鋪陳到 View 上。UIViewController 則是 UIKit 中最基礎的類——從第一個空白視圖到複雜的完整專案,都離不開它。正因為基礎,很多人反而對它的生命週期與屬性掌握得馬虎,本文就把這些底層東西講清楚。
二、生命週期
面向對象的語言裡,物件必然有生命週期。UIViewController 的生命週期既管自己的作用範圍,也管內部物件的作用範圍。相關方法如下:
//類的初始化方法
 + (void)initialize;
 //對象初始化方法
 - (instancetype)init;
 //從歸檔初始化
 - (instancetype)initWithCoder:(NSCoder *)coder;
 //加載視圖
 -(void)loadView;
 //將要加載視圖
 - (void)viewDidLoad;
 //將要布局子視圖
 -(void)viewWillLayoutSubviews;
 //已經布局子視圖
 -(void)viewDidLayoutSubviews;
 //內存警告
 - (void)didReceiveMemoryWarning;
 //已經展示
 -(void)viewDidAppear:(BOOL)animated;
 //將要展示
 -(void)viewWillAppear:(BOOL)animated;
 //將要消失
 -(void)viewWillDisappear:(BOOL)animated;
 //已經消失
 -(void)viewDidDisappear:(BOOL)animated;
 //被釋放
 -(void)dealloc;
乍看很多,關係其實很清楚:除 initialize、init、initWithCoder 之外,其餘方法都會在生命週期中有序被調用。實際打印一遍順序最可靠:
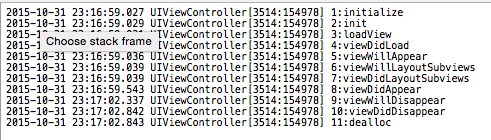
這是一個完整的生命週期,但有幾處需要特別說明:
1. initialize 並非每次建立物件都會觸發,只有該類第一次建立物件時才會呼叫,適合做類級別的一次性準備工作。若子類實作了 initialize,則子類首次建立物件時呼叫自己的;若子類沒實作,父類會代為再呼叫一次,此後都不再觸發。類相關的全域變數適合放在這裡初始化。
2. init 與 initWithCoder: 二者相似,只是觸發環境不同——用代碼初始化走 init,從 nib 檔或歸檔恢復走 initWithCoder:。
3. loadView 是加載視圖的起點,除非手動調用,生命週期中一般只會被呼叫一次。
4. viewDidLoad 是最常用的一個,成員物件與變數的初始化都放在這裡。類建立之後,無論視圖後續如何顯示或消失,這個方法都只會被呼叫一次。
5. viewWillAppear: 視圖即將顯示。
6. viewWillLayoutSubviews:在 viewWillAppear 之後,即將對子視圖進行排版。
7. viewDidLayoutSubviews:子視圖排版完成。
8. viewDidAppear: 顯示動畫結束。
9. viewWillDisappear:/10. viewDidDisappear: 即將消失/已經消失。
11. dealloc:controller 被釋放。
一個高頻陷阱:實測發現,從 nib 檔加載的 controller 只要不釋放,每次 viewWillAppear 都會觸發 layoutSubviews,甚至有時在 viewDidAppear 之後還會再來一次;而純代碼加載的只在開始時調用一次。所以把一次性布局邏輯寫在 layoutSubviews 裡是很危險的,容易出現反覆執行導致的錯位與效能浪費。
三、從 StoryBoard 加載時的傳值陷阱
從 StoryBoard 加載 ViewController 時,拖拽的視圖本該被初始化,但這裡有個細節常被忽略。用下面這種方式拿到的 controller,其內部視圖尚未被建立:
ViewController2 * viewController2 = [[UIStoryboard storyboardWithName:@"Main" bundle:[NSBundle mainBundle]] instantiateViewControllerWithIdentifier:@"ViewController2"];
拉一個 label 關聯到頭檔後打印驗證:
ViewController2 * viewController2 = [[UIStoryboard storyboardWithName:@"Main" bundle:[NSBundle mainBundle]] instantiateViewControllerWithIdentifier:@"ViewController2"];
     NSLog(@"%@",viewController2.label);
     [self presentViewController:viewController2 animated:YES completion:nil];
輸出結果:
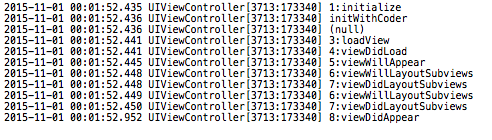
印出來是 nil。可以想見,此時若要對 label 做屬性設置,必然失敗。
有人提出手動調一下 loadView,試試看:
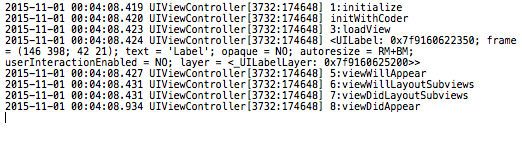
label 確實被建出來了,但暴露出更嚴重的問題:系統不再呼叫 viewDidLoad。而我們絕大部分初始化代碼都寫在這個方法裡,這風險太大。Apple 官方文檔明確聲明 loadView 從來都不應該手動直接調用,所以這條路是錯的。
iOS 9 提供了正解:
- (void)loadViewIfNeeded NS_AVAILABLE_IOS(9_0);
呼叫它會把視圖建立出來,同時不會跳過 viewDidLoad。iOS 9 還新增了一個唯讀屬性,用來判斷 view 是否已加載完成:
@property(nullable, nonatomic, readonly, strong) UIView *viewIfLoaded NS_AVAILABLE_IOS(9_0);
四、與 StoryBoard 的交互
Controller 的創建方式通常兩種:純代碼,或關聯 StoryBoard。UIViewController 提供了不少方法便於兩者協作。
1. StoryBoard 內的跳轉與傳值
在 StoryBoard 中連線跳轉非常方便:拉入兩個 controller,按住第一個上的按鈕拖到第二個,選擇一個 segue 類型即可。
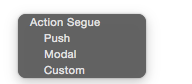
建立連接後,點擊按鈕就會自動跳轉。UIViewController 中有個方法可以攔截:
- (BOOL)shouldPerformSegueWithIdentifier:(NSString *)identifier sender:(nullable id)sender NS_AVAILABLE_IOS(6_0);
回傳 NO 則拒絕跳轉。注意它只在使用者操作觸發的自動跳轉時被調用,用代碼主動 performSegue 時不會走到這裡。
若回傳 YES,接著會執行跳轉前的準備:
- (void)prepareForSegue:(UIStoryboardSegue *)segue sender:(nullable id)sender NS_AVAILABLE_IOS(5_0);傳值就在這裡做。segue 物件封裝了相關的 controller,可用 segue.destinationViewController 取得目標。這個方法無論自動或手動跳轉都會執行,是最可靠的傳值入口。
StoryBoard 中的 segue 除了正向跳轉,還能反向返回(類似 pop/dismiss),稱為 unwind segue。要從 controller2 返回 controller1,需在 controller2 中實作如下格式的方法:
- (IBAction)unwindSegueToViewController:(UIStoryboardSegue *)segue {
     NSLog(@"unwindSegueToViewController");
 }
返回值必須是 IBAction,參數必須是 UIStoryboardSegue,方法名自訂。之後在 StoryBoard 中 controller1 的 Exit 選項裡就會出現它:
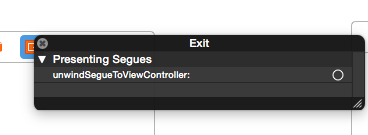
把它連到 controller2 的某個按鈕上:
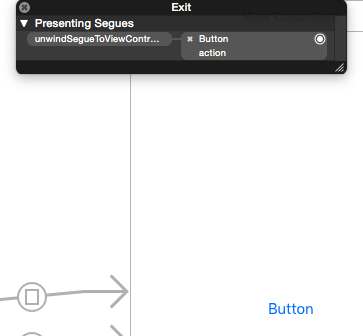
點擊該按鈕即返回 controller1。
unwind 同樣有前置回調,回傳 NO 則不能跳轉:
-(BOOL)canPerformUnwindSegueAction:(SEL)action fromViewController:(UIViewController *)fromViewController withSender:(id)sender{
     NSLog(@"canPerformUnwindSegueAction");
     return YES;
 }
之後才會執行自訂的 unwind 方法。這個方法可以是空實作,系統仍會完成跳轉。
2. 用代碼觸發 StoryBoard 中的 segue
先在 StoryBoard 裡為兩控制器間的 segue 取個 identifier:
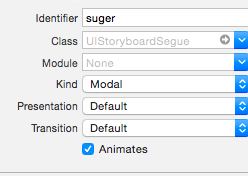
然後在需要的地方調用:
- (void)performSegueWithIdentifier:(NSString *)identifier sender:(nullable id)sender NS_AVAILABLE_IOS(5_0);
另外這三個唯讀屬性可以取得 controller 的來源資訊:
@property(nullable, nonatomic, readonly, copy) NSString *nibName;
 @property(nullable, nonatomic, readonly, strong) NSBundle *nibBundle;
 @property(nullable, nonatomic, readonly, strong) UIStoryboard *storyboard NS_AVAILABLE_IOS(5_0);
五、Controller 之間的從屬關係
1. parentViewController
UIViewController 內部維護了一個子 controller 陣列,导航控制器與 tabBar 控制器就是典型例子。可直接取得父級:
@property(nullable,nonatomic,weak,readonly) UIViewController *parentViewController;
2. 模態跳轉中的雙向引用
只要 controller 沒被釋放,就能順藤摸瓜找到彼此:
//其所present的contller,比如,A和B兩個controller,A跳轉到B,那麼A的presentedViewController就是B
 @property(nullable, nonatomic,readonly) UIViewController *presentedViewController  NS_AVAILABLE_IOS(5_0);
 //和上面的方法剛好相反,比如,A和B兩個controller,A跳轉到B,那麼B的presentingViewController就是A
 @property(nullable, nonatomic,readonly) UIViewController *presentingViewController NS_AVAILABLE_IOS(5_0);
理解這兩個屬性之後就會發現:反向傳值根本不需要代理、block、通知這些繞彎的手段,直接拿到上一級 controller 設置即可。例如要在第二個界面關閉後改變第一個界面的顏色:
    self.presentingViewController.view.backgroundColor = [UIColor colorWithRed:arc4random()%255/255.0 green:arc4random()%255/255.0 blue:arc4random()%255/255.0 alpha:1];
     [self dismissViewControllerAnimated:YES completion:nil];
不過要提醒一句:這種直接改父級 view 的寫法耦合較重,適合小專案或臨時方案。長期維護的專案仍建議用 delegate 或 block 保持雙向解耦。
六、模態跳轉與過場動畫
最常用的一對方法:
- (void)presentViewController:(UIViewController *)viewControllerToPresent animated: (BOOL)flag completion:(void (^ __nullable)(void))completion NS_AVAILABLE_IOS(5_0);
 - (void)dismissViewControllerAnimated: (BOOL)flag completion: (void (^ __nullable)(void))completion NS_AVAILABLE_IOS(5_0);
animated 參數控制是否播放動畫,預設效果是從螢幕底部向上彈起。這個效果可以改:
@property(nonatomic,assign) UIModalTransitionStyle modalTransitionStyle NS_AVAILABLE_IOS(3_0);
注意要設在即將跳轉到的那個 controller 上:
typedef NS_ENUM(NSInteger, UIModalTransitionStyle) {
     UIModalTransitionStyleCoverVertical = 0,//默認的,從下向上覆蓋
     UIModalTransitionStyleFlipHorizontal ,//水平翻轉
     UIModalTransitionStyleCrossDissolve,//溶解
     UIModalTransitionStylePartialCurl ,從下向上翻頁
 };
另一個屬性控制彈出 controller 的填充方式,但只在 iPad 上有效,iPhone 一律全屏:
@property(nonatomic,assign) UIModalPresentationStyle modalPresentationStyle NS_AVAILABLE_IOS(3_2);
 //枚舉如下
 typedef NS_ENUM(NSInteger, UIModalPresentationStyle) {
         UIModalPresentationFullScreen = 0,//填充整個屏幕
         UIModalPresentationPageSheet,//留下狀態欄
         UIModalPresentationFormSheet,//四周留下變暗的空白
         UIModalPresentationCurrentContext ,//和跳轉到它的控制器保持一致
         UIModalPresentationCustom NS_ENUM_AVAILABLE_IOS(7_0),//自定義
         UIModalPresentationOverFullScreen NS_ENUM_AVAILABLE_IOS(8_0),
         UIModalPresentationOverCurrentContext NS_ENUM_AVAILABLE_IOS(8_0),
         UIModalPresentationPopover NS_ENUM_AVAILABLE_IOS(8_0) __TVOS_PROHIBITED,
         UIModalPresentationNone NS_ENUM_AVAILABLE_IOS(7_0) = -1,
 };
七、新旧 API 對照
5.0 之前用的是 presentModalViewController 系列;5.0 之後引入了 presentedViewController/presentingViewController 的概念,modalViewController 對應的就是 presentedViewController。
FCDemoViewController *controller= [[FCDemoViewController alloc]initWithNibName:@"FCDemoViewController" bundle:nil];
 controller.modalTransitionStyle=UIModalTransitionStyleFlipHorizontal;
 [self presentModalViewController:controller animated:YES];
 NSLog(@"%@",self.modalViewController);
 //5.0
 [self presentViewController:controller animated:YES completion:nil];
 NSLog(@"%@",self.presentedViewController);
 NSLog(@"%@",self.presentingViewController);
關閉對應的方法則是 dismissModalViewControllerAnimated,或 5.0 之後的 dismissViewControllerAnimated:completion:。
5.0 之後的其他變化:controller 可以自訂子 controller 集合,也就是每個 controller 都能成為 container controller;definesPresentationContext 決定當前 controller 是否向 presentedViewController 提供自己的 context,若不提供,系統會往上層查找。
最後一點設計建議:Apple 官方推薦用協議(delegate)的方式讓 controller 互相通信。聲明協議、在主 controller 中實作,present 時把 delegate 設為 self,被展示的 controller 需要回饋時直接調 delegate 方法即可。這樣做的好處是複用性大幅增強,而且被展示的 controller 不必知道展示者是誰、有哪些屬性——依賴方向單一,維護成本自然下降。