
iOS 手動布局:用 frame 與 layoutSubviews 排列子視圖
編輯:iOS 開發綜合
Auto Layout 出現之前,所有布局都靠 frame 計算。理解這套做法,對釐清視圖座標系統與重繪時機很有幫助。
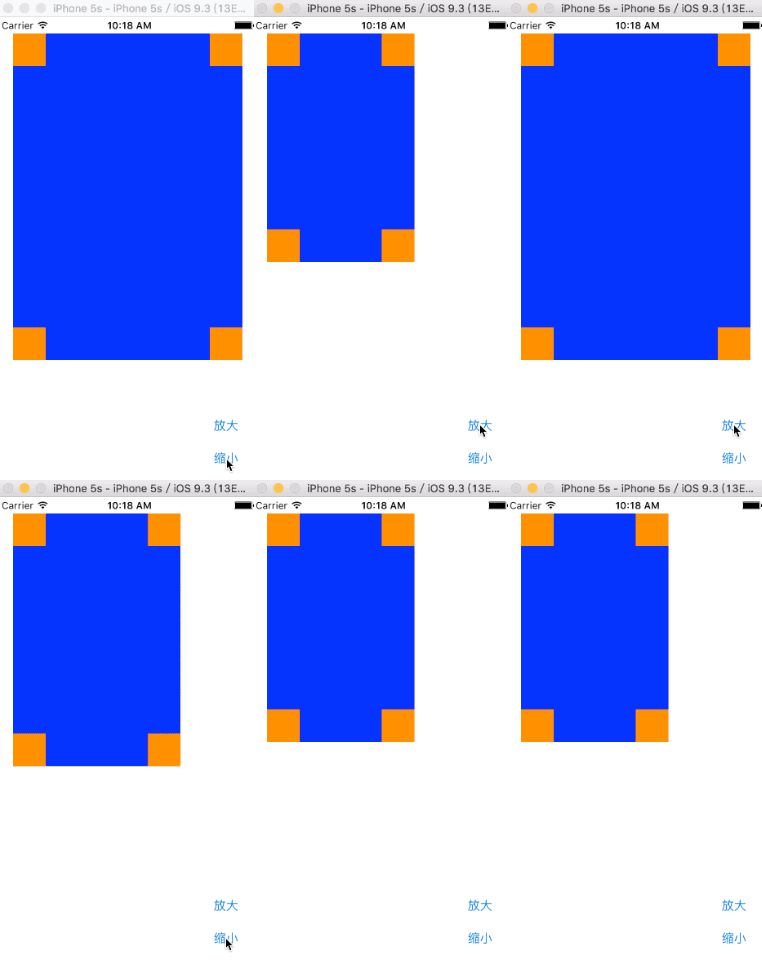
這裡以 storyboard 作為啟動畫面。目標是在白色畫面上放一個藍色父視圖 SuperView,並在裡面放四個橘色小方塊,分別貼齊四個角落;下方再擺「放大」「縮小」兩個按鈕,用來觸發重新的布局。
SuperView.h
 #import <UIKit/UIKit.h>

 @interface SuperView : UIView {
     UIView *_view01;
     UIView *_view02;
     UIView *_view03;
     UIView *_view04;
 }
 // 建立子視圖
 -(void)createSubViews;
 @end
SuperView.m
 #import "SuperView.h"

 @interface SuperView ()
 @end

 @implementation SuperView

 -(void)createSubViews {
     // 左上角
     _view01 = [[UIView alloc] init];
     _view01.frame = CGRectMake(0, 0, 40, 40);

     // 右上角
     _view02 = [[UIView alloc] init];
     _view02.frame = CGRectMake(self.bounds.size.width - 40, 0, 40, 40);

     // 右下角
     _view03 = [[UIView alloc] init];
     _view03.frame = CGRectMake(self.bounds.size.width - 40, self.bounds.size.height - 40, 40, 40);

     // 左下角
     _view04 = [[UIView alloc] init];
     _view04.frame = CGRectMake(0, self.bounds.size.height - 40, 40, 40);

     _view01.backgroundColor = [UIColor orangeColor];
     _view02.backgroundColor = [UIColor orangeColor];
     _view03.backgroundColor = [UIColor orangeColor];
     _view04.backgroundColor = [UIColor orangeColor];

     [self addSubview:_view01];
     [self addSubview:_view02];
     [self addSubview:_view03];
     [self addSubview:_view04];
 }

 // 需要重新布局時由系統呼叫,在此重設子視圖位置
 -(void)layoutSubviews {
     [UIView beginAnimations:nil context:nil];
     [UIView setAnimationDuration:1];

     _view01.frame = CGRectMake(0, 0, 40, 40);
     _view02.frame = CGRectMake(self.bounds.size.width - 40, 0, 40, 40);
     _view03.frame = CGRectMake(self.bounds.size.width - 40, self.bounds.size.height - 40, 40, 40);
     _view04.frame = CGRectMake(0, self.bounds.size.height - 40, 40, 40);

     [UIView commitAnimations];
 }
 @end
ViewController.m
 #import "ViewController.h"
 #import "SuperView.h"

 @interface ViewController ()
 @end

 @implementation ViewController

 - (void)viewDidLoad {
     [super viewDidLoad];

     // 建立父視圖
     SuperView *sView = [[SuperView alloc] init];
     sView.frame = CGRectMake(20, 20, 180, 280);
     [sView createSubViews];
     sView.backgroundColor = [UIColor blueColor];
     [self.view addSubview:sView];

     UIButton *btn01 = [UIButton buttonWithType:UIButtonTypeRoundedRect];
     btn01.frame = CGRectMake(240, 480, 80, 40);
     [btn01 setTitle:@"放大" forState:UIControlStateNormal];
     [btn01 addTarget:self action:@selector(pressLarge) forControlEvents:UIControlEventTouchUpInside];
     [self.view addSubview:btn01];

     UIButton *btn02 = [UIButton buttonWithType:UIButtonTypeRoundedRect];
     btn02.frame = CGRectMake(240, 520, 80, 40);
     [btn02 setTitle:@"縮小" forState:UIControlStateNormal];
     [btn02 addTarget:self action:@selector(pressSmall) forControlEvents:UIControlEventTouchUpInside];
     [self.view addSubview:btn02];

     // 用 tag 之後才方便取回這個視圖
     sView.tag = 101;
 }

 // 放大:父視圖變大後,系統會重跑 layoutSubviews,子視圖自動跟著貼角
 -(void)pressLarge {
     SuperView *sView = (SuperView *)[self.view viewWithTag:101];
     [UIView beginAnimations:nil context:nil];
     [UIView setAnimationDuration:1];
     sView.frame = CGRectMake(20, 20, 280, 400);
     [UIView commitAnimations];
 }

 // 縮小
 -(void)pressSmall {
     SuperView *sView = (SuperView *)[self.view viewWithTag:101];
     [UIView beginAnimations:nil context:nil];
     [UIView setAnimationDuration:1];
     sView.frame = CGRectMake(20, 20, 180, 280);
     [UIView commitAnimations];
 }

 - (void)didReceiveMemoryWarning {
     [super didReceiveMemoryWarning];
 }
 @end
這裡最關鍵的一點是:子視圖的位置一律用 self.bounds 去算,而不是寫死數字。這樣當父視圖尺寸改變、系統觸發 layoutSubviews 時,四個小方塊自然就會重新貼齊新的邊角,不必手動一格格搬。
- 上一篇文章: iOS 基礎控件:UISwitch 開關按鈕的用法
- 下一篇文章: Safari 存不了中文 cookie?跨平台編碼對症的處理方式