
iOS 實現郵箱輸入模糊匹配與後綴自動補全
先看效果
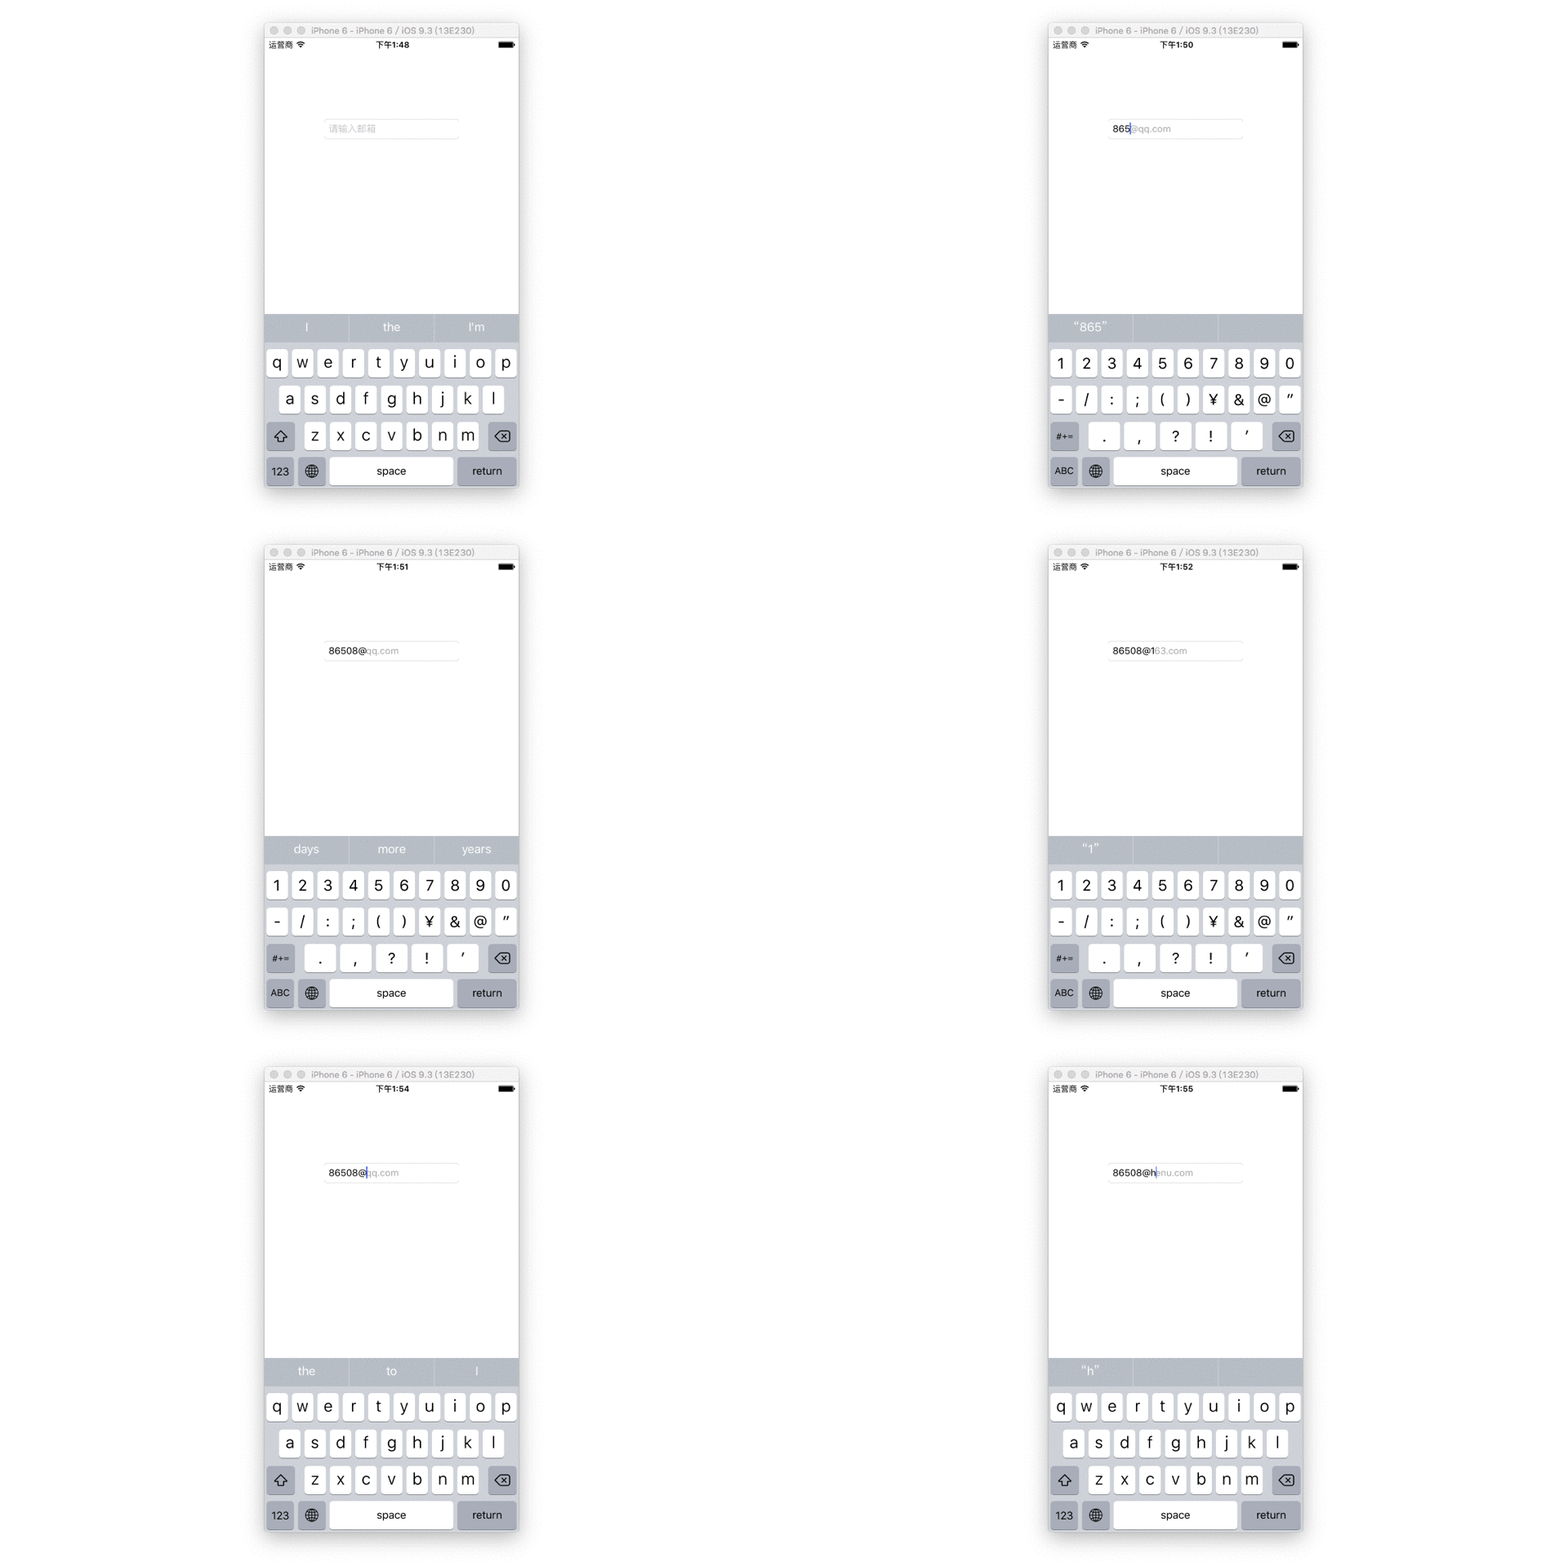
一、功能說明
使用者在輸入框裡敲入一串帳號,元件會自動在後方補上 @qq.com;若使用者自己打了 @,則改以 @ 之後的字元去比對後綴清單。
舉例來說,假設可匹配的後綴依序為 @qq.com、@163.com、@126.com、@yahoo.com、@139.com、@henu.com:輸入 @1 時補出 63.com,接著再輸入 2 變成 @12,則補出 6.com。比對優先順序完全依照清單順序,而清單本身可自由替換,方便依產品需求客製。
二、使用方式
方式一:在 xib 中使用
從元件庫拖出一個 textField,設定好約束,把它的 Class 改為 XLTextField(前提是已把 XLTextField.h 與 XLTextField.m 加入專案),樣式則在 xib 中自行調整。接著只需賦值後綴清單:
/**
 * 透過 xib 建立時,只需賦值此屬性
 * @param mailTypeArray 郵箱匹配類型
 */
@property (nonatomic, strong) NSMutableArray *mailTypeArray;
示例:
self.textField.mailTypeArray = [NSMutableArray arrayWithObjects:
    @"@qq.com", @"@163.com", @"@126.com",
    @"@yahoo.com", @"@139.com", @"@henu.com", nil];
另外還有一個可選的 mailMatchColor(UIColor 型別),用來設定後綴提示文字的颜色:
/**
 * Optional:匹配的郵箱後綴預設為 RGB(170, 170, 170),可自行設定
 */
@property (nonatomic, strong) UIColor *mailMatchColor;
方式二:純程式碼建立
/**
 * 手寫建立 textField 時呼叫
 * @param frame  尺寸
 * @param fontSize 字級
 */
- (instancetype)initWithFrame:(CGRect)frame fontSize:(CGFloat)fontSize;
示例:
XLTextField *field = [[XLTextField alloc] initWithFrame:CGRectMake(100, 200, 200, 30)
                                               fontSize:12];
field.placeholder = @"輸入郵箱地址";
field.mailTypeArray = [NSMutableArray arrayWithObjects:
    @"@qq.com", @"@163.com", @"@126.com",
    @"@yahoo.com", @"@139.com", @"@henu.com", nil];
field.mailMatchColor = [UIColor redColor];   // 可選屬性
[self.view addSubview:field];
元件刻意禁用了 init 與 new,誤用時會出現友善的編譯提示:
- (instancetype)init __attribute__((unavailable("init 方法不可用,請用 initWithFrame:fontSize:")));
+ (instancetype)new  __attribute__((unavailable("init 方法不可用,請用 initWithFrame:fontSize:")));
三、實作原理
1. 其實是 textField 加 label 的雙人組。textField 只負責接收輸入,真正呈現「帳號 + 完整後綴」的是一個 overlay 的 UILabel,並以 attributed string 讓已輸入部分透明、補全部分以淺色顯示。編輯結束時,label 的內容會寫回 textField.text 後清空,最終取值一律從 textField.text 取得。
2. 代理方法全部內封。所有 UITextFieldDelegate 實作都封裝在元件內部,使用方不必再設定 delegate,也不必操心代理衝突。
3. 比對發生在 shouldChangeCharactersInRange。每敲一個字就重新計算一次完整字串,切出 @ 前段與後段,再逐一比對後綴清單。
四、比對的核心程式碼
/**
 * 匹配郵箱過程
 * @param range 即將變動的範圍
 * @param string 使用者本次輸入
 */
- (void)configMailMatchingRange:(NSRange)range replacementString:(NSString *)string {
    // 1. 取得輸入後的完整字串
    NSString *completeStr = [self.text stringByReplacingCharactersInRange:range
                                                             withString:string];

    // 2. 以 @ 切開
    NSArray *temailArray = [completeStr componentsSeparatedByString:@"@"];
    NSString *emailString = [temailArray firstObject];   // @ 之前的部分

    // 3. 尚未輸入 @ 時,比對目標就是 @
    NSString *matchString = @"@";
    if (temailArray.count > 1) {
        matchString = [completeStr substringFromIndex:emailString.length];
    }

    // 4. 取出所有符合的後綴
    NSMutableArray *suffixArray = [self checkEmailStr:matchString];

    // 5. 邊界處理:沒有符合項時補全字串為空
    NSString *fixStr = suffixArray.count > 0 ? [suffixArray firstObject] : @"";

    // 6. 計算需要設為透明(已輸入)的長度
    NSInteger cutLenth = suffixArray.count > 0 ? completeStr.length : emailString.length;

    // 7. 最終結果
    self.email = fixStr.length > 0
        ? [NSString stringWithFormat:@"%@%@", emailString, fixStr]
        : completeStr;

    // 8. 用 attributed string 呈現:已輸入部分透明,補全部分顯色
    NSMutableAttributedString *attributeString = [[NSMutableAttributedString alloc]
        initWithString:[NSString stringWithFormat:@"%@%@", emailString, fixStr]];
    [attributeString addAttribute:NSForegroundColorAttributeName
                            value:[UIColor clearColor]
                            range:NSMakeRange(0, cutLenth)];
    self.mailLabel.attributedText = attributeString;

    // 9. 清空輸入時同步隱藏提示
    if (completeStr.length == 0) {
        self.mailLabel.text = @"";
        self.email = @"";
    }
}
五、一個值得注意的設計取捨
為什麼要多一個 label,而不是直接用 attributed placeholder?實測在單一 textField 上做即時 attributed 更新時,會遇到游標跳動與部分 iOS 版本上的顯示異常。改用獨立 label 覆蓋呈現,雖然多了一層同步邏輯,但行為穩定得多。這類「用多一個 view 換取可控性」的取捨,在自製輸入元件時經常出現。
六、總結
郵箱模糊匹配本質上是「前綴比對 + 後綴補全 + 雙色渲染」三件事的組合,難點在邊界條件(有無 @、清單是否命中、清空輸入)。有興趣的朋友可以照著動手實作一次,對自己的需求做定制。祝大家開發順利。
- 上一篇文章: 微信支付時序圖解讀:一次支付的完整旅程
- 下一篇文章: iOS NSArray 與 NSMutableArray 常用操作整理