iOS 10 推送大改:UserNotifications 框架與 UNNotificationCategory 實作
從 iOS 8 開始,推送相關的 API 幾乎每個大版本都在變,功能也不斷累加。iOS 10 又引入了通知擴充(類似 Today Widget 的開發方式),這裡直接上程式碼。
啟動時的變化
#import <UserNotifications/UserNotifications.h>

- (BOOL)application:(UIApplication *)application
didFinishLaunchingWithOptions:(NSDictionary *)launchOptions {
    /* App 未啟動時點擊本地通知的情況:
       iOS 10 已棄用 UIApplicationLaunchOptionsLocalNotificationKey,
       改由 UNUserNotificationCenterDelegate 的
       didReceiveNotificationResponse:withCompletionHandler: 取得 */

    NSDictionary *remoteUserInfo = launchOptions[UIApplicationLaunchOptionsRemoteNotificationKey];
    if (remoteUserInfo) {
        NSLog(@"remoteUserInfo:%@", remoteUserInfo);
        // 遠程推送在 iOS 10 下仍舊在這裡取得
    }

    [self registerNotification];
    return YES;
}
註冊方法的改寫
新增 UserNotifications 框架,通知的授權、動作與類別統一由 UNUserNotificationCenter 管理。
- (void)registerNotification {
    /* UNNotificationAction 參數說明
       identifier:行為標識,代理回呼時用來辨識是哪個按鈕
       title:按鈕顯示文字
       options:UNNotificationActionOptionForeground 表示點擊後會開啟 App
       UNTextInputNotificationAction 額外提供文字輸入框
       textInputButtonTitle / textInputPlaceholder:輸入框的按鈕文字與佔位文字 */

    UNNotificationAction *action1 =
    [UNNotificationAction actionWithIdentifier:@"action1"
                                         title:@"策略1行為1"
                                       options:UNNotificationActionOptionForeground];

    UNTextInputNotificationAction *action2 =
    [UNTextInputNotificationAction actionWithIdentifier:@"action2"
                                                 title:@"策略1行為2"
                                               options:UNNotificationActionOptionDestructive
                                   textInputButtonTitle:@"textInputButtonTitle"
                                   textInputPlaceholder:@"textInputPlaceholder"];

    UNNotificationCategory *category1 =
    [UNNotificationCategory categoryWithIdentifier:@"Category1"
                                           actions:@[action2, action1]
                                     minimalActions:@[action2, action1]
                                   intentIdentifiers:@[@"action1", @"action2"]
                                             options:UNNotificationCategoryOptionCustomDismissAction];

    UNNotificationAction *action3 =
    [UNNotificationAction actionWithIdentifier:@"action3"
                                         title:@"策略2行為1"
                                       options:UNNotificationActionOptionForeground];

    UNNotificationAction *action4 =
    [UNNotificationAction actionWithIdentifier:@"action4"
                                         title:@"策略2行為2"
                                       options:UNNotificationActionOptionForeground];

    UNNotificationCategory *category2 =
    [UNNotificationCategory categoryWithIdentifier:@"Category2"
                                           actions:@[action3, action4]
                                     minimalActions:@[action3, action4]
                                   intentIdentifiers:@[@"action3", @"action4"]
                                             options:UNNotificationCategoryOptionCustomDismissAction];

    [[UNUserNotificationCenter currentNotificationCenter]
        setNotificationCategories:[NSSet setWithObjects:category1, category2, nil]];

    [[UNUserNotificationCenter currentNotificationCenter]
        requestAuthorizationWithOptions:(UNAuthorizationOptionBadge |
                                          UNAuthorizationOptionSound |
                                          UNAuthorizationOptionAlert)
                      completionHandler:^(BOOL granted, NSError * _Nullable error) {
        NSLog(@"completionHandler");
    }];

    [[UIApplication sharedApplication] registerForRemoteNotifications];
    [UNUserNotificationCenter currentNotificationCenter].delegate = self;
}
這裡有幾個關鍵差異值得留意。iOS 9 的 UIMutableUserNotificationAction 用 activationMode 決定是否前台啟動,iOS 10 改為在 options 上直接指定;iOS 9 用 setActions:forContext: 區分「鎖定時顯示幾個」與「未鎖定時顯示幾個」,iOS 10 則在建構 category 時用 actions 與 minimalActions 兩個參數表達;category 名稱也必須與服務端 payload 裡的 category 欄位完全一致,否則通知下方不會出現任何按鈕。
代理方法的整併
iOS 10 把本地與遠程通知的回呼收攏到同一組代理方法裡。
#pragma mark - 通知相關回呼

- (void)userNotificationCenter:(UNUserNotificationCenter *)center
       willPresentNotification:(UNNotification *)notification
         withCompletionHandler:(void (^)(UNNotificationPresentationOptions))completionHandler {
    NSLog(@"willPresentNotification:%@", notification.request.content.title);
    // App 在前台時收到通知,自行決定要不要顯示
    NSString *notMess = [notification.request.content.userInfo objectForKey:@"aps"];
}

- (void)userNotificationCenter:(UNUserNotificationCenter *)center
   didReceiveNotificationResponse:(UNNotificationResponse *)response
             withCompletionHandler:(void (^)())completionHandler {
    // 使用者實際點了通知或某個 action 按鈕時呼叫
    // 用 response.actionIdentifier 判斷點的是哪個按鈕
    NSString *notMess = [response.notification.request.content.userInfo objectForKey:@"aps"];
    NSLog(@"didReceiveNotificationResponse:%@", response.notification.request.content.title);
}

#pragma mark - 遠程推送註冊

- (void)application:(UIApplication *)application
didRegisterForRemoteNotificationsWithDeviceToken:(NSData *)deviceToken {
    NSString *deviceTokenSt = [[[[deviceToken description]
        stringByReplacingOccurrencesOfString:@"<" withString:@""]
        stringByReplacingOccurrencesOfString:@">" withString:@""]
        stringByReplacingOccurrencesOfString:@" " withString:@""];
    NSLog(@"deviceTokenSt:%@", deviceTokenSt);
}

- (void)application:(UIApplication *)application
didFailToRegisterForRemoteNotificationsWithError:(NSError *)error {
    NSLog(@"didFailToRegisterForRemoteNotificationsWithError:%@", error);
}

// 靜默推送:App 在前台收到,需要在 completionHandler 回報處理結果
- (void)application:(UIApplication *)application
didReceiveRemoteNotification:(NSDictionary *)userInfo
      fetchCompletionHandler:(void (^)(UIBackgroundFetchResult))completionHandler {
    NSLog(@"didReceiveRemoteNotification:%@", userInfo);
}
deviceToken 印出來是 NSData 的十六進位描述,字串前後還帶著 < > 與空白,實際要回報給伺服器前記得清乾淨,上面那段串接就是為了這個。
另外,iOS 9 時代的 didReceiveRemoteNotification: 與 handleActionWithIdentifier:forRemoteNotification:、didReceiveLocalNotification:、handleActionWithIdentifier:forLocalNotification: 都已被標記為棄用,新專案直接改用 UNUserNotificationCenterDelegate 的兩個方法即可。
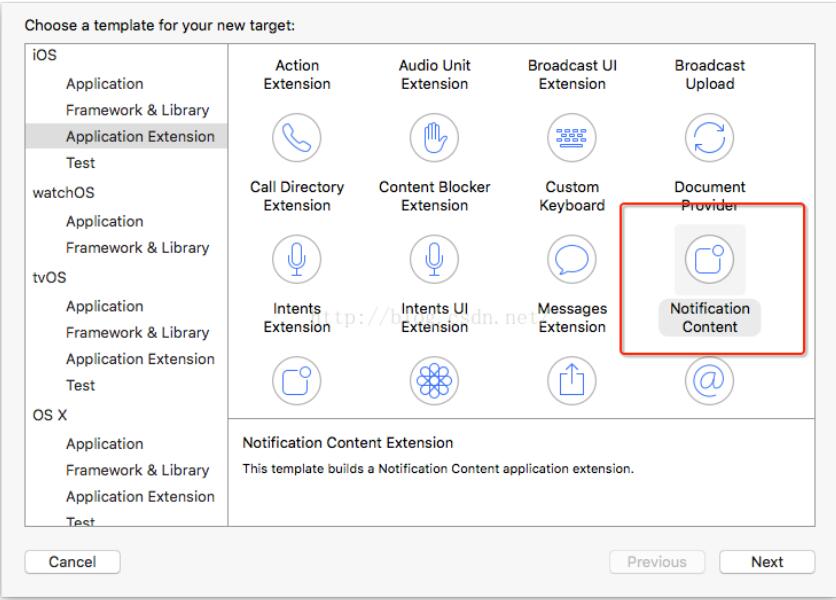
通知擴充
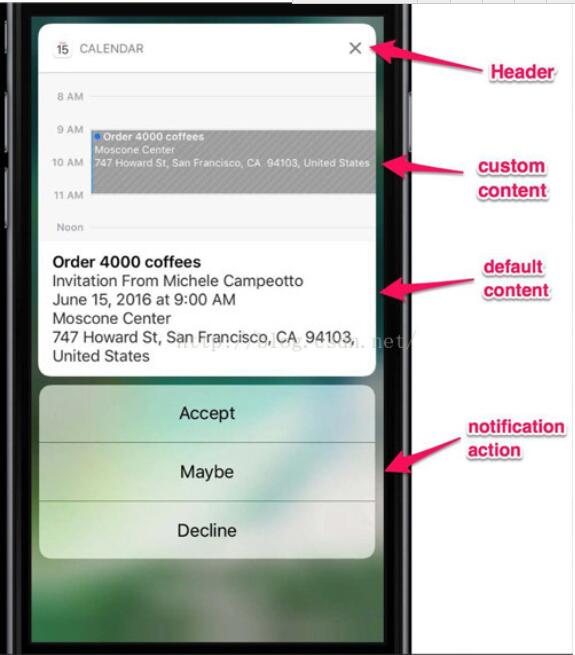
iOS 10 還開放通知擴充開發,方式與 Today Widget 類似,可以在通知裡嵌入自訂 UI 與互動。