
仿時光網選票橫幅:用 UIScrollView 打造居中放大效果
編輯:iOS 開發綜合
一、專案簡介
這是一個靠 UIScrollView 各階段滾動事件做出來的橫幅選票元件,模仿時光網的電影場次選擇體驗。用法簡單、擴充性夠,功能包括:點任一項目即可選票、選中項目自動居中、滑動中依距離中心遠近即時縮放,並且針對「放手時有沒有初速」分成兩條路徑處理。
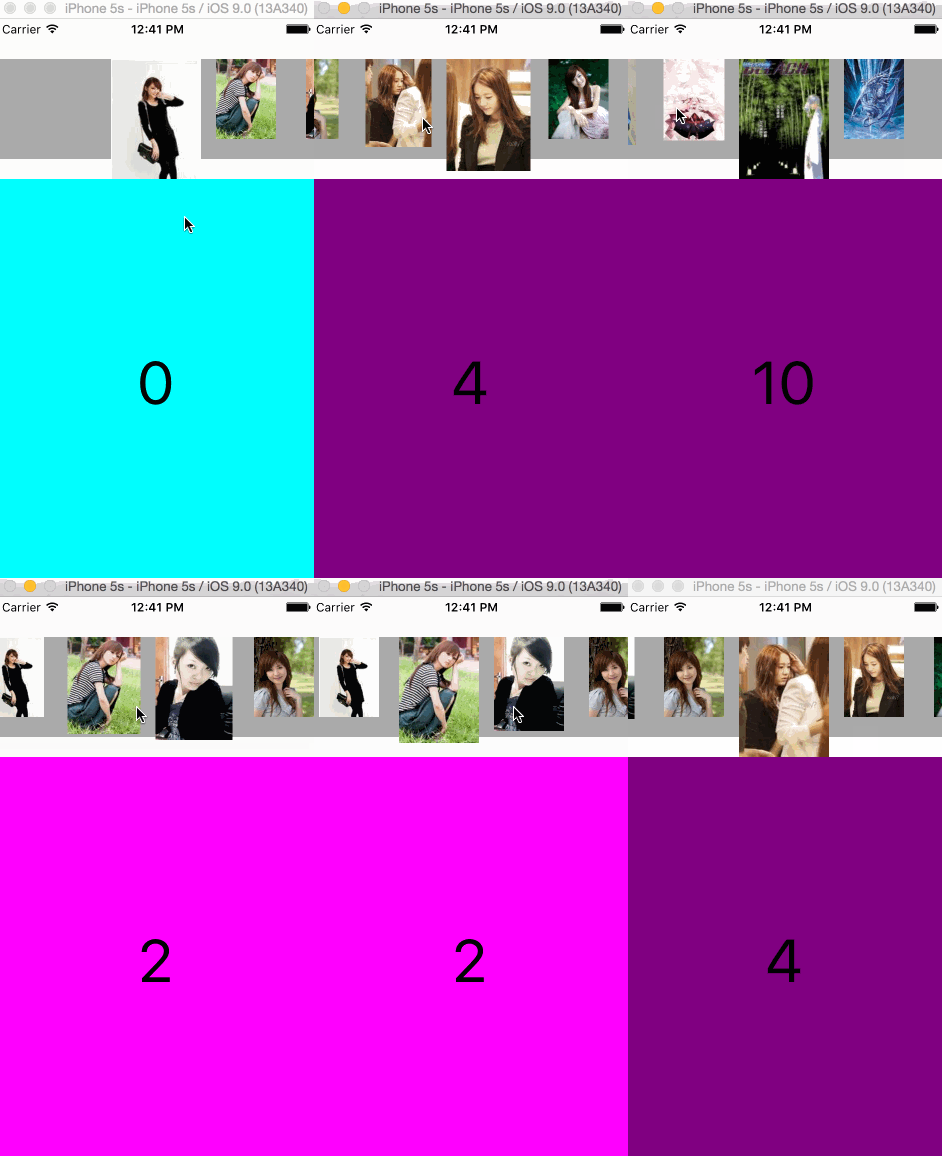
二、原理拆解
1. 建立每個項目並統一管理
初始化時把每個 item 的 view 放進 _viewArray 方便定位與管理,內部的 UIImageView 則放進 _imageViewArray,之後滑動時要放大縮小就靠這個陣列。
- (instancetype)initViewWithImageArray:(NSArray *)imageArray {
    if (!imageArray) {
        return nil;
    }
    if (imageArray.count < 1) {
        return nil;
    }
    NSInteger totalNum = imageArray.count;
    self = [super initWithFrame:CGRectMake(0, 40, SCREEN_WIDTH, 120)];
    if (self) {
        _scrollview = [[UIScrollView alloc] initWithFrame:self.bounds];
        _scrollview.contentSize = CGSizeMake(LEFT_SPACE * 2 + SELECT_VIEW_WIDTH
                                             + (totalNum - 1) * NORMAL_VIEW_WIDTH
                                             + (totalNum - 1) * ITEM_SPACE, 120);
        _scrollview.delegate = self;
        _scrollview.showsHorizontalScrollIndicator = NO;
        _scrollview.decelerationRate = UIScrollViewDecelerationRateFast;
        [self addSubview:_scrollview];

        UIView *backView = [[UIView alloc] initWithFrame:CGRectMake(-SCREEN_WIDTH, 0,
                              _scrollview.contentSize.width + SCREEN_WIDTH * 2,
                              _scrollview.contentSize.height - 20)];
        backView.backgroundColor = [UIColor lightGrayColor];
        [_scrollview addSubview:backView];

        _imageViewArray = [NSMutableArray array];
        _viewArray = [NSMutableArray array];

        CGFloat offsetX = LEFT_SPACE;
        for (int i = 0; i < totalNum; i++) {
            UIView *view = [[UIView alloc] initWithFrame:CGRectMake(offsetX, 0, NORMAL_VIEW_WIDTH, NORMAL_VIEW_HEIGHT)];
            [_scrollview addSubview:view];
            [_viewArray addObject:view];
            offsetX += NORMAL_VIEW_WIDTH + ITEM_SPACE;

            CGRect rect;
            if (i == 0) {
                // 第一個預設就是選中狀態,直接放大
                rect = CGRectMake(-(SELECT_VIEW_WIDTH - NORMAL_VIEW_WIDTH) / 2, 0,
                                  SELECT_VIEW_WIDTH, SELECT_VIEW_HEIGHT);
            } else {
                rect = CGRectMake(0, 0, NORMAL_VIEW_WIDTH, NORMAL_VIEW_HEIGHT);
            }

            UIImageView *imageView = [[UIImageView alloc] initWithFrame:rect];
            imageView.image = imageArray[i];
            imageView.tag = i;
            imageView.userInteractionEnabled = YES;
            UITapGestureRecognizer *tap = [[UITapGestureRecognizer alloc] initWithTarget:self
                                                                                 action:@selector(clickImage:)];
            [imageView addGestureRecognizer:tap];
            [view addSubview:imageView];
            [_imageViewArray addObject:imageView];
        }
    }
    return self;
}
2. 滑動時即時縮放
滾動過程中要隨時判斷哪個項目離中心最近。過渡期間,離中心越近的項目 frame 越大,越遠則越小,兩個相鄰項目之間做線性插值即可。
- (void)scrollViewDidScroll:(UIScrollView *)scrollView {
    int currentIndex = scrollView.contentOffset.x / (NORMAL_VIEW_WIDTH + ITEM_SPACE);
    if (currentIndex > _imageViewArray.count - 2 || currentIndex < 0) {
        return;
    }
    int rightIndex = currentIndex + 1;
    UIImageView *currentImageView = _imageViewArray[currentIndex];
    UIImageView *rightImageView   = _imageViewArray[rightIndex];

    CGFloat scale = (scrollView.contentOffset.x - currentIndex * (NORMAL_VIEW_WIDTH + ITEM_SPACE))
                    / (NORMAL_VIEW_WIDTH + ITEM_SPACE);

    // 左邊那張由大變小
    CGFloat width  = SELECT_VIEW_WIDTH  - scale * (SELECT_VIEW_WIDTH  - NORMAL_VIEW_WIDTH);
    CGFloat height = SELECT_VIEW_HEIGHT - scale * (SELECT_VIEW_HEIGHT - NORMAL_VIEW_HEIGHT);
    if (width  < NORMAL_VIEW_WIDTH)  { width  = NORMAL_VIEW_WIDTH;  }
    if (height < NORMAL_VIEW_HEIGHT) { height = NORMAL_VIEW_HEIGHT; }
    if (width  > SELECT_VIEW_WIDTH)  { width  = SELECT_VIEW_WIDTH;  }
    if (height > SELECT_VIEW_HEIGHT) { height = SELECT_VIEW_HEIGHT; }
    currentImageView.frame = CGRectMake(-(width - NORMAL_VIEW_WIDTH) / 2, 0, width, height);

    // 右邊那張由小變大
    width  = NORMAL_VIEW_WIDTH  + scale * (SELECT_VIEW_WIDTH  - NORMAL_VIEW_WIDTH);
    height = NORMAL_VIEW_HEIGHT + scale * (SELECT_VIEW_HEIGHT - NORMAL_VIEW_HEIGHT);
    if (width  < NORMAL_VIEW_WIDTH)  { width  = NORMAL_VIEW_WIDTH;  }
    if (height < NORMAL_VIEW_HEIGHT) { height = NORMAL_VIEW_HEIGHT; }
    if (width  > SELECT_VIEW_WIDTH)  { width  = SELECT_VIEW_WIDTH;  }
    if (height > SELECT_VIEW_HEIGHT) { height = SELECT_VIEW_HEIGHT; }
    rightImageView.frame = CGRectMake(-(width - NORMAL_VIEW_WIDTH) / 2, 0, width, height);
}
3. 點擊項目使其居中
- (void)clickImage:(UITapGestureRecognizer *)tap {
    UIImageView *imageView = (UIImageView *)tap.view;
    NSInteger tag = imageView.tag;
    UIView *containerView = _viewArray[tag];
    CGFloat offsetX = CGRectGetMidX(containerView.frame) - SCREEN_WIDTH / 2;
    [_scrollview scrollRectToVisible:CGRectMake(offsetX, 0, SCREEN_WIDTH, 120) animated:YES];
    if (_delegate && [_delegate respondsToSelector:@selector(itemSelected:)]) {
        [_delegate itemSelected:tag];
    }
}
4. 放手時有初速:等減速結束再對齊
使用者滑完放手,若還帶著速度,scrollView 會進入 decelerating 階段,對齊動作要等到减速結束才做。
- (void)scrollViewDidEndDecelerating:(UIScrollView *)scrollView {
    int currentIndex = roundf(scrollView.contentOffset.x / (NORMAL_VIEW_WIDTH + ITEM_SPACE));
    UIView *containerView = _viewArray[currentIndex];
    CGFloat offsetX = CGRectGetMidX(containerView.frame) - SCREEN_WIDTH / 2;
    [_scrollview scrollRectToVisible:CGRectMake(offsetX, 0, SCREEN_WIDTH, 120) animated:YES];
    if (_delegate && [_delegate respondsToSelector:@selector(itemSelected:)]) {
        [_delegate itemSelected:currentIndex];
    }
}
5. 放手時沒有初速:走另一條路徑
若放手時沒有速度,didEndDecelerating 根本不會觸發,得在 didEndDragging:willDecelerate: 裡攔下來處理。
- (void)scrollViewDidEndDragging:(UIScrollView *)scrollView willDecelerate:(BOOL)decelerate {
    if (!decelerate) {
        int currentIndex = roundf(scrollView.contentOffset.x / (NORMAL_VIEW_WIDTH + ITEM_SPACE));
        UIView *containerView = _viewArray[currentIndex];
        CGFloat offsetX = CGRectGetMidX(containerView.frame) - SCREEN_WIDTH / 2;
        [_scrollview scrollRectToVisible:CGRectMake(offsetX, 0, SCREEN_WIDTH, 120) animated:YES];
        if (_delegate && [_delegate respondsToSelector:@selector(itemSelected:)]) {
            [_delegate itemSelected:currentIndex];
        }
    }
}
6. 一個容易忽略的細節
把 _scrollview.decelerationRate 設為 UIScrollViewDecelerationRateFast,能讓滾動提早停下,操作手感反而更俐落。
三、使用方式
1. 支援 CocoaPods:
pod 'YXFilmSelectView', '~> 0.0.1'
2. 建立元件:
YXFilmSelectView *filmSelectView = [[YXFilmSelectView alloc] initViewWithImageArray:imageArray];
filmSelectView.delegate = self;
[self.view addSubview:filmSelectView];
3. 透過 YXFilmSelectViewDelegate 接收選中事件:
- (void)itemSelected:(NSInteger)index {
    _containerView.backgroundColor = _colorArray[index % _colorArray.count];
    _showLabel.text = [NSString stringWithFormat:@"%zi", index];
}
四、Demo
需要完整專案的朋友可以從範例倉庫下載,以上就是這個選票橫幅的實作分享。
- 上一篇文章: iOS App 如何在背景活得久一點:墓碑機制下的突圍思路
- 下一篇文章: iOS 遠端推送通知入門:DeviceToken 的取得與回報