
iOS 委託機制與文字輸入的實戰(依 iOS 程式設計整理)
一、加入 UITextField
本篇繼續開發 JXHypnoNerd。首先在 JXHypnosisViewController.m 的 loadView 方法中,往 view 裡加入一個 UITextField:
#import "JXHypnosisViewController.h" #import "JXHypnosisView.h" @interface JXHypnosisViewController () @end @implementation JXHypnosisViewController - (instancetype)initWithNibName:(NSString *)nibNameOrNil bundle:(NSBundle *)nibBundleOrNil { self = [super initWithNibName:nibNameOrNil bundle:nibBundleOrNil]; if (self) { // 設置標簽項的標題 self.tabBarItem.title = @"Hypnotize"; // 從圖片文件創建一個 UIImage 對象 UIImage * i = [UIImage imageNamed:@"Hypno"]; // 將 UIImage 對象賦值給標簽項的 iamge 屬性 self.tabBarItem.image = i; } return self; } - (void)viewDidLoad { [super viewDidLoad]; } - (void)loadView { // 創建一個 JXHypnosisView 對象 JXHypnosisView * backgroundView = [[JXHypnosisView alloc] init]; CGRect textFieldRect = CGRectMake(40, 70, 240, 30); UITextField * textField = [[UITextField alloc] init]; textField.frame = textFieldRect; // 設置 UITextField 對象的邊框樣式,便於查看它在屏幕上的位置 textField.borderStyle = UITextBorderStyleRoundedRect; [backgroundView addSubview:textField]; // 將 JXHypnosisView 對象賦給視圖控制器的view 屬性 self.view = backgroundView; } @end
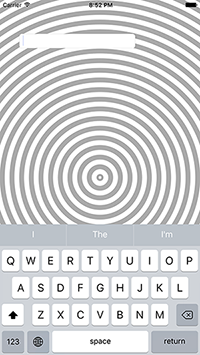
建置並執行後,畫面上會出現一個圓角框線的輸入框。點它,鍵盤會從底部彈出。
二、UIResponder 與第一響應者
UIResponder 是 UIKit 中的抽象類,我們先前接觸過它的幾個子類:UIView、UIViewController、UIApplication。
它定義了一整套接收與處理使用者事件的方法,包含觸碰事件、晃動裝置產生的運動事件,以及編輯文字、控制音樂播放這類功能控制事件。子類會覆寫這些方法,寫入自己的回應邏輯。
觸碰事件顯然該由被觸碰的視圖處理,系統會直接送到該視圖;其他類型的事件則交給第一響應者。UIWindow 有一個 firstResponder 屬性指向第一響應者,例如使用者點擊 UITextField 時,該輸入框就成為第一響應者,之後的運動事件與功能控制事件都會送給它。
當 UITextField 或 UITextView 成為第一響應者時,鍵盤就會彈出。除了使用者點擊,也可以在程式碼中送出 becomeFirstResponder 訊息讓它成為第一響應者;相對地,送出 resignFirstResponder 就能要求它放棄這個身分,鍵盤隨之消失。
其實大多數視圖都不需要成為第一響應者。例如 UISlider 只處理觸碰事件(使用者拖曳滑桿),因此完全不必參與第一響應者的競爭。
三、設定鍵盤的外觀
UITextField 提供了一系列屬性來調整鍵盤與輸入框外觀。下面加上占位文字,並把換行鍵改成 Done:
#import "JXHypnosisViewController.h" #import "JXHypnosisView.h" @interface JXHypnosisViewController () @end @implementation JXHypnosisViewController - (instancetype)initWithNibName:(NSString *)nibNameOrNil bundle:(NSBundle *)nibBundleOrNil { self = [super initWithNibName:nibNameOrNil bundle:nibBundleOrNil]; if (self) { // 設置標簽項的標題 self.tabBarItem.title = @"Hypnotize"; // 從圖片文件創建一個 UIImage 對象 UIImage * i = [UIImage imageNamed:@"Hypno"]; // 將 UIImage 對象賦值給標簽項的 iamge 屬性 self.tabBarItem.image = i; } return self; } - (void)viewDidLoad { [super viewDidLoad]; } - (void)loadView { // 創建一個 JXHypnosisView 對象 JXHypnosisView * backgroundView = [[JXHypnosisView alloc] init]; CGRect textFieldRect = CGRectMake(40, 70, 240, 30); UITextField * textField = [[UITextField alloc] init]; textField.frame = textFieldRect; // 設置 UITextField 對象的邊框樣式,便於查看它在屏幕上的位置 textField.borderStyle = UITextBorderStyleRoundedRect; // 修改占位符 textField.placeholder = @"Hypontize me"; // 修改鍵盤類型 textField.returnKeyType = UIReturnKeyDone; [backgroundView addSubview:textField]; // 將 JXHypnosisView 對象賦給視圖控制器的view 屬性 self.view = backgroundView; } @end
執行後可以看到占位文字 Hypontize me,一旦開始輸入它就會消失;換行鍵也不再顯示預設的 Return,而是 Done。
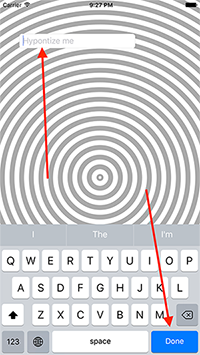
但按下 Done 卻毫無反應。原因很單純:改 returnKeyType 只改變了按鈕外觀,要讓它有行為,必須自己寫回應程式碼——這就需要委託。
四、委託設計模式
目標—動作(Target-Action)是 UIKit 最常用的設計模式之一:當特定事件發生(例如按下按鈕),事件源會向預先指定的目標物件送出一則設定好的動作訊息。所有繼承自 UIControl 的物件都能設定目標—動作。
不同事件需要不同的動作訊息。UIButton 的事件很單純,通常只處理點擊;但 UITextField 這類事件繁多的物件,蘋果改用委託模式處理。它有一個 delegate 屬性,只要設定好委託, textfield 在事件發生時就會主動送出對應訊息,由委託物件接手處理。例如與編輯文字內容相關的事件,就有一整組委託方法可用:
@protocol UITextFieldDelegate <NSObject> @optional - (BOOL)textFieldShouldBeginEditing:(UITextField *)textField; // return NO to disallow editing. - (void)textFieldDidBeginEditing:(UITextField *)textField; // became first responder - (BOOL)textFieldShouldEndEditing:(UITextField *)textField; // return YES to allow editing to stop and to resign first responder status. NO to disallow the editing session to end - (void)textFieldDidEndEditing:(UITextField *)textField; // may be called if forced even if shouldEndEditing returns NO (e.g. view removed from window) or endEditing:YES called - (BOOL)textField:(UITextField *)textField shouldChangeCharactersInRange:(NSRange)range replacementString:(NSString *)string; // return NO to not change text - (BOOL)textFieldShouldClear:(UITextField *)textField; // called when clear button pressed. return NO to ignore (no notifications) - (BOOL)textFieldShouldReturn:(UITextField *)textField; // called when 'return' key pressed. return NO to ignore. @end
注意:委託方法通常會把物件自身作為第一個參數。多個物件可能共用同一個委託,收到訊息時得靠這個參數判斷來源。例如某個視圖控制器裡有多個 UITextField、委託都是自己,那麼控制器就要依 textField 參數分辨是哪一個,再執行相應處理。
接著把 JXHypnosisViewController 設為該輸入框的委託,並實作 textFieldShouldReturn:,讓按下 Done 時能被呼叫:
#import "JXHypnosisViewController.h" #import "JXHypnosisView.h" @interface JXHypnosisViewController () @end @implementation JXHypnosisViewController - (instancetype)initWithNibName:(NSString *)nibNameOrNil bundle:(NSBundle *)nibBundleOrNil { self = [super initWithNibName:nibNameOrNil bundle:nibBundleOrNil]; if (self) { // 設置標簽項的標題 self.tabBarItem.title = @"Hypnotize"; // 從圖片文件創建一個 UIImage 對象 UIImage * i = [UIImage imageNamed:@"Hypno"]; // 將 UIImage 對象賦值給標簽項的 iamge 屬性 self.tabBarItem.image = i; } return self; } - (void)viewDidLoad { [super viewDidLoad]; } - (void)loadView { // 創建一個 JXHypnosisView 對象 JXHypnosisView * backgroundView = [[JXHypnosisView alloc] init]; CGRect textFieldRect = CGRectMake(40, 70, 240, 30); UITextField * textField = [[UITextField alloc] init]; textField.frame = textFieldRect; // 設置 UITextField 對象的邊框樣式,便於查看它在屏幕上的位置 textField.borderStyle = UITextBorderStyleRoundedRect; // 修改占位符 textField.placeholder = @"Hypontize me"; // 修改鍵盤類型 textField.returnKeyType = UIReturnKeyDone; textField.delegate = self; [backgroundView addSubview:textField]; // 將 JXHypnosisView 對象賦給視圖控制器的view 屬性 self.view = backgroundView; } - (BOOL)textFieldShouldReturn:(UITextField *)textField { NSLog(@"%@",textField.text); return YES; } @end
執行後,按下 Done 就能在控制台看到輸入內容(此處會出現一則警告,暫時忽略)。另外別忘了:不需要實作所有委託方法,UITextField 在執行期會自行檢查某方法是否已實作,沒實作就不會呼叫。
五、協議(Protocol)
凡是支援委託的物件,背後都有一個對應的協議,用來聲明可以向它的委託物件送出哪些訊息。委託方需依協議實作相應方法;一個類別若實作了協議中規定的方法,就稱它「遵守該協議」。
宣告協議時以 @protocol 起始,後接協議名稱(如 UITextFieldDelegate)。角括號裡的 NSObject 表示繼承 NSObject 協議,也就是把 NSObject 協議的全部方法一併納入;接著宣告本協議特有的方法,最後以 @end 收尾。
協議不是類別,只是一組方法宣告:不能為它建立物件,也不能加實例變數,協議本身不實作任何方法,實作交由遵守它的類別負責。
協議方法可以是必須的(required)或可選的(optional),預設為必須。自訂協議時最好明確標示,使用 @optional 之後的方法都會變成可選。
送方可選方法前,通常會先問一句 respondsToSelector:。所有 Objective-C 物件都從 NSObject 繼承了這個方法,可在執行期檢查物件是否實作了指定方法;@selector() 則能把選擇器轉成數值以便傳遞。
- (void)clearButtonTapped { // textFieldShouldClear:是可選方法,需要先檢查委托是否實現了該方法 SEL clearSelector = @selector(textFieldShouldClear:); if ([self.delegate respondsToSelector:clearSelector]) { self.text = @""; } }
若方法是必須的,送方可以直接送出訊息而不必檢查;一旦委託方沒實作,應用就會拋出 unrecognized selector 異常而崩潰。
為了在編譯階段就攔下這種疏漏,編譯器會檢查類別是否實作了協議中的必須方法——前提是必須先宣告該類別遵守協議。語法是在 @interface 敘述末尾、用角括號列出協議名稱,多個則以逗號分隔:
#import "JXHypnosisViewController.h" #import "JXHypnosisView.h" @interface JXHypnosisViewController ()<UITextFieldDelegate> @end @implementation JXHypnosisViewController - (instancetype)initWithNibName:(NSString *)nibNameOrNil bundle:(NSBundle *)nibBundleOrNil { self = [super initWithNibName:nibNameOrNil bundle:nibBundleOrNil]; if (self) { // 設置標簽項的標題 self.tabBarItem.title = @"Hypnotize"; // 從圖片文件創建一個 UIImage 對象 UIImage * i = [UIImage imageNamed:@"Hypno"]; // 將 UIImage 對象賦值給標簽項的 iamge 屬性 self.tabBarItem.image = i; } return self; } - (void)viewDidLoad { [super viewDidLoad]; } - (void)loadView { // 創建一個 JXHypnosisView 對象 JXHypnosisView * backgroundView = [[JXHypnosisView alloc] init]; CGRect textFieldRect = CGRectMake(40, 70, 240, 30); UITextField * textField = [[UITextField alloc] init]; textField.frame = textFieldRect; // 設置 UITextField 對象的邊框樣式,便於查看它在屏幕上的位置 textField.borderStyle = UITextBorderStyleRoundedRect; // 修改占位符 textField.placeholder = @"Hypontize me"; // 修改鍵盤類型 textField.returnKeyType = UIReturnKeyDone; textField.delegate = self; [backgroundView addSubview:textField]; // 將 JXHypnosisView 對象賦給視圖控制器的view 屬性 self.view = backgroundView; } - (BOOL)textFieldShouldReturn:(UITextField *)textField { NSLog(@"%@",textField.text); return YES; } @end
順帶一提,幾乎所有委託屬性都宣告為弱引用,目的就是避免物件與委託之間形成強引用循環。以本例來說,控制器持有 textfield 的強引用,若 textfield 再強引用它的委託(控制器),兩者就會互相牽住、誰也無法釋放。
六、在畫面上鋪滿 UILabel
接著新增一個方法,在畫面隨機位置撒上 20 個 UILabel,並用參數決定顯示的文字:
#import "JXHypnosisViewController.h" #import "JXHypnosisView.h" @interface JXHypnosisViewController ()<UITextFieldDelegate> @end @implementation JXHypnosisViewController - (instancetype)initWithNibName:(NSString *)nibNameOrNil bundle:(NSBundle *)nibBundleOrNil { self = [super initWithNibName:nibNameOrNil bundle:nibBundleOrNil]; if (self) { // 設置標簽項的標題 self.tabBarItem.title = @"Hypnotize"; // 從圖片文件創建一個 UIImage 對象 UIImage * i = [UIImage imageNamed:@"Hypno"]; // 將 UIImage 對象賦值給標簽項的 iamge 屬性 self.tabBarItem.image = i; } return self; } - (void)viewDidLoad { [super viewDidLoad]; } - (void)loadView { // 創建一個 JXHypnosisView 對象 JXHypnosisView * backgroundView = [[JXHypnosisView alloc] init]; CGRect textFieldRect = CGRectMake(40, 70, 240, 30); UITextField * textField = [[UITextField alloc] init]; textField.frame = textFieldRect; // 設置 UITextField 對象的邊框樣式,便於查看它在屏幕上的位置 textField.borderStyle = UITextBorderStyleRoundedRect; // 修改占位符 textField.placeholder = @"Hypontize me"; // 修改鍵盤類型 textField.returnKeyType = UIReturnKeyDone; textField.delegate = self; [backgroundView addSubview:textField]; // 將 JXHypnosisView 對象賦給視圖控制器的view 屬性 self.view = backgroundView; } - (BOOL)textFieldShouldReturn:(UITextField *)textField { NSLog(@"%@",textField.text); return YES; } - (void)drawHypnoticMessage:(NSString *)message { for (NSInteger i = 0; i < 20; i++) { UILabel * messageLabel = [[UILabel alloc] init]; // 設置 UIlabel 對象的文字和顏色 messageLabel.backgroundColor = [UIColor clearColor]; messageLabel.textColor = [UIColor whiteColor]; messageLabel.text = message; //根據要顯示的文字調整 UILabel 對象的大小 [messageLabel sizeToFit]; // 獲取隨機 x 坐標 // 使 UILabe 對象的寬度不超出控制器的 view 寬度 NSInteger width = self.view.bounds.size.width - messageLabel.bounds.size.width; NSInteger x = arc4random() % width; // 獲取隨機 y 坐標 // 使 UILabel 對象的高度不超出控制器的 view 寬度 NSInteger height = self.view.bounds.size.height - messageLabel.bounds.size.height; NSInteger y = arc4random() % height; // 設置 UILabel 對象的 frame CGRect frame = messageLabel.frame; frame.origin = CGPointMake(x, y); messageLabel.frame = frame; // 將 UILabel 對象添加到控制器的 view 中 [self.view addSubview:messageLabel]; } } @end
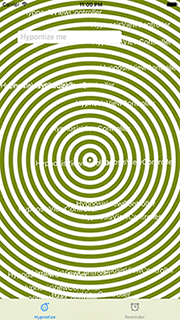
然後改寫 textFieldShouldReturn::把輸入的文字傳給自訂方法、清空輸入框,最後用 resignFirstResponder 收起鍵盤。
#import "JXHypnosisViewController.h" #import "JXHypnosisView.h" @interface JXHypnosisViewController ()<UITextFieldDelegate> @end @implementation JXHypnosisViewController - (instancetype)initWithNibName:(NSString *)nibNameOrNil bundle:(NSBundle *)nibBundleOrNil { self = [super initWithNibName:nibNameOrNil bundle:nibBundleOrNil]; if (self) { // 設置標簽項的標題 self.tabBarItem.title = @"Hypnotize"; // 從圖片文件創建一個 UIImage 對象 UIImage * i = [UIImage imageNamed:@"Hypno"]; // 將 UIImage 對象賦值給標簽項的 iamge 屬性 self.tabBarItem.image = i; } return self; } - (void)viewDidLoad { [super viewDidLoad]; } - (void)loadView { // 創建一個 JXHypnosisView 對象 JXHypnosisView * backgroundView = [[JXHypnosisView alloc] init]; CGRect textFieldRect = CGRectMake(40, 70, 240, 30); UITextField * textField = [[UITextField alloc] init]; textField.frame = textFieldRect; // 設置 UITextField 對象的邊框樣式,便於查看它在屏幕上的位置 textField.borderStyle = UITextBorderStyleRoundedRect; // 修改占位符 textField.placeholder = @"Hypontize me"; // 修改鍵盤類型 textField.returnKeyType = UIReturnKeyDone; textField.delegate = self; [backgroundView addSubview:textField]; // 將 JXHypnosisView 對象賦給視圖控制器的view 屬性 self.view = backgroundView; } - (BOOL)textFieldShouldReturn:(UITextField *)textField { NSLog(@"%@",textField.text); [self drawHypnoticMessage:textField.text]; textField.text = @""; [textField resignFirstResponder]; return YES; } - (void)drawHypnoticMessage:(NSString *)message { for (NSInteger i = 0; i < 20; i++) { UILabel * messageLabel = [[UILabel alloc] init]; // 設置 UIlabel 對象的文字和顏色 messageLabel.backgroundColor = [UIColor clearColor]; messageLabel.textColor = [UIColor whiteColor]; messageLabel.text = message; //根據要顯示的文字調整 UILabel 對象的大小 [messageLabel sizeToFit]; // 獲取隨機 x 坐標 // 使 UILabe 對象的寬度不超出控制器的 view 寬度 NSInteger width = self.view.bounds.size.width - messageLabel.bounds.size.width; NSInteger x = arc4random() % width; // 獲取隨機 y 坐標 // 使 UILabel 對象的高度不超出控制器的 view 寬度 NSInteger height = self.view.bounds.size.height - messageLabel.bounds.size.height; NSInteger y = arc4random() % height; // 設置 UILabel 對象的 frame CGRect frame = messageLabel.frame; frame.origin = CGPointMake(x, y); messageLabel.frame = frame; // 將 UILabel 對象添加到控制器的 view 中 [self.view addSubview:messageLabel]; } } @end
七、加入視差運動效果
iOS 裝置內建加速度感測器、磁力感測器與三軸陀螺儀,應用能藉此得知裝置的加速、方向與傾斜角度。從 iOS 7 起,蘋果提供了更便利的 API,能輕鬆做出隨傾斜而偏移的視差效果。
想像你坐在高速行駛的車上望向窗外,遠景的後退速度明顯比近景慢——這是視覺上的錯覺,稱為視差。iOS 7 之後這種效果隨處可見,例如稍微傾斜裝置,主畫面的圖示會相對壁紙位移。
實作上使用 UIInterpolatingMotionEffect:建立物件、設定方向(水平或垂直)、key path(要產生視差的屬性)與最小/最大相對值(位移範圍),再加到目標視圖上即可。
#import "JXHypnosisViewController.h" #import "JXHypnosisView.h" @interface JXHypnosisViewController ()<UITextFieldDelegate> @end @implementation JXHypnosisViewController - (instancetype)initWithNibName:(NSString *)nibNameOrNil bundle:(NSBundle *)nibBundleOrNil { self = [super initWithNibName:nibNameOrNil bundle:nibBundleOrNil]; if (self) { // 設置標簽項的標題 self.tabBarItem.title = @"Hypnotize"; // 從圖片文件創建一個 UIImage 對象 UIImage * i = [UIImage imageNamed:@"Hypno"]; // 將 UIImage 對象賦值給標簽項的 iamge 屬性 self.tabBarItem.image = i; } return self; } - (void)viewDidLoad { [super viewDidLoad]; } - (void)loadView { // 創建一個 JXHypnosisView 對象 JXHypnosisView * backgroundView = [[JXHypnosisView alloc] init]; CGRect textFieldRect = CGRectMake(40, 70, 240, 30); UITextField * textField = [[UITextField alloc] init]; textField.frame = textFieldRect; // 設置 UITextField 對象的邊框樣式,便於查看它在屏幕上的位置 textField.borderStyle = UITextBorderStyleRoundedRect; // 修改占位符 textField.placeholder = @"Hypontize me"; // 修改鍵盤類型 textField.returnKeyType = UIReturnKeyDone; textField.delegate = self; [backgroundView addSubview:textField]; // 將 JXHypnosisView 對象賦給視圖控制器的view 屬性 self.view = backgroundView; } - (BOOL)textFieldShouldReturn:(UITextField *)textField { [self drawHypnoticMessage:textField.text]; textField.text = @""; [textField resignFirstResponder]; return YES; } - (void)drawHypnoticMessage:(NSString *)message { for (NSInteger i = 0; i < 20; i++) { UILabel * messageLabel = [[UILabel alloc] init]; // 設置 UIlabel 對象的文字和顏色 messageLabel.backgroundColor = [UIColor clearColor]; messageLabel.textColor = [UIColor whiteColor]; messageLabel.text = message; //根據要顯示的文字調整 UILabel 對象的大小 [messageLabel sizeToFit]; // 獲取隨機 x 坐標 // 使 UILabe 對象的寬度不超出控制器的 view 寬度 NSInteger width = self.view.bounds.size.width - messageLabel.bounds.size.width; NSInteger x = arc4random() % width; // 獲取隨機 y 坐標 // 使 UILabel 對象的高度不超出控制器的 view 寬度 NSInteger height = self.view.bounds.size.height - messageLabel.bounds.size.height; NSInteger y = arc4random() % height; // 設置 UILabel 對象的 frame CGRect frame = messageLabel.frame; frame.origin = CGPointMake(x, y); messageLabel.frame = frame; // 將 UILabel 對象添加到控制器的 view 中 [self.view addSubview:messageLabel]; UIInterpolatingMotionEffect * motionEffect; motionEffect = [[UIInterpolatingMotionEffect alloc] initWithKeyPath:@"center.x" type:UIInterpolatingMotionEffectTypeTiltAlongHorizontalAxis]; motionEffect.minimumRelativeValue = @(-25); motionEffect.maximumRelativeValue = @(25); [messageLabel addMotionEffect:motionEffect]; motionEffect = [[UIInterpolatingMotionEffect alloc] initWithKeyPath:@"center.y" type:UIInterpolatingMotionEffectTypeTiltAlongVerticalAxis]; motionEffect.minimumRelativeValue = @(-25); motionEffect.maximumRelativeValue = @(25); [messageLabel addMotionEffect:motionEffect]; } } @end
要驗證運動效果,必須在真機上執行,模擬器不會有反應。
八、延伸:main() 與 UIApplication
不論用 C 還是 Objective-C,程式的進入點都是 main()。在 JXHypnoNerd 專案的 main.m 中可以看到:
#import <UIKit/UIKit.h> #import "AppDelegate.h" int main(int argc, char * argv[]) { @autoreleasepool { return UIApplicationMain(argc, argv, nil, NSStringFromClass([AppDelegate class])); } }
UIApplicationMain 會建立一個 UIApplication 物件。每個 iOS 應用有且只有一個 UIApplication,負責維護運行循環;一旦建立,這個循環就會持續運轉,main() 的執行也因此阻塞在這裡。
此外,UIApplicationMain 還會依最後一個參數(一個代表類別名稱的 NSString)建立指定類別的物件,並設為 UIApplication 的 delegate。以上例而言,就是建立一個 AppDelegate 並掛上去。
在應用啟動運行循環、開始接收事件之前,UIApplication 會先送出下列訊息,讓應用有機會完成初始化:
- (BOOL)application:(UIApplication *)application didFinishLaunchingWithOptions:(NSDictionary *)launchOptions
以上就是本篇關於 iOS 委託機制與文字輸入的完整整理。理解第一響應者、協議與弱引用委託這三件事,之後處理任何輸入相關的互動都會順手很多。若有疑問歡迎留言交流。
- 上一篇文章: iOS 實作只有底部框線的輸入框
- 下一篇文章: iOS 開發中 UIWebView 載入本地資料的三種方式