
iOS 實作格瓦拉風格的放大轉場動畫
用過格瓦拉電影這類 App 的朋友應該都看過:點擊某個按鈕後,畫面以放大效果完成轉場的動畫,現在相當流行。效果大致如下:
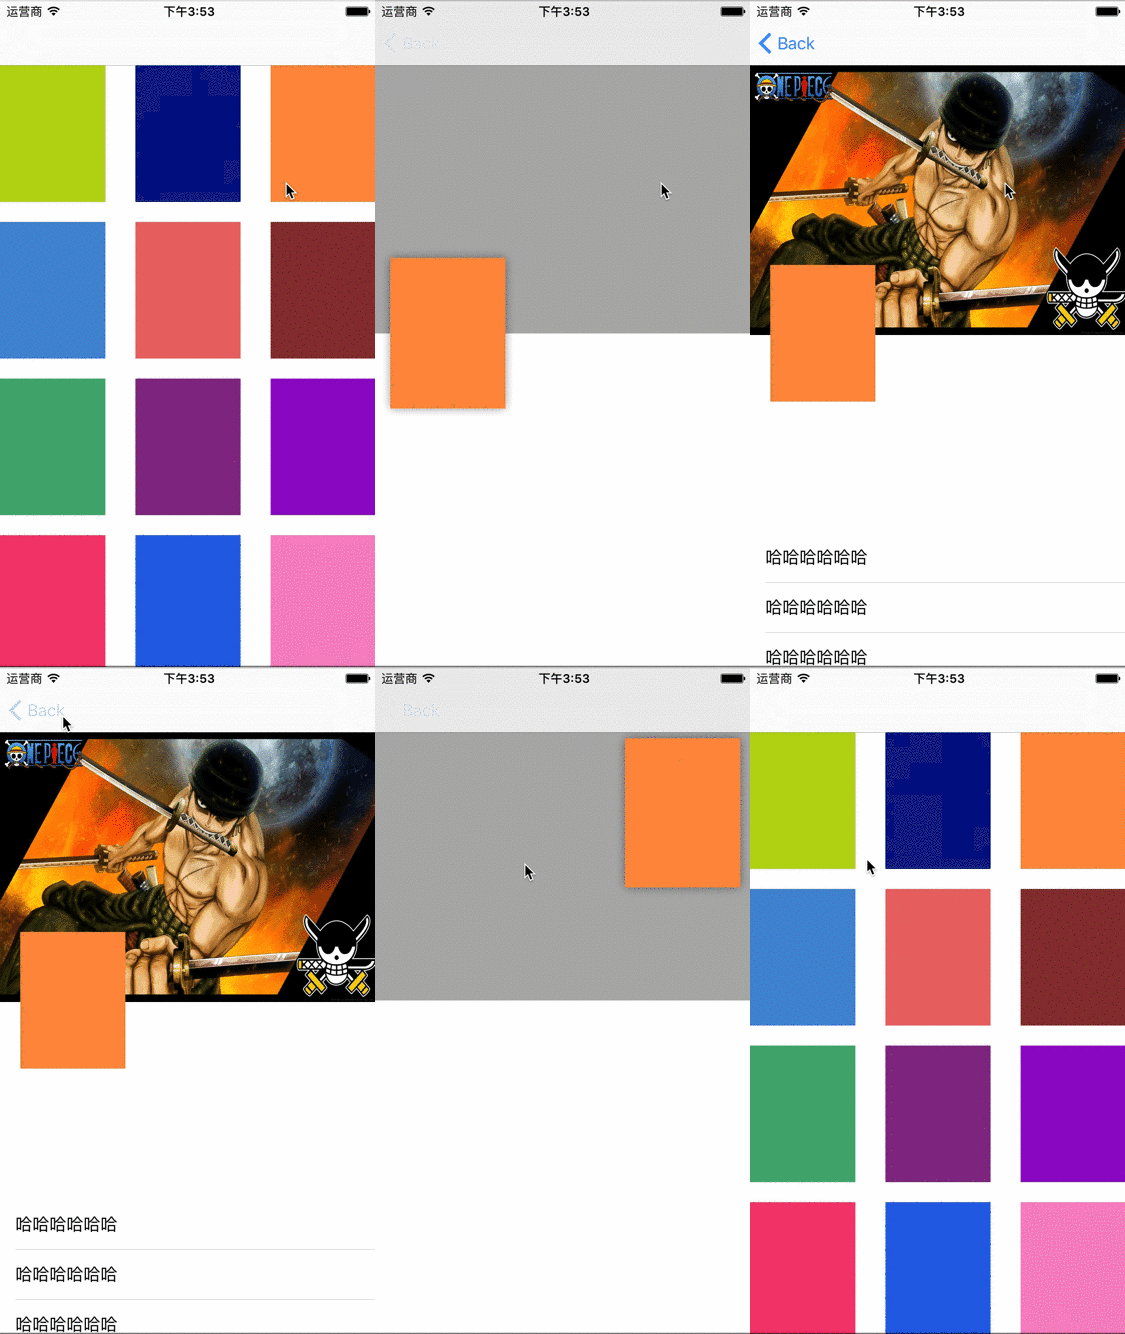
自定義轉場動畫
首先宣告一個遵守 UIViewControllerAnimatedTransitioning 協議的類別,並實作協議中的兩個方法:
// This is used for percent driven interactive transitions, as well as for container controllers that have companion animations that might need to // 返回轉場時間 - (NSTimeInterval)transitionDuration:(nullable id <UIViewControllerContextTransitioning>)transitionContext; // 轉場的動作 - (void)animateTransition:(id <UIViewControllerContextTransitioning>)transitionContext;
push 和 pop 都在 animateTransition: 裡實作,因此需要一個參數區分是 push 還是 pop,另外還要一個參數表示轉場時間:
#import <UIKit/UIKit.h> #import <Foundation/Foundation.h> typedef enum : NSUInteger { animate_push = 0, animate_pop = 1, } Animate_Type; @interface SFTrainsitionAnimate : NSObject<UIViewControllerAnimatedTransitioning> - (instancetype)initWithAnimateType:(Animate_Type)type andDuration:(CGFloat)dura; @property (assign, nonatomic) CGFloat duration; @property (assign, nonatomic) Animate_Type type; @end
那麼這個新物件該怎麼用呢?可以透過 UINavigationControllerDelegate 中的方法來回傳:
- (id<UIViewControllerAnimatedTransitioning>)navigationController:(UINavigationController *)navigationController animationControllerForOperation:(UINavigationControllerOperation)operation fromViewController:(UIViewController *)fromVC toViewController:(UIViewController *)toVC{ if (operation == UINavigationControllerOperationPush) { self.animate = [[SFTrainsitionAnimate alloc] init]; return self.animate; }else{ return nil; } }
當然,要觸發這個方法,得先把 UINavigationControllerDelegate 的委託交給視圖控制器:
self.navigationController.delegate = self;
再來看 UIViewControllerAnimatedTransitioning 協議,返回時間的方法就不多說了,重點在 animateTransition 這個方法:
- (void)animateTransition:(id<UIViewControllerContextTransitioning>)transitionContext{ //起始視圖控制器 UIViewController *fromVC = [transitionContext viewControllerForKey:UITransitionContextFromViewControllerKey]; //目標視圖控制器 UIViewController *toVC = [transitionContext viewControllerForKey:UITransitionContextToViewControllerKey]; //在這個視圖上實現跳轉動畫 UIView *containView = [transitionContext containerView]; }
如上註解,我們可以透過 transitionContext 參數取得起始與目標控制器,並在 containView 這個視圖上實現想要的動畫。
接下來就是轉場動畫的實作。push 動畫的流程大致是:點擊第一頁的某個控制項,模擬出一個鏡像視圖並移動到第二頁同樣式控制項的位置,接著再以該位置為中心,把第二頁以圓形擴散的方式顯示出來。
於是我們在協議方法中,先從 fromVC 取得第一頁的控制項,製造一個鏡像視圖移動到 toVC 的目標控制項位置。這裡我透過 UIViewController 的分類關聯了一個物件,用來記錄控制項(非擁有關係):
#import <UIKit/UIKit.h> #import <Foundation/Foundation.h> @interface UIViewController (SFTrainsitionExtension) @property (assign, nonatomic) CGFloat sf_targetHeight;//灰白背景的分割線高度 @property (weak , nonatomic) UIView *sf_targetView; @end
產生 targetView 鏡像:
//產生targetView鏡像 - (UIView *)customSnapshoFromView:(UIView *)inputView { // Make an image from the input view. UIGraphicsBeginImageContextWithOptions(inputView.bounds.size, NO, 0); [inputView.layer renderInContext:UIGraphicsGetCurrentContext()]; UIImage *image = UIGraphicsGetImageFromCurrentImageContext(); UIGraphicsEndImageContext(); // Create an image view. UIView *snapshot = [[UIImageView alloc] initWithImage:image]; snapshot.layer.masksToBounds = NO; snapshot.layer.cornerRadius = 0.0; snapshot.layer.shadowOffset = CGSizeMake(0.0, 0.0); snapshot.layer.shadowRadius = 5.0; snapshot.layer.shadowOpacity = 0.4; return snapshot; }
接著製作移動動畫:
//起始位置 CGRect originFrame = [fromVC.sf_targetView convertRect:fromVC.sf_targetView.bounds toView:fromVC.view]; //動畫移動的視圖鏡像 UIView *customView = [self customSnapshoFromView:fromVC.sf_targetView]; customView.frame = originFrame; //移動的目標位置 CGRect finishFrame = [toVC.sf_targetView convertRect:toVC.sf_targetView.bounds toView:toVC.view]; UIView *containView = [transitionContext containerView]; //背景視圖 灰色高度 CGFloat height = CGRectGetMidY(finishFrame); toVC.sf_targetHeight = height; //背景視圖 灰色 UIView *backgray = [[UIView alloc] initWithFrame:CGRectMake(0, 0, k_SF_SCREEN_WIDTH, k_SF_SCREEN_HIGHT)]; backgray.backgroundColor = [UIColor lightGrayColor]; //背景視圖 白色 UIView *backwhite = [[UIView alloc] initWithFrame:CGRectMake(0, height, k_SF_SCREEN_HIGHT, k_SF_SCREEN_HIGHT-height)]; backwhite.backgroundColor = [UIColor whiteColor]; toVC.view.frame = [transitionContext finalFrameForViewController:toVC]; //注意添加順序 [containView addSubview:toVC.view]; [containView addSubview:backgray]; [backgray addSubview:backwhite]; [containView addSubview:customView]; //動畫 [UIView animateWithDuration:_duration/3 animations:^{ customView.frame = finishFrame; customView.transform = CGAffineTransformMakeScale(1.1, 1.1); } completion:^(BOOL finished) { if (finished) { [UIView animateWithDuration:_duration/3 animations:^{ customView.transform = CGAffineTransformIdentity; } completion:^(BOOL finished) { if (finished) { [UIView animateWithDuration:_duration/3 animations:^{ customView.alpha = 0.0; } completion:^(BOOL finished) { if (finished) { [backgray removeFromSuperview]; [customView removeFromSuperview]; [transitionContext completeTransition:YES]; } }]; [self addPathAnimateWithView:backgray fromPoint:customView.center]; } }];
移動完成後,要以圓形擴散的方式顯示出 push 之後的介面。這可以透過 UIBezierPath 與 CAShapeLayer 來實現:UIBezierPath 表示路徑,CAShapeLayer 可依路徑顯示區域。先看看效果:
UIBezierPath *path = [UIBezierPath bezierPathWithRect:self.collectionView.bounds]; [path appendPath:[UIBezierPath bezierPathWithArcCenter:self.collectionView.center radius:50 startAngle:0 endAngle:2*M_PI clockwise:NO]]; CAShapeLayer *layer = [CAShapeLayer layer]; layer.path = path.CGPath; self.collectionView.layer.mask = layer;
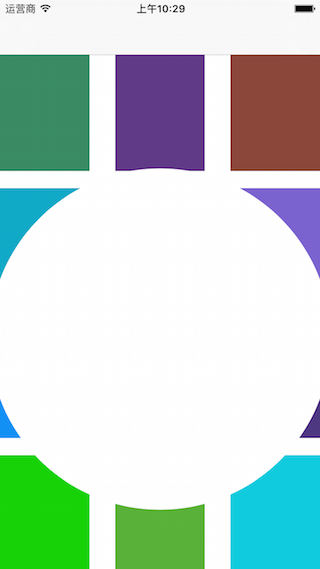
初始化 path 時,先沿 collectionView 四邊畫一個路徑,再加上一個以 collectionView 中心為圓心、半徑 50 的路徑,顯示的區域就是兩條路徑之間的部分。
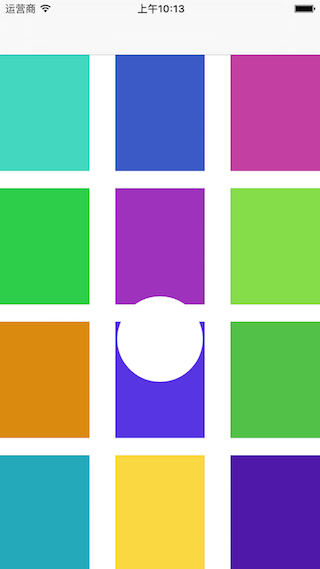
再把半徑改為 200:
接著建立一個 CABasicAnimation 物件來完成擴散動畫,起始是半徑 10 的圓,終點是半徑 200 的圓:
UIBezierPath *path = [UIBezierPath bezierPathWithRect:self.collectionView.bounds]; [path appendPath:[UIBezierPath bezierPathWithArcCenter:self.collectionView.center radius:10 startAngle:0 endAngle:2*M_PI clockwise:NO]]; UIBezierPath *path2 = [UIBezierPath bezierPathWithRect:self.collectionView.bounds]; [path2 appendPath:[UIBezierPath bezierPathWithArcCenter:self.collectionView.center radius:200 startAngle:0 endAngle:2*M_PI clockwise:NO]]; CAShapeLayer *layer = [CAShapeLayer layer]; self.collectionView.layer.mask = layer; CABasicAnimation *pathAnimation = [CABasicAnimation animationWithKeyPath:@"path"]; pathAnimation.fromValue = (__bridge id)path.CGPath; pathAnimation.toValue = (__bridge id)path2.CGPath; pathAnimation.duration = 1.0; pathAnimation.repeatCount = 1; pathAnimation.removedOnCompletion = NO; pathAnimation.fillMode = kCAFillModeForwards; pathAnimation.timingFunction = [CAMediaTimingFunction functionWithName:kCAMediaTimingFunctionEaseOut]; [layer addAnimation:pathAnimation forKey:@"pathAnimate"];
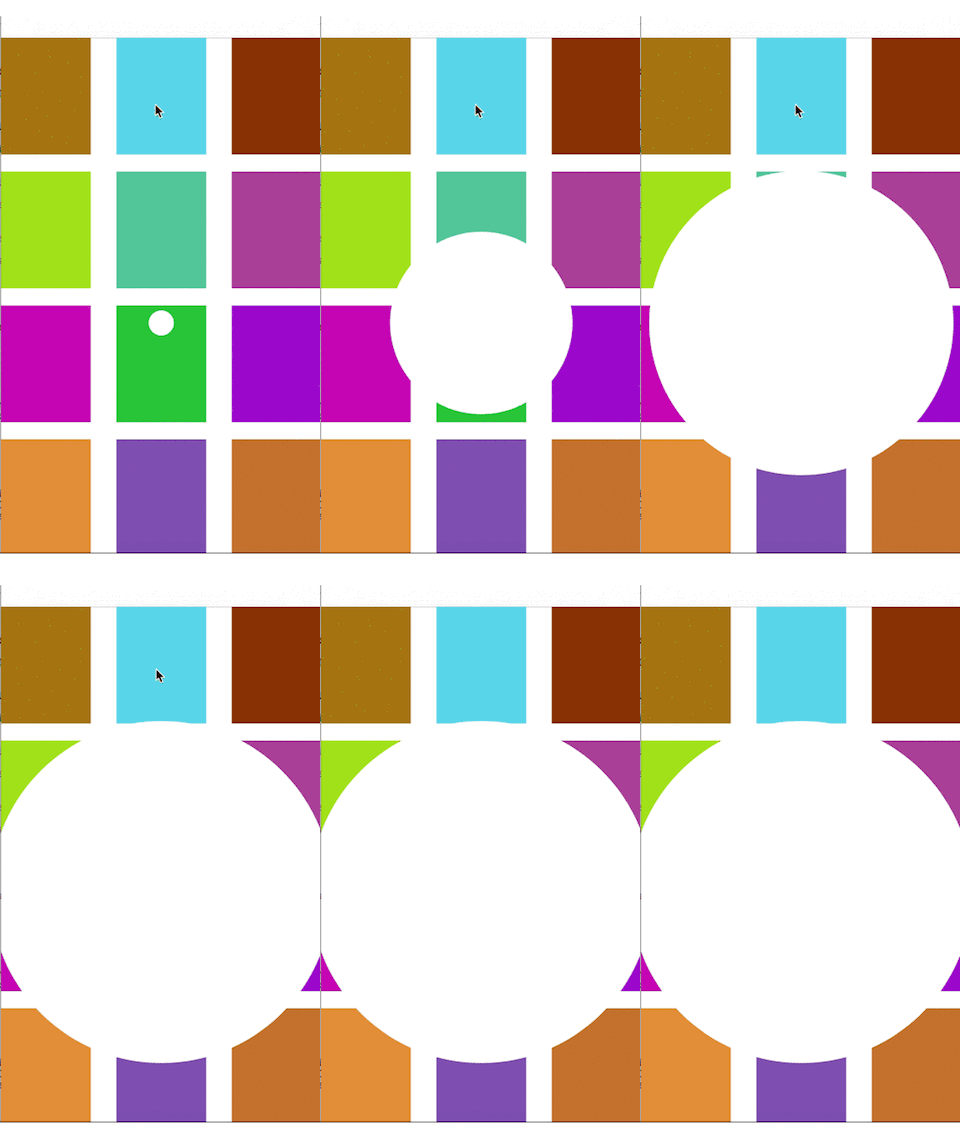
這樣 push 的轉場效果就完成了。要留意圓圈白色部分顯示的是 collectionView 底下的 self.view 視圖。
//加入收合動畫 - (void)addPathAnimateWithView:(UIView *)toView fromPoint:(CGPoint)point{ //create path UIBezierPath *path = [UIBezierPath bezierPathWithRect:CGRectMake(0, 0, k_SF_SCREEN_WIDTH, k_SF_SCREEN_HIGHT)]; //create path [path appendPath:[UIBezierPath bezierPathWithArcCenter:point radius:0.1 startAngle:0 endAngle:2*M_PI clockwise:NO]]; CGFloat radius = point.y > 0?k_SF_SCREEN_HIGHT*3/4: k_SF_SCREEN_HIGHT*3/4-point.y; UIBezierPath *path2 = [UIBezierPath bezierPathWithRect:CGRectMake(0, 0, k_SF_SCREEN_WIDTH, k_SF_SCREEN_HIGHT)]; [path2 appendPath:[UIBezierPath bezierPathWithArcCenter:point radius:radius startAngle:0 endAngle:2*M_PI clockwise:NO]]; CAShapeLayer *shapeLayer = [CAShapeLayer layer]; //shapeLayer.path = path.CGPath; toView.layer.mask = shapeLayer; CABasicAnimation *pathAnimation = [CABasicAnimation animationWithKeyPath:@"path"]; pathAnimation.fromValue = _type == animate_push? (__bridge id)path.CGPath:(__bridge id)path2.CGPath; pathAnimation.toValue = _type == animate_push? (__bridge id)path2.CGPath:(__bridge id)path.CGPath; pathAnimation.duration = _duration/3; pathAnimation.repeatCount = 1; pathAnimation.removedOnCompletion = NO; pathAnimation.fillMode = kCAFillModeForwards; pathAnimation.timingFunction = [CAMediaTimingFunction functionWithName:kCAMediaTimingFunctionEaseOut]; [shapeLayer addAnimation:pathAnimation forKey:@"pathAnimate"]; }
pop 動畫的原理和 push 差不多,這裡就不再贅述。以上是本文全部內容,希望對大家的學習或工作有所幫助,有疑問歡迎留言交流。
- 上一篇文章: iOS 開發:表視圖(UITableView)完全詳解
- 下一篇文章: iOS 視頻播放器封裝實作詳解