
UIBezierPath 屬性與方法完整整理(附效果圖)
做 iOS 只要碰到自訂圖形,大概都躲不開 UIBezierPath。因為使用頻率高,索性把它的屬性與方法整理成一份可隨時翻查的清單。
UIBezierPath 主要用於繪製向量圖形,它其實是 Core Graphics 中 CGPathRef 與 path 繪圖屬性的一層 Objective-C 封裝。正因為底層依賴圖形上下文(CGContextRef),所以它通常要在 drawRect: 裡使用,或在明確取得 UIGraphics 上下文的場合繪製。
屬性篇
CGPath:把 UIBezierPath 轉為 CGPathRef,性質類似 UIColor 的 CGColor。
empty:唯讀,判斷路徑上是否還有效元素。
bounds:取得 path 的 X、Y 座標與寬度,但高度固定為 0,這點和 view 的 bounds 不同,別混用。
currentPoint:目前路徑的位置,可理解為畫筆當前所在的終點。
lineWidth:線寬。
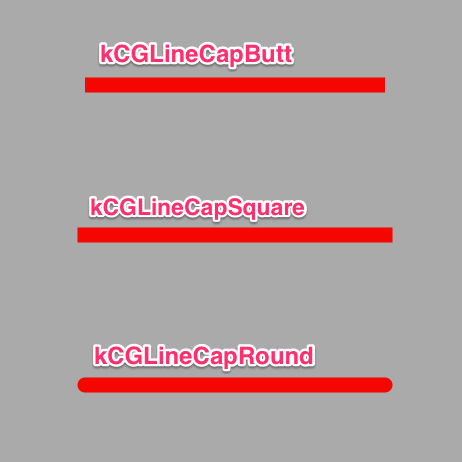
lineCapStyle:端點樣式,共三種。
- kCGLineCapButt:無端點,平頭
- kCGLineCapRound:圓形端點
- kCGLineCapSquare:方形端點(外觀接近 Butt,但會多出線寬一半的長度)
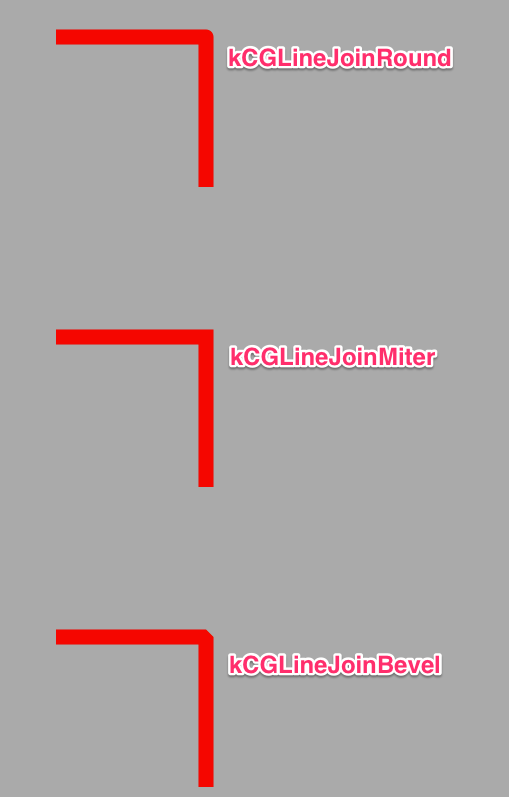
lineJoinStyle:轉角樣式。
- kCGLineJoinMiter:尖角
- kCGLineJoinRound:圓角
- kCGLineJoinBevel:缺角(斜切)
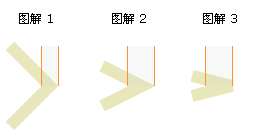
miterLimit:最大斜接長度,僅在 lineJoinStyle 為 Miter 時生效。兩邊夾角越小,尖角就拉得越長。
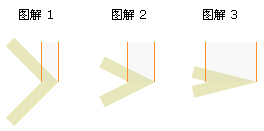
為了避免尖角突出過頭,可用 miterLimit 限制;一旦超過門檻,轉角會自動改以 Bevel 樣式呈現。
flatness:弧線的渲染精度,預設 0.6。數值越小越平滑,但 correspondingly 更耗效能。
usesEvenOddFillRule:是否以奇偶規則決定填充區域,預設 NO。做镂空效果時會用到它。
UIRectCorner:指定圓角的對象,可組合使用。
- UIRectCornerTopLeft:左上角
- UIRectCornerTopRight:右上角
- UIRectCornerBottomLeft:左下角
- UIRectCornerBottomRight:右下角
- UIRectCornerAllCorners:四個角
建立路徑的方法
// 1. 建立空路徑
+ (instancetype)bezierPath;

// 2. 矩形路徑,rect 為矩形 Frame
+ (instancetype)bezierPathWithRect:(CGRect)rect;

// 3. 內切橢圓/圓形,rect 為外圍矩形 Frame
+ (instancetype)bezierPathWithOvalInRect:(CGRect)rect;

// 4. 帶圓角的矩形;當矩形本身就是正圓時,cornerRadius 不再起作用
+ (instancetype)bezierPathWithRoundedRect:(CGRect)rect
                             cornerRadius:(CGFloat)cornerRadius;

// 5. 指定特定角為圓角
+ (instancetype)bezierPathWithRoundedRect:(CGRect)rect
                        byRoundingCorners:(UIRectCorner)corners
                              cornerRadii:(CGSize)cornerRadii;

// 6. 圓弧:center 圓心、radius 半徑、startAngle 起始角、endAngle 結束角、clockwise 是否順時針
+ (instancetype)bezierPathWithArcCenter:(CGPoint)center
                                 radius:(CGFloat)radius
                             startAngle:(CGFloat)startAngle
                               endAngle:(CGFloat)endAngle
                              clockwise:(BOOL)clockwise;

// 7. 由既有 CGPath 建立
+ (instancetype)bezierPathWithCGPath:(CGPathRef)CGPath;

// 8. 一般初始化
- (instancetype)init;
- (nullable instancetype)initWithCoder:(NSCoder *)aDecoder;

// 9. 轉為 CGPathRef
- (CGPathRef)CGPath;
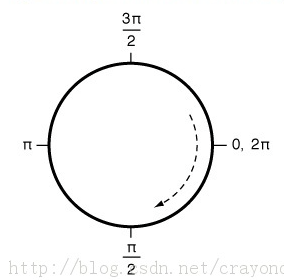
圓弧的角度起點是 3 點鐘方向,順時針為正,這張圖可以幫助對照:
繪製路徑的方法
// 移動畫筆到指定點(不會產生線條)
- (void)moveToPoint:(CGPoint)point;

// 從目前位置畫一直線到指定點
- (void)addLineToPoint:(CGPoint)point;

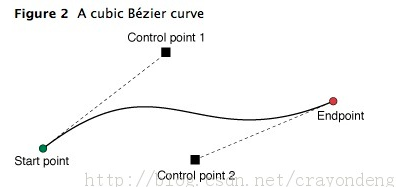
// 三次貝茲曲線:兩個控制點 + 終點
- (void)addCurveToPoint:(CGPoint)endPoint
           controlPoint1:(CGPoint)controlPoint1
           controlPoint2:(CGPoint)controlPoint2;

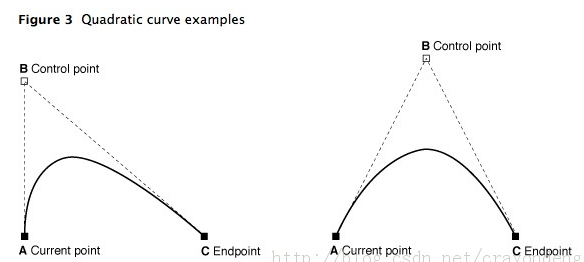
// 二次貝茲曲線:一個控制點 + 終點
- (void)addQuadCurveToPoint:(CGPoint)endPoint
               controlPoint:(CGPoint)controlPoint;

// 追加圓弧
- (void)addArcWithCenter:(CGPoint)center
                  radius:(CGFloat)radius
              startAngle:(CGFloat)startAngle
                endAngle:(CGFloat)endAngle
               clockwise:(BOOL)clockwise;

// 閉合路徑:在終點與起點之間補一條線
- (void)closePath;

// 清空所有點
- (void)removeAllPoints;
三次貝茲曲線的兩個控制點分別決定曲線在起點與終點附近的走向:
二次貝茲曲線則只有一個控制點,曲線會被它「吸」過去但不經過該點:
變形與樣式設定
// 追加另一條路徑(重疊處在 EvenOdd 規則下會被镂空)
- (void)appendPath:(UIBezierPath *)bezierPath;

// 反轉路徑:起點變終點、終點變起點
- (UIBezierPath *)bezierPathByReversingPath;

// 施加仿射變換
- (void)applyTransform:(CGAffineTransform)transform;

// 虛線:pattern 為線段/間距的 C 陣列,count 為元素個數,phase 為起始偏移
- (void)setLineDash:(nullable const CGFloat *)pattern
              count:(NSInteger)count
              phase:(CGFloat)phase;

// 填充與描邊(路徑必須 stroke 才看得到線)
- (void)fill;
- (void)stroke;

// 顏色設定:設定後需再呼叫 fill 或 stroke 才會生效
[[UIColor blackColor] setStroke];
[[UIColor redColor] setFill];

// 混合模式
- (void)fillWithBlendMode:(CGBlendMode)blendMode alpha:(CGFloat)alpha;
- (void)strokeWithBlendMode:(CGBlendMode)blendMode alpha:(CGFloat)alpha;

// 裁剪:後續繪圖只會出現在指定路徑的填充區域內
- (void)addClip;
其中 addClip 搭配 push/pop context 使用,可以做出「只畫圓形區塊內的內容」這類效果,是很常被忽略但很好用的方法。
範例專案:https://github.com/Locking-Xu/UIBezierPath
把這份清單當成隨身速查表即可。真正需要花時間體會的是幾個「幾何語意」:bounds 高度為 0、圓弧角度以 3 點鐘方向為起點、miterLimit 只在尖角時生效——這幾點釐清了,畫圖形就少一大半的困惑。
- 上一篇文章: GCD 入門圖解:同步、異步、串行、並行與死鎖的由來
- 下一篇文章: Xcode 8 / iOS 10 升級後常見的踩坑清單與解法