
iOS XMPPFramework 入門:登錄、好友、消息、聊天室與回執
編輯:iOS 開發綜合
XMPPFramework 是 OS X 與 iOS 平台上的開源即時通訊框架,使用 Objective-C 實作了 XMPP 協議,並提供 XML 讀寫工具,大幅簡化了即時通訊應用的開發流程。本文將介紹登錄、好友狀態、訊息收發、聊天室、訊息回執與心跳檢測等常見功能。
一、常用物件
- XMPPStream:負責與伺服器建立連接。
- XMPPRoster:好友列表。
- XMPPRosterCoreDataStorage:好友列表的 Core Data 儲存。
- XMPPvCardCoreDataStorage:好友名片的 Core Data 儲存。
- XMPPvCardTemp:好友名片實體。
- XMPPReconnect:斷線自動重連。
- XMPPRoom:聊天室支援。
二、登錄與上線
登錄本質上是建立 XMPPStream 連接,並完成身分驗證。
- (void)connect {
    if (self.xmppStream == nil) {
        self.xmppStream = [[XMPPStream alloc] init];
        [self.xmppStream addDelegate:self delegateQueue:dispatch_get_main_queue()];
    }

    if (![self.xmppStream isConnected]) {
        NSString *username = [[NSUserDefaults standardUserDefaults] objectForKey:@"username"];
        XMPPJID *jid = [XMPPJID jidWithUser:username domain:@"example.com" resource:@"iOS"];
        [self.xmppStream setMyJID:jid];
        [self.xmppStream setHostName:@"127.0.0.1"];

        NSError *error = nil;
        if (![self.xmppStream connect:&error]) {
            NSLog(@"連接失敗:%@", error.localizedDescription);
        }
    }
}
連接成功後,會依序觸發 socket 已連接、Stream 已連接等 delegate。完成密碼驗證後,可發送 presence 表示上線。
- (void)xmppStreamDidAuthenticate:(XMPPStream *)sender {
    XMPPPresence *presence = [XMPPPresence presenceWithType:@"available"];
    [self.xmppStream sendElement:presence];
}
三、好友狀態與訊息接收
當收到 presence 標籤時,可透過 delegate 判斷好友上線、離線或忙碌等狀態。
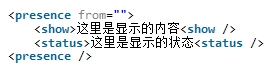
- (void)xmppStream:(XMPPStream *)sender didReceivePresence:(XMPPPresence *)presence {
    NSString *presenceType = [presence type];
    NSString *fromUser = [[presence from] user];

    if (![fromUser isEqualToString:[[sender myJID] user]]) {
        if ([presenceType isEqualToString:@"available"]) {
            NSLog(@"好友上線");
        } else if ([presenceType isEqualToString:@"unavailable"]) {
            NSLog(@"好友下線");
        }
    }
}
訊息內容通常存放在 message 標籤的 body 子節點中。

- (void)sendMessage:(NSString *)message toUser:(NSString *)user {
    NSXMLElement *body = [NSXMLElement elementWithName:@"body"];
    [body setStringValue:message];

    NSXMLElement *messageElement = [NSXMLElement elementWithName:@"message"];
    [messageElement addAttributeWithName:@"type" stringValue:@"chat"];
    [messageElement addAttributeWithName:@"to" stringValue:[NSString stringWithFormat:@"%@@example.com", user]];
    [messageElement addChild:body];

    [self.xmppStream sendElement:messageElement];
}

- (void)xmppStream:(XMPPStream *)sender didReceiveMessage:(XMPPMessage *)message {
    NSString *messageBody = [[message elementForName:@"body"] stringValue];
    NSLog(@"收到訊息:%@", messageBody);
}
四、好友列表與聊天室
好友列表可透過 XMPPRoster 取得。常見操作包括取得好友列表、新增好友、接受好友請求與刪除好友。
[_xmppRoster fetchRoster];

- (void)xmppRoster:(XMPPRoster *)sender didRecieveRosterItem:(NSXMLElement *)item {
    NSLog(@"收到好友節點");
}

- (void)xmppRosterDidEndPopulating:(XMPPRoster *)sender {
    NSLog(@"好友列表取得完成");
}
聊天室可透過 XMPPRoom 建立、加入、離開與監聽成員動態。
XMPPJID *roomJID = [XMPPJID jidWithString:@"room@example.com"];
xmppRoom = [[XMPPRoom alloc] initWithRoomStorage:self jid:roomJID];
[xmppRoom activate:xmppStream];
[xmppRoom addDelegate:self delegateQueue:dispatch_get_main_queue()];

[xmppRoom joinRoomUsingNickname:@"iOSUser" history:nil];
五、訊息回執與心跳
訊息回執通常基於 XEP-0184。發送訊息時附加 receipt 請求,收到請求後返回 received 節點。
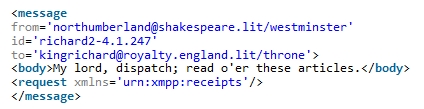
NSString *messageID = [XMPPStream generateUUID];
XMPPMessage *message = [XMPPMessage messageWithType:@"chat" to:jid elementID:messageID];

NSXMLElement *receipt = [NSXMLElement elementWithName:@"request" xmlns:@"urn:xmpp:receipts"];
[message addChild:receipt];
[message addBody:@"測試訊息"];

[self.xmppStream sendElement:message];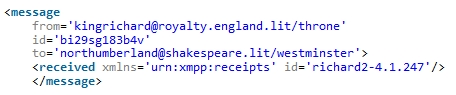
為保持連接穩定,建議加入心跳機制。XMPPFramework 提供了 XMPPAutoPing 與 XMPPPing,其中 XMPPAutoPing 已整合 XMPPPing,使用上較方便。
_xmppAutoPing = [[XMPPAutoPing alloc] init];
[_xmppAutoPing activate:_xmppStream];
[_xmppAutoPing addDelegate:self delegateQueue:dispatch_get_main_queue()];
_xmppAutoPing.respondsToQueries = YES;
_xmppAutoPing.pingInterval = 5;
透過 ping、pong 與 timeout 等 delegate,可以監聽伺服器是否仍然存活,並在異常時觸發重連或提示。