
iOS collectionView 廣告無限滾動實作範例(Swift)
編輯:iOS 開發綜合
今天公司的實習生跑來問我,一般 App 上的廣告無限滾動是怎麼實現的。剛好很久沒寫部落格了,就決定記錄下來,盡量幫助那些剛起步的 iOS 學習者。
做一個小 demo,大致實現效果如下圖所示:

基本實現思路:
1. 在你需要放置無限滾動展示資料的地方,把要展示的資料在原本基礎上擴大三倍(當然擴大兩倍也可以,三倍的話比較好示範)。
// MARK: - 設置數據源 func collectionView(_ collectionView: UICollectionView, numberOfItemsInSection section: Int) -> Int { // print(self.arrayM.count) return self.arrayM.count * 3 }
2. 在定時器的作用下,或在拖動情況下滾動到第八個時,設定此時的 collectionView.contentOffset.x 等於滾動到第三個 cell 的 contentOffset.x。
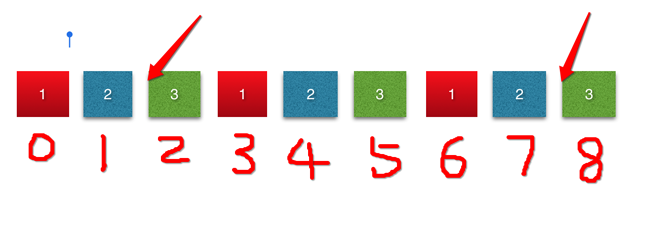
if collectionView.contentOffset.x == CGFloat(3 * self.arrayM.count - 1) * self.collectionView.bounds.width { self.collectionView.contentOffset.x = CGFloat(self.arrayM.count - 1) * self.collectionView.bounds.width }
3. 當拖動到第 0 個 cell 時,設定此時的 collectionView.contentOffset.x 等於第六個 cell 的 contentOffset.x。
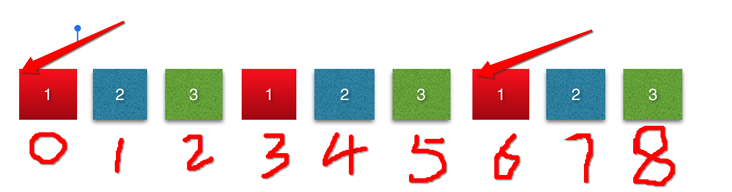
程式碼如下:
我在程式碼中用到 5 張照片,所以應該一共有 15 個 cell。
import UIKit class ViewController: UIViewController ,UICollectionViewDataSource, UICollectionViewDelegate { @IBOutlet weak var collectionView: UICollectionView! var timer : Timer? var arrayM : [BOModel] = [] { didSet { self.collectionView.reloadData() } } static let CellID = "cell" override func viewDidLoad() { super.viewDidLoad() self.collectionView.dataSource = self self.collectionView.delegate = self // 加載數據 loadData() self.collectionView.register(UINib.init(nibName: "BOCollectionViewCell", bundle: nil), forCellWithReuseIdentifier: ViewController.CellID) //設置collextionView setupCollectionView() // 開啟定時器 starTimer() } /// 從polist中加載數據 func loadData() { let stemp: NSArray = NSArray(contentsOfFile: Bundle.main.path(forResource: "shops.plist", ofType: nil)!)! for dict in stemp { let model = BOModel.init(dict: dict as! [String : Any]) self.arrayM.append(model) } } /// 設置cellection的布局方式 /// /// - Returns: 一個布局類型 func setupCollectionFlowlayout() -> (UICollectionViewFlowLayout) { let flowLayout = UICollectionViewFlowLayout() flowLayout.itemSize = self.collectionView.bounds.size flowLayout.minimumLineSpacing = 0 flowLayout.minimumInteritemSpacing = 0 flowLayout.scrollDirection = .horizontal flowLayout.sectionInset = UIEdgeInsetsMake(0, 0, 0, 0) return flowLayout } /// 設置collectionVIew func setupCollectionView() -> () { self.collectionView.collectionViewLayout = self.setupCollectionFlowlayout() self.collectionView.showsVerticalScrollIndicator = false self.collectionView.showsHorizontalScrollIndicator = false self.collectionView.isPagingEnabled = true } // MARK: - 設置數據源 func collectionView(_ collectionView: UICollectionView, numberOfItemsInSection section: Int) -> Int { // print(self.arrayM.count) return self.arrayM.count * 3 } func collectionView(_ collectionView: UICollectionView, cellForItemAt indexPath: IndexPath) -> UICollectionViewCell { let cell = self.collectionView.dequeueReusableCell(withReuseIdentifier: ViewController.CellID, for: indexPath) as! BOCollectionViewCell cell.model = self.arrayM[indexPath.row % self.arrayM.count] return cell } // MARK: - 實現代理方法 func scrollViewDidEndDecelerating(_ scrollView: UIScrollView) { //contentOffset.x == 0 時,重新設置contentOffset.x的值 if collectionView.contentOffset.x == 0 { self.collectionView.contentOffset.x = CGFloat(2 * self.arrayM.count - 1) * self.collectionView.bounds.width } //當到達最後一個cell時,重新設置contentOffset.x的值 if collectionView.contentOffset.x == CGFloat(3 * self.arrayM.count - 1) * self.collectionView.bounds.width { self.collectionView.contentOffset.x = CGFloat(self.arrayM.count - 1) * self.collectionView.bounds.width } } /// 開啟定時器 func starTimer () { let timer = Timer.init(timeInterval: 1, target: self, selector: #selector(ViewController.nextPage), userInfo: nil, repeats: true) // 這一句代碼涉及到runloop 和 主線程的知識,則在界面上不能執行其他的UI操作 RunLoop.main.add(timer, forMode: RunLoopMode.commonModes) self.timer = timer } /// 在1秒後,自動跳轉到下一頁 func nextPage() { // 如果到達最後一個,則變成第四個 if collectionView.contentOffset.x == CGFloat(3 * self.arrayM.count - 1) * self.collectionView.bounds.width { self.collectionView.contentOffset.x = CGFloat(self.arrayM.count - 1) * self.collectionView.bounds.width }else { // 每過一秒,contentOffset.x增加一個cell的寬度 self.collectionView.contentOffset.x += self.collectionView.bounds.size.width } } /// 當collectionView開始拖動的時候,取消定時器 func scrollViewWillBeginDragging(_ scrollView: UIScrollView) { self.timer?.invalidate() self.timer = nil } /// 當用戶停止拖動的時候,開啟定時器 func scrollViewWillEndDragging(_ scrollView: UIScrollView, withVelocity velocity: CGPoint, targetContentOffset: UnsafeMutablePointer<CGPoint>) { starTimer() } }
plist 檔如下圖所示: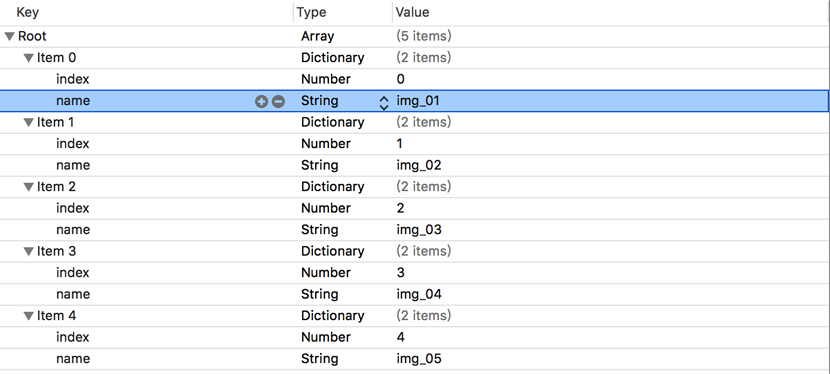
用到的字典轉模型因為是比較簡單的轉換,就自己寫了個:
import UIKit class BOCollectionViewCell: UICollectionViewCell { @IBOutlet weak var imageView: UIImageView! var model : BOModel? { didSet { guard let image = UIImage.init(named: (model?.name)!) else { return } self.imageView.image = image } } override func awakeFromNib() { super.awakeFromNib() } }
自定義 collectionViewCell 類中的內容:
import UIKit class BOCollectionViewCell: UICollectionViewCell { @IBOutlet weak var imageView: UIImageView! var model : BOModel? { didSet { guard let image = UIImage.init(named: (model?.name)!) else { return } self.imageView.image = image } } override func awakeFromNib() { super.awakeFromNib() } }
附註:其實這種方法實現無限滾動比較取巧,用電腦測試時可能有點缺陷。
原文連結:https://www.cnblogs.com/muzichenyu/p/6071757.html
以上就是本文的完整內容,希望對你的學習有所幫助,也感謝你的支持。