
iOS 學習筆記(十七):沙盒目錄結構與 NSFileManager 檔案操作
編輯:iOS 開發綜合
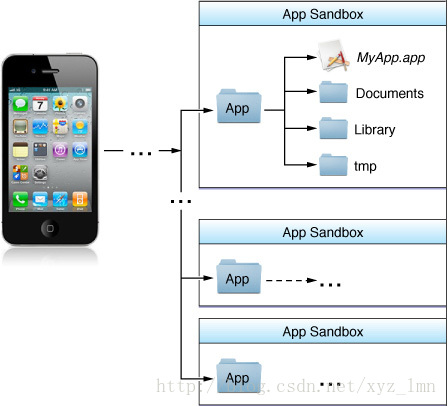
iOS 有嚴格的沙盒(Sandbox)機制:App 只能存取自己容器內的檔案。它不像 Android 那樣有 SD 卡的概念,你無法直接翻看全域的圖片或影片,App 產生的所有內容——圖片、文件、快取——都必須留在自己的沙盒裡。
預設情況下,每個沙盒包含三個目錄:Documents、Library 與 tmp,其中 Library 底下又有 Caches 與 Preferences。

在模擬器中,完整路徑大致是:使用者 → 資源庫 → Application Support → iPhone Simulator → 6.1 → Applications。
各目錄的職責
Documents:存放 App 產生的檔案,以及使用者主動瀏覽、儲存的資料。iTunes 備份與還原時會包含這個目錄,所以「值得備份的東西」放這裡。
Library:存放 App 的預設設定與其他狀態資訊。
Library/Caches:快取與需要持久化的資料。這個目錄不會被 iTunes 同步,因此體積大又不需要備份的檔案很適合放在這兒,能省下不少同步時間。
tmp:即時建立暫存檔的地方,App 關閉後內容就會被清掉,系統也可能在 App 未執行時主動清理。千萬別把唯一一份重要資料只放在這裡。
取得各目錄路徑
// 沙盒根路徑
-(void)dirHome {
    NSString *dirHome = NSHomeDirectory();
    NSLog(@"app_home: %@", dirHome);
}

// Documents
-(NSString *)dirDoc {
    NSArray *paths = NSSearchPathForDirectoriesInDomains(NSDocumentDirectory, NSUserDomainMask, YES);
    NSString *documentsDirectory = [paths objectAtIndex:0];
    NSLog(@"app_home_doc: %@", documentsDirectory);
    return documentsDirectory;
}

// Library
-(void)dirLib {
    NSArray *paths = NSSearchPathForDirectoriesInDomains(NSLibraryDirectory, NSUserDomainMask, YES);
    NSString *libraryDirectory = [paths objectAtIndex:0];
    NSLog(@"app_home_lib: %@", libraryDirectory);
}

// Caches
-(void)dirCache {
    NSArray *cacPath = NSSearchPathForDirectoriesInDomains(NSCachesDirectory, NSUserDomainMask, YES);
    NSString *cachePath = [cacPath objectAtIndex:0];
    NSLog(@"app_home_lib_cache: %@", cachePath);
}

// tmp
-(void)dirTmp {
    NSString *tmpDirectory = NSTemporaryDirectory();
    NSLog(@"app_home_tmp: %@", tmpDirectory);
}
實務上比較推薦用 NSSearchPathForDirectoriesInDomains 這類 API 來取路徑,而不是把 NSHomeDirectory() 的字串硬接上去——後者雖然直覺,卻顯得脆弱。
建立資料夾與檔案
// 建立資料夾
-(void)createDir {
    NSString *documentsPath = [self dirDoc];
    NSFileManager *fileManager = [NSFileManager defaultManager];
    NSString *testDirectory = [documentsPath stringByAppendingPathComponent:@"test"];

    BOOL res = [fileManager createDirectoryAtPath:testDirectory withIntermediateDirectories:YES attributes:nil error:nil];
    if (res) { NSLog(@"文件夾創建成功"); } else { NSLog(@"文件夾創建失敗"); }
}

// 建立檔案
-(void)createFile {
    NSString *documentsPath = [self dirDoc];
    NSString *testDirectory = [documentsPath stringByAppendingPathComponent:@"test"];
    NSFileManager *fileManager = [NSFileManager defaultManager];
    NSString *testPath = [testDirectory stringByAppendingPathComponent:@"test.txt"];

    BOOL res = [fileManager createFileAtPath:testPath contents:nil attributes:nil];
    if (res) { NSLog(@"文件創建成功: %@", testPath); } else { NSLog(@"文件創建失敗"); }
}
讀寫內容
// 寫入
-(void)writeFile {
    NSString *testPath = [[[self dirDoc] stringByAppendingPathComponent:@"test"] stringByAppendingPathComponent:@"test.txt"];
    NSString *content = @"測試寫入內容!";
    BOOL res = [content writeToFile:testPath atomically:YES encoding:NSUTF8StringEncoding error:nil];
    if (res) { NSLog(@"文件寫入成功"); } else { NSLog(@"文件寫入失敗"); }
}

// 讀取
-(void)readFile {
    NSString *testPath = [[[self dirDoc] stringByAppendingPathComponent:@"test"] stringByAppendingPathComponent:@"test.txt"];
    NSString *content = [NSString stringWithContentsOfFile:testPath encoding:NSUTF8StringEncoding error:nil];
    NSLog(@"文件讀取成功: %@", content);
}
查詢屬性與刪除
// 屬性
-(void)fileAttriutes {
    NSString *testPath = [[[self dirDoc] stringByAppendingPathComponent:@"test"] stringByAppendingPathComponent:@"test.txt"];
    NSFileManager *fileManager = [NSFileManager defaultManager];
    NSDictionary *fileAttributes = [fileManager attributesOfItemAtPath:testPath error:nil];

    NSArray *keys = [fileAttributes allKeys];
    int count = [keys count];
    for (int i = 0; i < count; i++) {
        id key = [keys objectAtIndex:i];
        id value = [fileAttributes objectForKey:key];
        NSLog(@"Key: %@ for value: %@", key, value);
    }
}

// 刪除
-(void)deleteFile {
    NSString *testPath = [[[self dirDoc] stringByAppendingPathComponent:@"test"] stringByAppendingPathComponent:@"test.txt"];
    NSFileManager *fileManager = [NSFileManager defaultManager];
    BOOL res = [fileManager removeItemAtPath:testPath error:nil];
    if (res) { NSLog(@"文件刪除成功"); } else { NSLog(@"文件刪除失敗"); }
}
以上就是本文的全部內容,希望對大家的學習有所幫助。