
iOS 本地動態生成驗證碼:CoreGraphics 繪圖完整實作
編輯:iOS 開發綜合
前陣子 App 的註冊介面被腳本刷了,於是考慮在本地動態生成一張驗證碼圖片來緩解。下面把整個實作過程記錄下來。
最終效果大致如下:
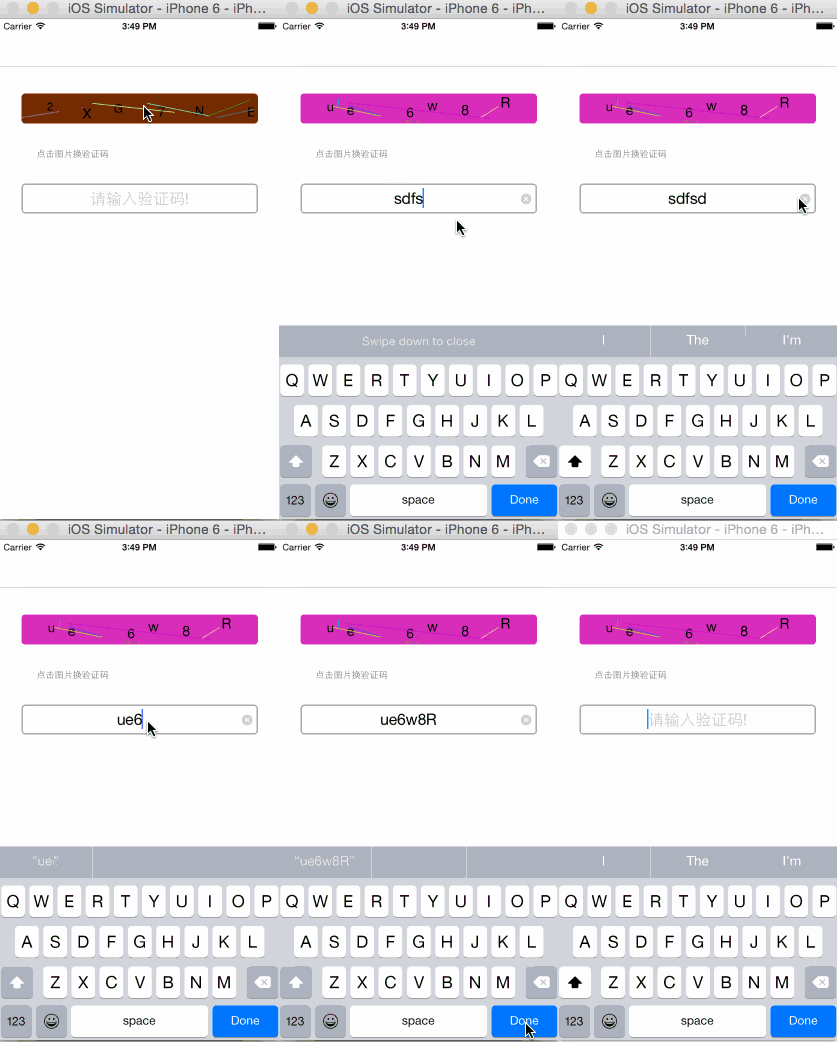
第一步,匯入 CoreGraphics.framework,用來做自繪。
第二步,封裝一個 AuthcodeView,對外只暴露字元素材與驗證碼字串,方便複用:
// AuthcodeView.h
#import <UIKit/UIKit.h>

@interface AuthcodeView : UIView
@property (strong, nonatomic) NSArray *dataArray;        // 字元素材
@property (strong, nonatomic) NSMutableString *authCodeStr; // 驗證碼字串
@end

// AuthcodeView.m
#import "AuthcodeView.h"

#define kRandomColor [UIColor colorWithRed:arc4random() % 256 / 256.0 green:arc4random() % 256 / 256.0 blue:arc4random() % 256 / 256.0 alpha:1.0];
#define kLineCount 6
#define kLineWidth 1.0
#define kCharCount 6
#define kFontSize [UIFont systemFontOfSize:arc4random() % 5 + 15]

@implementation AuthcodeView

- (instancetype)initWithFrame:(CGRect)frame {
    self = [super initWithFrame:frame];
    if (self) {
        self.layer.cornerRadius = 5.0f;
        self.layer.masksToBounds = YES;
        self.backgroundColor = kRandomColor;
        [self getAuthcode];
    }
    return self;
}

#pragma mark 取得隨機驗證碼
- (void)getAuthcode {
    _dataArray = [[NSArray alloc] initWithObjects:@"0", @"1", @"2", @"3", @"4", @"5", @"6", @"7", @"8", @"9",
                  @"A", @"B", @"C", @"D", @"E", @"F", @"G", @"H", @"I", @"J", @"K", @"L", @"M",
                  @"N", @"O", @"P", @"Q", @"R", @"S", @"T", @"U", @"V", @"W", @"X", @"Y", @"Z",
                  @"a", @"b", @"c", @"d", @"e", @"f", @"g", @"h", @"i", @"j", @"k", @"l", @"m",
                  @"n", @"o", @"p", @"q", @"r", @"s", @"t", @"u", @"v", @"w", @"x", @"y", @"z", nil];
    _authCodeStr = [[NSMutableString alloc] initWithCapacity:kCharCount];
    for (int i = 0; i < kCharCount; i++) {
        NSInteger index = arc4random() % (_dataArray.count - 1);
        NSString *tempStr = [_dataArray objectAtIndex:index];
        _authCodeStr = (NSMutableString *)[_authCodeStr stringByAppendingString:tempStr];
    }
}

#pragma mark 點擊畫面換一張
- (void)touchesBegan:(NSSet *)touches withEvent:(UIEvent *)event {
    [self getAuthcode];
    [self setNeedsDisplay]; // 觸發 drawRect:
}

- (void)drawRect:(CGRect)rect {
    [super drawRect:rect];
    self.backgroundColor = kRandomColor;

    NSString *text = [NSString stringWithFormat:@"%@", _authCodeStr];
    CGSize cSize = [@"A" sizeWithAttributes:@{NSFontAttributeName: [UIFont systemFontOfSize:20]}];
    int width = rect.size.width / text.length - cSize.width;
    int height = rect.size.height - cSize.height;
    CGPoint point;

    // 逐字繪製,可自訂每個字元的大小與顏色
    float pX, pY;
    for (int i = 0; i < text.length; i++) {
        pX = arc4random() % width + rect.size.width / text.length * i;
        pY = arc4random() % height;
        point = CGPointMake(pX, pY);
        unichar c = [text characterAtIndex:i];
        NSString *textC = [NSString stringWithFormat:@"%C", c];
        [textC drawAtPoint:point withAttributes:@{NSFontAttributeName: kFontSize}];
    }

    // drawRect: 執行前系統已壓入 CGContextRef
    CGContextRef context = UIGraphicsGetCurrentContext();
    CGContextSetLineWidth(context, kLineWidth);

    // 繪製干擾線
    for (int i = 0; i < kLineCount; i++) {
        UIColor *color = kRandomColor;
        CGContextSetStrokeColorWithColor(context, color.CGColor);
        pX = arc4random() % (int)rect.size.width;
        pY = arc4random() % (int)rect.size.height;
        CGContextMoveToPoint(context, pX, pY);
        pX = arc4random() % (int)rect.size.width;
        pY = arc4random() % (int)rect.size.height;
        CGContextAddLineToPoint(context, pX, pY);
        CGContextStrokePath(context);
    }
}
@end
第三步,把驗證碼掛到介面上,並完成輸入比對與錯誤回饋:
@interface AuthCodeViewController () <UITextFieldDelegate, UIAlertViewDelegate> {
    AuthcodeView *authCodeView;
    UITextField *_input;
}
@end

@implementation AuthCodeViewController

- (void)viewDidLoad {
    [super viewDidLoad];
    self.view.backgroundColor = [UIColor whiteColor];

    authCodeView = [[AuthcodeView alloc] initWithFrame:CGRectMake(30, 100, self.view.frame.size.width - 60, 40)];
    [self.view addSubview:authCodeView];

    UILabel *label = [[UILabel alloc] initWithFrame:CGRectMake(50, 160, self.view.frame.size.width - 100, 40)];
    label.text = @"點擊圖片換驗證碼";
    label.font = [UIFont systemFontOfSize:12];
    label.textColor = [UIColor grayColor];
    [self.view addSubview:label];

    _input = [[UITextField alloc] initWithFrame:CGRectMake(30, 220, self.view.frame.size.width - 60, 40)];
    _input.layer.borderColor = [UIColor lightGrayColor].CGColor;
    _input.layer.borderWidth = 2.0;
    _input.layer.cornerRadius = 5.0;
    _input.font = [UIFont systemFontOfSize:21];
    _input.placeholder = @"請輸入驗證碼!";
    _input.clearButtonMode = UITextFieldViewModeWhileEditing;
    _input.backgroundColor = [UIColor clearColor];
    _input.textAlignment = NSTextAlignmentCenter;
    _input.returnKeyType = UIReturnKeyDone;
    _input.delegate = self;
    [self.view addSubview:_input];
}

#pragma mark 點擊 return
- (BOOL)textFieldShouldReturn:(UITextField *)textField {
    if ([_input.text isEqualToString:authCodeView.authCodeStr]) {
        UIAlertView *alview = [[UIAlertView alloc] initWithTitle:@"恭喜您 ^o^" message:@"驗證成功" delegate:self cancelButtonTitle:@"OK" otherButtonTitles:nil, nil];
        [alview show];
    } else {
        // 驗證失敗,輸入框抖動作為回饋
        CAKeyframeAnimation *anim = [CAKeyframeAnimation animationWithKeyPath:@"transform.translation.x"];
        anim.repeatCount = 1;
        anim.values = @[@-20, @20, @-20];
        [_input.layer addAnimation:anim forKey:nil];
    }
    return YES;
}

- (void)alertView:(UIAlertView *)alertView clickedButtonAtIndex:(NSInteger)buttonIndex {
    if (buttonIndex == 0) {
        _input.text = @"";
        [_input resignFirstResponder];
    }
}
@end
幾個實作細節值得留意:字元長度用 text.length 均分寬度,能避免不同螢幕尺寸下文字擠在一起;干擾線與字元都走 arc4random(),每次刷新都不一樣;點擊整張圖片即可換碼,符合多數使用者的操作習慣。
需要提醒的是,本地驗證碼只能攔住最粗糙的腳本,真正防刷還是要靠服務端的頻次限制與行為校驗,本地驗證碼定位是「提高一點成本」,不能當作唯一防線。
- 上一篇文章: 動手繪製 iOS 3D 餅圖的實作方法
- 下一篇文章: iOS Cache 設計詳解與簡單示例