
用可拉伸圖片實作氣泡聊天介面
聊天介面中的對話氣泡是個經典需求:同一張底圖要能撐開成任意寬度,而四角的圓弧與那個小尾巴必須保持原樣不被拉變形。iOS 的 stretchableImage 正是為此而生。
- (UIView *)bubbleView:(NSString *)text from:(BOOL)fromSelf {
    UIView *returnView = [[UIView alloc] initWithFrame:CGRectZero];
    returnView.backgroundColor = [UIColor clearColor];

    UIImage *bubble = [UIImage imageWithContentsOfFile:
            [[NSBundle mainBundle] pathForResource:fromSelf ? @"bubbleSelf" : @"bubble" ofType:@"png"]];
    UIImageView *bubbleImageView = [[UIImageView alloc]
            initWithImage:[bubble stretchableImageWithLeftCapWidth:21 topCapHeight:14]];

    UIFont *font = [UIFont systemFontOfSize:12];
    CGSize size = [text sizeWithFont:font
                   constrainedToSize:CGSizeMake(150.0f, 1000.0f)
                       lineBreakMode:UILineBreakModeCharacterWrap];

    UILabel *bubbleText = [[UILabel alloc]
            initWithFrame:CGRectMake(21.0f, 14.0f, size.width + 10, size.height + 10)];
    bubbleText.backgroundColor = [UIColor clearColor];
    bubbleText.font = font;
    bubbleText.numberOfLines = 0;
    bubbleText.lineBreakMode = UILineBreakModeCharacterWrap;
    bubbleText.text = text;

    bubbleImageView.frame = CGRectMake(0.0f, 0.0f, 200.0f, size.height + 40.0f);
    if (fromSelf)
        returnView.frame = CGRectMake(120.0f, 10.0f, 200.0f, size.height + 50.0f);
    else
        returnView.frame = CGRectMake(0.0f, 10.0f, 200.0f, size.height + 50.0f);

    [returnView addSubview:bubbleImageView];
    [bubbleImageView release];
    [returnView addSubview:bubbleText];
    [bubbleText release];

    return [returnView autorelease];
}
效果圖:
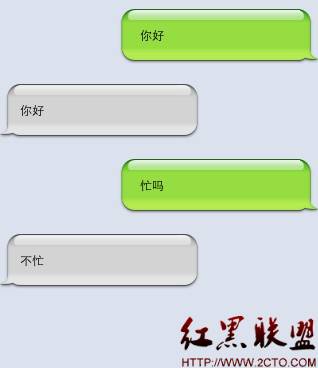
核心觀念:九宮格拉伸
stretchableImageWithLeftCapWidth:21 topCapHeight:14 是整段程式的靈魂。它宣告:左邊 21 點、上方 14 點是不可變形的邊角區域,中央部分才允許被拉伸。因此當你把 imageView 的寬度設成 200 時,左側的圓角與尾巴保持原樣,只有中間的純色區塊被拉長。
這兩個數值必須依你的素材調整,原則是「把尾巴與圓弧完整包含進去,但不要多留空白」。數值給太小會導致尾巴被拉變形,給太大則會讓長氣泡的中段無法有效伸展。iOS 之後提供了 resinizableImageWithCapInsets: 作為新寫法,觀念完全相同。
文字高度的自動計算
sizeWithFont:constrainedToSize:lineBreakMode: 用來算出文字在給定寬度下換行後實際需要的高度。把最大寬度限制在 150,高度上限給一個大值(1000),就能得到「依內容自動增高」的效果。配合 numberOfLines = 0(不限行數),氣泡就會隨文字長度自然長高。
幾處可以改進的地方
寬度寫死為 200 會截斷長文字。程式算出 size 之後,卻把 bubbleImageView 的寬度固定設成 200,只有高度跟著 size 變。若文字換行後寬度接近 150,加上左右各 21 的邊距後剛好 192,勉強放得下;但這其實是靠數字湊出來的巧合,實務上應該直接用 size.width + 42 之類的計算式。
左右氣泡的位置寫死。fromSelf 時 x 設 120、否則設 0,這在 320 寬的舊螢幕上剛好靠齊右側。若換成更寬的裝置,自己的氣泡就浮在畫面中間了。正確做法是用 self.view.bounds.size.width - 200 - margin 計算右側座標。
sizeWithFont: 系列 API 已於 iOS 7 廢棄。新專案請改用 boundingRectWithSize:options:attributes:context:,並搭配 NSAttributedString 建立屬性字串。若使用 Auto Layout 與 UILabel,更可以完全不必手算——設定 preferredMaxLayoutWidth 後系統會自行回報高度。
每次呼叫都重新讀取圖片。imageWithContentsOfFile: 每次都從磁碟解一次 PNG。氣泡圖只有兩張且反覆使用,應該在 viewDidLoad 中讀一次存成實例變數,或直接改用 imageNamed: 讓系統快取。
更現代的替代方案。若只是要顯示對話,直接自訂一個 UITableViewCell 子類、內部用 Auto Layout 約束氣泡 imageView 與 label,並在 tableView:heightForRowAtIndexPath: 中回報計算好的高度,會比每則訊息包一個 UIView 更容易管理捲動效能與資料來源。
- 上一篇文章: DLog 的使用:讓除錯訊息在正式版自動消失
- 下一篇文章: 用程式碼開啟 iOS「設定」中的定位服務與其他系統頁面