
UITableView 詳解(一):初始化、資料來源與委派方法全解析
作者:Andy-清風。
1. 建立 UITableView
UITableView *tableview = [[UITableView alloc] initWithFrame:CGRectMake(0, 0, 320, 420)];
[tableview setDelegate:self];
[tableview setDataSource:self];
[self.view addSubview:tableview];
[tableview release];
幾個必須掌握的前提:
(1)協定的實作是強制性的。若不是繼承 UITableViewController,就必須在 .h 中宣告採用 UITableViewDelegate 與 UITableViewDataSource,並實作三個資料來源方法、把 delegate 與 dataSource 都設為 self。少實作任何一個,列表都跑不起來。
(2)用專案範本繼承 UITableViewController 時,Xcode 會自動把必要的方法骨架產生好,省下不少設定功夫。
(3)UITableView 繼承自 UIScrollView,所以滾動、橡皮筋回彈等行為都是天上掉下來的,不必自己處理。
2. 資料來源(DataSource)的三個核心方法
UITableView 本身不存資料,它會透過索引路徑(NSIndexPath 物件)向外索取內容。索引路徑由 section(分段)與 row(列)兩個維度組成。
numberOfSectionsInTableView: 決定要分成幾段。回傳 1 就是單純的單一列表;回傳多個數字則呈現分段樣式。
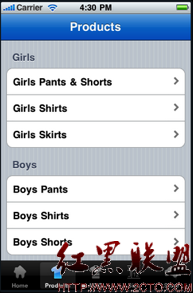
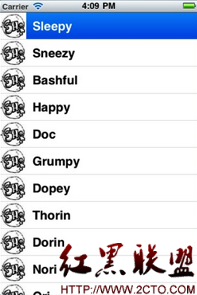
tableView:numberOfRowsInSection: 回傳每個分段各有幾列。若要讓不同分段有不同列數,用 switch 判斷 section 即可。
tableView:cellForRowAtIndexPath: 回傳該索引位置要顯示的 cell,透過 indexPath 的 section 與 row 決定內容。這也是效能最關鍵的方法,稍後會談到重用機制。
3. 委派(Delegate)方法逐項說明
委派的存在是為了回應使用者的互動——點選某一列、下拉更新、刪除資料等等。以下把常用方法整理成可直接複用的樣板:
// 右側索引列的標題陣列
- (NSArray *)sectionIndexTitlesForTableView:(UITableView *)tableView {
    return TitleData;
}

// 每個 section 的標題文字
- (NSString *)tableView:(UITableView *)tableView titleForHeaderInSection:(NSInteger)section {
    return @"Andy-清風";
}

// 分區數量,預設為 1
- (NSInteger)numberOfSectionsInTableView:(UITableView *)tableView {
    return 2;
}

// 每個分區的列數,預設為 1
- (NSInteger)tableView:(UITableView *)tableView numberOfRowsInSection:(NSInteger)section {
    return 10;
}

// 產生每一列的 cell(含重用機制)
- (UITableViewCell *)tableView:(UITableView *)tableView cellForRowAtIndexPath:(NSIndexPath *)indexPath {
    static NSString *SimpleTableIdentifier = @"SimpleTableIdentifier";

    UITableViewCell *cell = [tableView dequeueReusableCellWithIdentifier:SimpleTableIdentifier];
    if (cell == nil) {
        cell = [[[UITableViewCell alloc] initWithStyle:UITableViewCellStyleDefault
                                      reuseIdentifier:SimpleTableIdentifier] autorelease];
    }
    cell.imageView.image = image;                    // 未選取時的圖
    cell.imageView.highlightedImage = highlightImage; // 選取後的圖
    cell.textLabel.text = @"Andy-清風";
    return cell;
}

// 設定列的縮排層級
- (NSInteger)tableView:(UITableView *)tableView indentationLevelForRowAtIndexPath:(NSIndexPath *)indexPath {
    NSUInteger row = [indexPath row];
    return row;
}

// 每列高度
- (CGFloat)tableView:(UITableView *)tableView heightForRowAtIndexPath:(NSIndexPath *)indexPath {
    return 40;
}

// 程式化選取某一列
NSIndexPath *ip = [NSIndexPath indexPathForRow:row inSection:section];
[TopicsTable selectRowAtIndexPath:ip animated:YES scrollPosition:UITableViewScrollPositionNone];

// 點選後的回應
- (void)tableView:(UITableView *)tableView didSelectRowAtIndexPath:(NSIndexPath *)indexPath {
    [tableView deselectRowAtIndexPath:indexPath animated:YES]; // 立刻取消反白
}

// 決定哪一列可以被選取
- (NSIndexPath *)tableView:(UITableView *)tableView willSelectRowAtIndexPath:(NSIndexPath *)indexPath {
    NSUInteger row = [indexPath row];
    return indexPath;
}

// 是否允許刪除(左滑出現 Delete 鈕)
- (BOOL)tableView:(UITableView *)tableView canEditRowAtIndexPath:(NSIndexPath *)indexPath {
    return YES;
}

// 確認刪除、進入編輯狀態
- (void)tableView:(UITableView *)tableView commitEditingStyle:(UITableViewCellEditingStyle)editingStyle
forRowAtIndexPath:(NSIndexPath *)indexPath {
    // 在此真正移除資料來源中的元素,並呼叫 deleteRowsAtIndexPaths
}
4. 幾組常用的列舉常數
// 選取時的高亮樣式
typedef enum {
    UITableViewCellSelectionStyleNone,
    UITableViewCellSelectionStyleBlue,
    UITableViewCellSelectionStyleGray
} UITableViewCellSelectionStyle;

// 右側輔助圖示
typedef enum {
    UITableViewCellAccessoryNone,                    // 不顯示
    UITableViewCellAccessoryDisclosureIndicator,     // 灰色箭頭,不可點
    UITableViewCellAccessoryDetailDisclosureButton,  // 藍色 i 鈕,可點
    UITableViewCellAccessoryCheckmark                // 勾選標記
} UITableViewCellAccessoryType;

// 分隔線樣式
typedef enum {
    UITableViewCellSeparatorStyleNone,
    UITableViewCellSeparatorStyleSingleLine
} UITableViewCellSeparatorStyle;

// 自訂分隔線顏色
tableView.separatorColor = [UIColor blueColor];
5. UITableViewCell 的組成
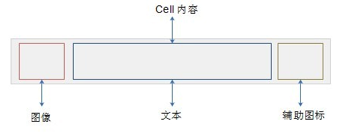
表格中的每一列就是一個 UITableViewCell。系統預先提供了三個可選屬性,足以應付多數清單需求:
- textLabel:主要文字。
- detailTextLabel:較次要的副標題。
- imageView:左側縮圖,以 UIImage 載入。
若預設樣式不夠用(例如 App Store 那種結構),可以自行從 UITableViewCell 派生子類,在 contentView 上自由佈局。
效能關鍵:cell 重用
請特別注意 cellForRowAtIndexPath 中的 dequeueReusableCellWithIdentifier:。UITableView 只會配置屏幕上看得見的十來個 cell,捲動時回收離開視窗的 cell 重新填入新資料。若不使用重用機制而每次都 alloc 新 cell,長列表會迅速吃光記憶體並造成嚴重卡頓。
下一節將接著談自訂 cell、多型別重用標識、以及資料排序等實務問題。