
用 UIButton 與 Core Animation 自訂按鈕外觀,不必再切圖
作者:Matt Long,原文發表於 cimgf.com。
乍看之下,UIButton 在自訂方面的彈性小得令人洩氣。多數人在 Interface Builder 裡設定按鈕的 Background 屬性時,都得先用繪圖工具做一張背景圖貼上去——這當然可行,但 Core Animation 的 layer 提供了一條更省事的路:完全不需要任何圖片素材,幾行程式碼就能畫出圓角、邊框、漸層。
一、只用 layer 換背景色與圓角
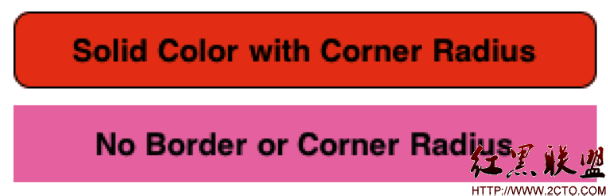
在 IB 中把 Button 的 type 設為 Custom 之後,你確實可以指定一個背景色。但執行起來會發現圓角消失了,眼前只剩一個方正色塊。原因很簡單:custom 型態的按鈕沒有任何預設樣式,圓角這類屬性必須自己設定,而這正是 Core Animation layer 派上用場的地方。
提示:動手寫程式之前,記得先把 QuartzCore.framework 加入專案,並在 .pch 或相關標頭檔中 #import <QuartzCore/QuartzCore.h>,否則 layer 相關的屬性與方法都無法使用。
IB 沒做的事,只能用程式補回來。要得到一個紅底、圓角、帶細邊框的按鈕,先把按鈕以 IBOutlet 連到 view controller,然後操作它的 layer:
[[button layer] setCornerRadius:8.0f];
[[button layer] setMasksToBounds:YES];
[[button layer] setBorderWidth:1.0f];
第一行把圓角半徑設為 8;第二行的 setMasksToBounds: 告訴 layer 把超出邊界(含子 layer)的內容裁掉,這一步是圓角能正確呈現的關鍵,少了它圓角會被子圖層蓋回去;第三行加上 1.0 的邊框寬度。邊框預設是黑色,若要換色可用 setBorderColor:,參數型別是 CGColorRef,例如 [[UIColor greenColor] CGColor] 就是綠框。
延伸技巧:任何 UIView 都自帶一個 root layer,所以圓角效果並不限於按鈕。只要對 view.layer 呼叫 setCornerRadius: 與 setMasksToBounds:,任何視圖都能變圓角。
背景色可以從 IB 設,也可以用程式碼設,兩種寫法的參數型別不同:
// Core Animation 寫法,參數為 CGColorRef
[[button layer] setBackgroundColor:[[UIColor redColor] CGColor]];

// UIView 寫法,參數為 UIColor
[button setBackgroundColor:[UIColor redColor]];
二、加上漸層:CAGradientLayer

以下示例用了相當鮮豔誇張的配色,實務上建議挑選過渡自然一些的組合。要做出漸層,做法是建立一個 CAGradientLayer 並插入按鈕的 layer 樹中。為了方便,這裡做了一個 UIButton 子類 ColorfulButton,把漸層的建立與重繪都封裝進去:
#import "ColorfulButton.h"

@implementation ColorfulButton

@synthesize _highColor;
@synthesize _lowColor;
@synthesize gradientLayer;

- (void)awakeFromNib;
{
    // 建立漸層 layer
    gradientLayer = [[CAGradientLayer alloc] init];

    // 尺寸與父層一致
    [gradientLayer setBounds:[self bounds]];

    // 置中於父層
    [gradientLayer setPosition:
            CGPointMake([self bounds].size.width / 2,
                        [self bounds].size.height / 2)];

    // 插到 index 0,確保按鈕文字不會被遮住
    [[self layer] insertSublayer:gradientLayer atIndex:0];

    // 圓角
    [[self layer] setCornerRadius:8.0f];

    // 開啟裁切
    [[self layer] setMasksToBounds:YES];

    // 1.0 pixel 邊框
    [[self layer] setBorderWidth:1.0f];
}

- (void)drawRect:(CGRect)rect
{
    if (_highColor && _lowColor) {
        // 以 high / low 兩色作為漸層起訖
        [gradientLayer setColors:
                [NSArray arrayWithObjects:
                        (id)[_highColor CGColor],
                        (id)[_lowColor CGColor], nil]];
    }
    [super drawRect:rect];
}

- (void)setHighColor:(UIColor*)color {
    [self set_highColor:color];
    [[self layer] setNeedsDisplay];
}

- (void)setLowColor:(UIColor*)color {
    [self set_lowColor:color];
    [[self layer] setNeedsDisplay];
}

- (void)dealloc {
    [gradientLayer release];
    [super dealloc];
}

@end
接著在 IB 中放一個按鈕,把它的 class 改成 ColorfulButton,並連出一個 outlet。

若不指定漸層色,按鈕就照 IB 裡設定的背景色渲染;想啟用漸層,只要在 view controller 中設定兩個顏色屬性:
- (void)viewDidLoad {
    [super viewDidLoad];
    [button1 setHighColor:[UIColor redColor]];
    [button1 setLowColor:[UIColor orangeColor]];
    [button2 setHighColor:[UIColor blueColor]];
    [button2 setLowColor:[UIColor lightGrayColor]];
    [button3 setHighColor:[UIColor yellowColor]];
    [button3 setLowColor:[UIColor purpleColor]];
    [button4 setHighColor:[UIColor cyanColor]];
    [button4 setLowColor:[UIColor magentaColor]];
}
介面中的四個按鈕宣告如下:
#import <UIKit/UIKit.h>
#import "ColorfulButton.h"

@interface ColorfulButtonsViewController : UIViewController {
    IBOutlet ColorfulButton *button1;
    IBOutlet ColorfulButton *button2;
    IBOutlet ColorfulButton *button3;
    IBOutlet ColorfulButton *button4;
}
@end
小結
CAGradientLayer 的 colors 屬性接受一個 CGColor 陣列,會自動讓這些顏色平均分布並做線性漸層,同時也能透過 locations 自訂各色停靠的位置。本文為了簡化只用了兩色,若要更細緻的變化(例如三色以上、或加上 startPoint/endPoint 改變漸層方向),直接擴充 ColorfulButton 即可。
這套做法最大的價值在於:按鈕外觀完全程式化,不必為每個狀態準備一組切圖,改配色只需改一行程式,也能隨著螢幕解析度自由縮放而不失真。