iOS新功能引導提示界面實例詳解
編輯:IOS開發綜合
在開發中,現在很多app更新了新功能時都會給出用戶一個提示,以方便用戶更好的體驗,那麼這個功能如何實現的呢?
首先看下效果圖:
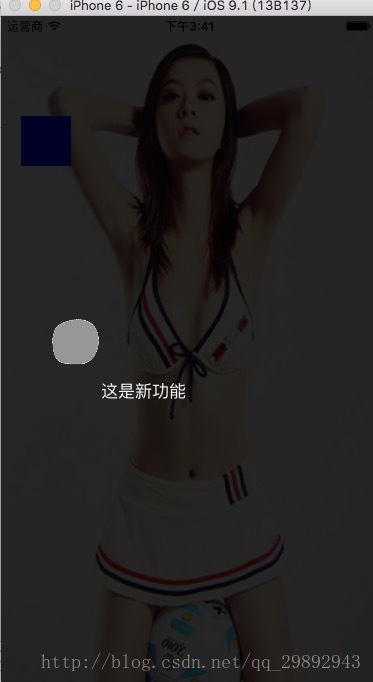
1.首先創建第一個viewcontroller 在上面放上一個imageview和一個按鈕
- (void)viewDidLoad {
  [super viewDidLoad];
  // Do any additional setup after loading the view.
  UIImageView *imageview=[[UIImageView alloc]init];
  imageview.frame=CGRectMake(0, 0, self.view.frame.size.width, self.view.frame.size.height);
  imageview.image=[UIImage imageNamed:@"girl.png"];
  [self.view addSubview:imageview];
  UIButton *Btn=[[UIButton alloc]init];
  Btn.frame=CGRectMake(20, 100, 50, 50);
  Btn.backgroundColor=[UIColor blueColor];
  [Btn addTarget:self action:@selector(btnclick) forControlEvents:UIControlEventTouchUpInside];
  [imageview addSubview:Btn];
  imageview.userInteractionEnabled=YES;
}
-(void)btnclick
{
  BackViewController *backVc=[[BackViewController alloc]init];
  [self presentViewController:backVc animated:YES completion:nil];
}
2.這時候我們在創建一個BackViewController 設置透明即可
- (instancetype)init
{
  self = [super init];
  if (self) {
    self.view.backgroundColor=[UIColor colorWithWhite:0 alpha:0.4];
    self.modalTransitionStyle = UIModalTransitionStyleCrossDissolve;
    self.modalPresentationStyle = UIModalPresentationOverFullScreen;
  }
  return self;
}
這裡提示一點,很多時候我們對視圖直接設置alpha屬性的值會導致其子控件也變得半透明,而通常我們的需求是:背景半透明而其子控件不透明。
因此我們可以用一下方法設置透明度
//只設置黑白背景色 white後面的參數表示灰度,從0-1之間表示從黑到白的變化,alpha就是你想調整的透明度。
  blackV.backgroundColor = [UIColor colorWithWhite:0.f alpha:0.7];
//設置任意顏色的背景色
blackV.backgroundColor = [UIColor colorWithRed:122/255.0 green:123/255.0 blue:234/255.0 alpha:0.7];
UIColor *color = [UIColor blackColor];
bgView.backgroundColor = [color colorWithAlphaComponent:0.5];
3.設置BackViewController上面的控件
- (void)viewDidLoad {
  [super viewDidLoad];
  UIButton *btn=[UIButton buttonWithType:UIButtonTypeCustom];
  btn.frame=CGRectMake(50, 300, 50, 50);
//  btn.backgroundColor=[UIColor blueColor];
  [self.view addSubview:btn];
  [btn setBackgroundImage:[UIImage imageNamed:@"userGuideBtnBG_unClear.png"] forState:UIControlStateNormal];
  [btn addTarget:self action:@selector(btnclick) forControlEvents:UIControlEventTouchUpInside];
  btn.backgroundColor=[UIColor clearColor];
  btn.alpha=0.75;
  UIView *view1=[[UIView alloc]init];
  view1.backgroundColor=[UIColor blackColor];
  view1.alpha=0.75;
  [self.view addSubview:view1];
  view1.frame=CGRectMake(0, 0, self.view.frame.size.width, 300);
  UIView *view2=[[UIView alloc]init];
  view2.backgroundColor=[UIColor blackColor];
  view2.alpha=0.75;
  [self.view addSubview:view2];
  view2.frame=CGRectMake(0, 300+50, self.view.frame.size.width, self.view.frame.size.height-50-300);
  UIView *view3=[[UIView alloc]init];
  view3.backgroundColor=[UIColor blackColor];
  view3.alpha=0.75;
  [self.view addSubview:view3];
  view3.frame=CGRectMake(0, 300, 50, 50);
  UIView *view4=[[UIView alloc]init];
  view4.backgroundColor=[UIColor blackColor];
  view4.alpha=0.75;
  [self.view addSubview:view4];
  view4.frame=CGRectMake(50+50, 300, self.view.frame.size.width-50-50, 50);
  UILabel *titlelabel=[[UILabel alloc]init];
  titlelabel.frame=CGRectMake(100, 350,100,50 );
  [self.view addSubview:titlelabel];
  titlelabel.text=@"這是新功能";
  titlelabel.textColor=[UIColor whiteColor];
}
-(void)btnclick
{
  [self dismissViewControllerAnimated:YES completion:nil];
}
原理很簡單,我們present出來一個透明的控制器,這樣在控制器上面放上幾個深度alpha的view和一個btn,哦,還需要一個label提示文字,也可以自己再添加一些箭頭什麼的,當然這個btn時美工扣圖處理之後給你的,然後通過改變它們的frame來實現不同位置的提示。因為是做的demo所以我用了frame,我建議用autolayout去定它們之間的關系,然後用transform來實現移動frame,然後可以提示多個新功能。
btn摳圖之後的效果:

以上所述是小編給大家介紹的iOS新功能引導提示界面實例詳解,希望對大家有所幫助,如果大家有任何疑問請給我留言,小編會及時回復大家的。在此也非常感謝大家對本站網站的支持!
- 上一頁:iOS中遍歷的方法總結
- 下一頁:iOS實現相冊和網絡圖片的存取

相關文章
+