iOS利用CoreImage實現人臉識別詳解
前言
CoreImage是Cocoa Touch中一個強大的API,也是iOS SDK中的關鍵部分,不過它經常被忽視。在本篇教程中,我會帶大家一起驗證CoreImage的人臉識別特性。在開始之前,我們先要簡單了解下CoreImage framework 組成
CoreImage framework組成
Apple 已經幫我們把image的處理分類好,來看看它的結構:
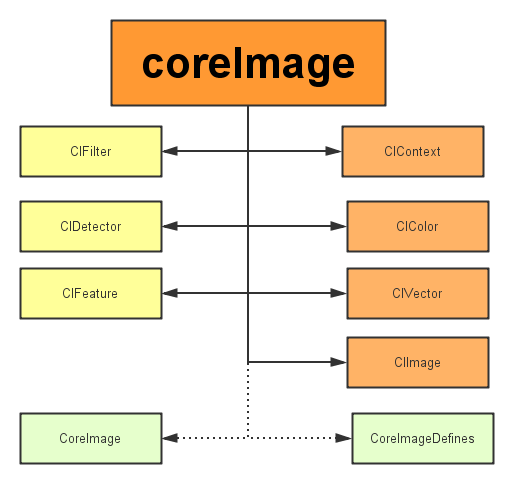
主要分為三個部分:
1、定義部分:CoreImage 和CoreImageDefines。見名思義,代表了CoreImage 這個框架和它的定義。
2、操作部分:
- 濾鏡(CIFliter):CIFilter 產生一個CIImage。典型的,接受一到多的圖片作為輸入,經過一些過濾操作,產生指定輸出的圖片。
- 檢測(CIDetector):CIDetector 檢測處理圖片的特性,如使用來檢測圖片中人臉的眼睛、嘴巴、等等。
- 特征(CIFeature):CIFeature 代表由 detector處理後產生的特征。
3、圖像部分:
- 畫布(CIContext):畫布類可被用與處理Quartz 2D 或者 OpenGL。可以用它來關聯CoreImage類。如濾鏡、顏色等渲染處理。
- 顏色(CIColor): 圖片的關聯與畫布、圖片像素顏色的處理。
- 向量(CIVector): 圖片的坐標向量等幾何方法處理。
- 圖片(CIImage): 代表一個圖像,可代表關聯後輸出的圖像。
在了解上述基本知識後,我們開始通過創建一個工程來帶大家一步步驗證Core Image的人臉識別特性。
將要構建的應用
iOS的人臉識別從iOS 5(2011)就有了,不過一直沒怎麼被關注過。人臉識別API允許開發者不僅可以檢測人臉,也可以檢測到面部的一些特殊屬性,比如說微笑或眨眼。
首先,為了了解Core Image的人臉識別技術我們會創建一個app來識別照片中的人臉並用一個方框來標記它。在第二個demo中,讓用戶拍攝一張照片,檢測其中的人臉並檢索人臉位置。這樣一來,就充分掌握了iOS中的人臉識別,並且學會如何利用這個強大卻總被忽略的API。
話不多說,開搞!
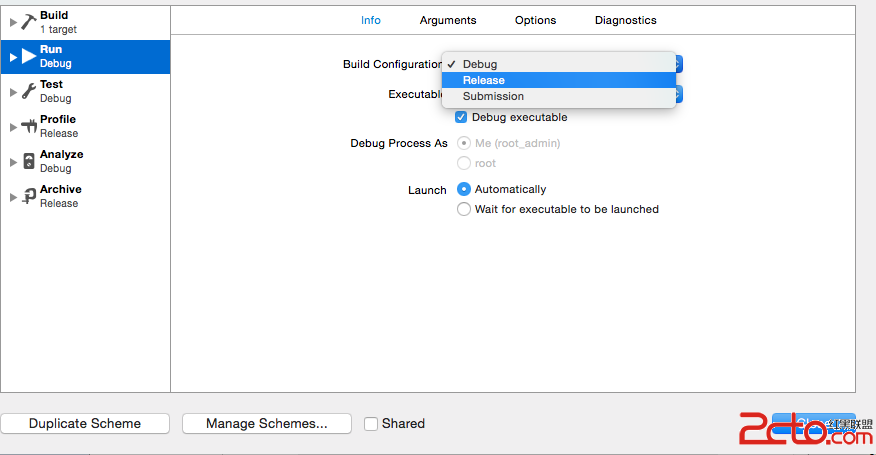
建立工程(我用的是Xcode8.0)
這裡提供了初始工程,當然你也可以自己創建(主要是為了方便大家)點我下載 用Xcode打開下載後的工程,可以看到裡面只有一個關聯了IBOutlet和imageView的StoryBoard。

使用CoreImage識別人臉
在開始工程中,故事板中的imageView組件與代碼中的IBOutlet已關聯,接下來要編寫實現人臉識別的代碼部分。在ViewController.swift文件中寫下如下代碼:
import UIKit
import CoreImage // 引入CoreImage
class ViewController: UIViewController {
 @IBOutlet weak var personPic: UIImageView!

 override func viewDidLoad() {
 super.viewDidLoad()

 personPic.image = UIImage(named: "face-1")
 // 調用detect
 detect()

 }
 //MARK: - 識別面部
 func detect() {
 // 創建personciImage變量保存從故事板中的UIImageView提取圖像並將其轉換為CIImage,使用Core Image時需要用CIImage
 guard let personciImage = CIImage(image: personPic.image!) else {
  return
 }
 // 創建accuracy變量並設為CIDetectorAccuracyHigh,可以在CIDetectorAccuracyHigh(較強的處理能力)與CIDetectorAccuracyLow(較弱的處理能力)中選擇,因為想讓准確度高一些在這裡選擇CIDetectorAccuracyHigh
 let accuracy = [CIDetectorAccuracy: CIDetectorAccuracyHigh]
 // 這裡定義了一個屬於CIDetector類的faceDetector變量,並輸入之前創建的accuracy變量
 let faceDetector = CIDetector(ofType: CIDetectorTypeFace, context: nil, options: accuracy)
 // 調用faceDetector的featuresInImage方法,識別器會找到所給圖像中的人臉,最後返回一個人臉數組
 let faces = faceDetector?.features(in: personciImage)
 // 循環faces數組裡的所有face,並將識別到的人臉強轉為CIFaceFeature類型
 for face in faces as! [CIFaceFeature] {

  print("Found bounds are \(face.bounds)")
  // 創建名為faceBox的UIView,frame設為返回的faces.first的frame,繪制一個矩形框來標識識別到的人臉
  let faceBox = UIView(frame: face.bounds)
  // 設置faceBox的邊框寬度為3
  faceBox.layer.borderWidth = 3
  // 設置邊框顏色為紅色
  faceBox.layer.borderColor = UIColor.red.cgColor
  // 將背景色設為clear,意味著這個視圖沒有可見的背景
  faceBox.backgroundColor = UIColor.clear
  // 最後,把這個視圖添加到personPic imageView上
  personPic.addSubview(faceBox)
  // API不僅可以幫助你識別人臉,也可識別臉上的左右眼,我們不在圖像中標識出眼睛,只是給你展示一下CIFaceFeature的相關屬性
  if face.hasLeftEyePosition {
  print("Left eye bounds are \(face.leftEyePosition)")
  }

  if face.hasRightEyePosition {
  print("Right eye bounds are \(face.rightEyePosition)")
  }
 }
 }
}
編譯並運行app,結果應如下圖所示:
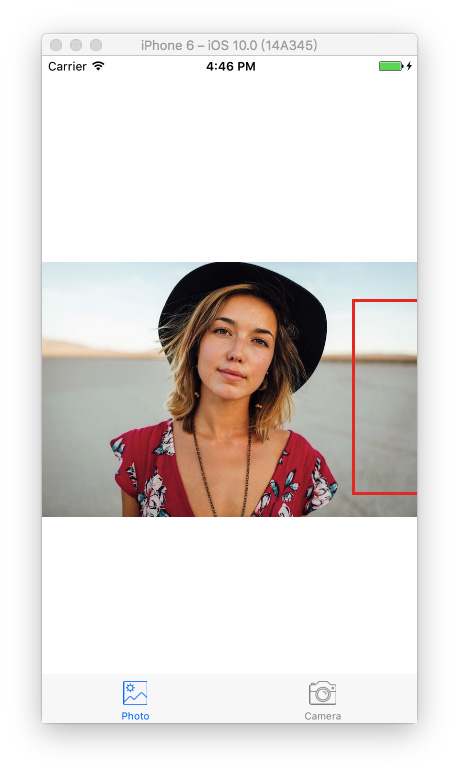
根據控制台的輸出來看,貌似識別器識別到了人臉:
Found bounds are (314.0, 243.0, 196.0, 196.0)
當前的實現中沒有解決的問題:
- 人臉識別是在原始圖像上進行的,由於原始圖像的分辨率比image view要高,因此需要設置image view的content mode為aspect fit(保持縱橫比的情況下縮放圖片)。為了合適的繪制矩形框,需要計算image view中人臉的實際位置與尺寸
- 還要注意的是,CoreImage與UIView使用兩種不同的坐標系統(看下圖),因此要實現一個CoreImage坐標到UIView坐標的轉換。
UIView坐標系:
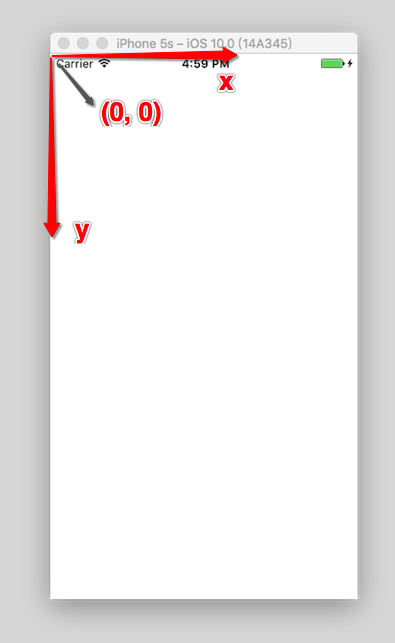
CoreImage坐標系:

現在使用下面的代碼替換detect()方法:
func detect1() {

 guard let personciImage = CIImage(image: personPic.image!) else { return }
 let accuracy = [CIDetectorAccuracy: CIDetectorAccuracyHigh]
 let faceDetector = CIDetector(ofType: CIDetectorTypeFace, context: nil, options: accuracy)
 let faces = faceDetector?.features(in: personciImage)

 // 轉換坐標系
 let ciImageSize = personciImage.extent.size
 var transform = CGAffineTransform(scaleX: 1, y: -1)
 transform = transform.translatedBy(x: 0, y: -ciImageSize.height)

 for face in faces as! [CIFaceFeature] {
 print("Found bounds are \(face.bounds)")
 // 應用變換轉換坐標
 var faceViewBounds = face.bounds.applying(transform)
 // 在圖像視圖中計算矩形的實際位置和大小
 let viewSize = personPic.bounds.size
 let scale = min(viewSize.width / ciImageSize.width, viewSize.height / ciImageSize.height)
 let offsetX = (viewSize.width - ciImageSize.width * scale) / 2
 let offsetY = (viewSize.height - ciImageSize.height * scale) / 2

 faceViewBounds = faceViewBounds.applying(CGAffineTransform(scaleX: scale, y: scale))
 faceViewBounds.origin.x += offsetX
 faceViewBounds.origin.y += offsetY

 let faceBox = UIView(frame: faceViewBounds)
 faceBox.layer.borderWidth = 3
 faceBox.layer.borderColor = UIColor.red.cgColor
 faceBox.backgroundColor = UIColor.clear
 personPic.addSubview(faceBox)

 if face.hasLeftEyePosition {
  print("Left eye bounds are \(face.leftEyePosition)")
 }

 if face.hasRightEyePosition {
  print("Right eye bounds are \(face.rightEyePosition)")
 }
 }
}
上述代碼中,首先使用仿射變換(AffineTransform)將Core Image坐標轉換為UIKit坐標,然後編寫了計算實際位置與矩形視圖尺寸的代碼。
再次運行app,應該會看到人的面部周圍會有一個框。OK,你已經成功使用Core Image識別出了人臉。

但是有的童鞋在使用了上面的代碼運行後可能會出現方框不存在(即沒有識別人臉)這種情況,這是由於忘記關閉Auto Layout以及Size Classes了。 選中storyBoard中的ViewController,選中view下的imageView。然後在右邊的面板中的第一個選項卡中找到use Auto Layout ,將前面的✔️去掉就可以了
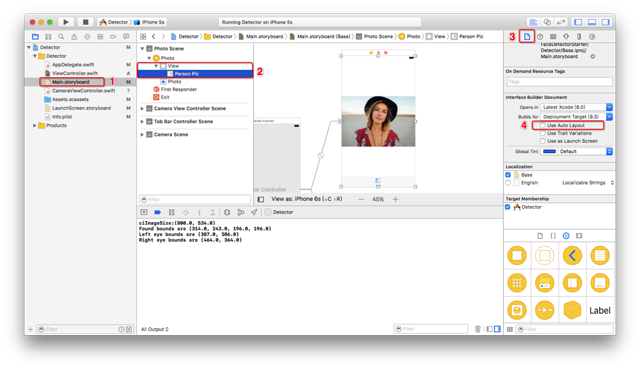
經過上面的設置後我們再次運行App,就會看到圖三出現的效果了。
構建一個人臉識別的相機應用
想象一下你有一個用來照相的相機app,照完相後你想運行一下人臉識別來檢測一下是否存在人臉。若存在一些人臉,你也許想用一些標簽來對這些照片進行分類。我們不會構建一個保存照片後再處理的app,而是一個實時的相機app,因此需要整合一下UIImagePicker類,在照完相時立刻進行人臉識別。
在開始工程中已經創建好了CameraViewController類,使用如下代碼實現相機的功能:
class CameraViewController: UIViewController, UIImagePickerControllerDelegate, UINavigationControllerDelegate {
 @IBOutlet var imageView: UIImageView!
 let imagePicker = UIImagePickerController()

 override func viewDidLoad() {
  super.viewDidLoad()
  imagePicker.delegate = self
 }

 @IBAction func takePhoto(_ sender: AnyObject) {

  if !UIImagePickerController.isSourceTypeAvailable(.camera) {
   return
  }

  imagePicker.allowsEditing = false
  imagePicker.sourceType = .camera

  present(imagePicker, animated: true, completion: nil)
 }

 func imagePickerController(_ picker: UIImagePickerController, didFinishPickingMediaWithInfo info: [String : Any]) {

  if let pickedImage = info[UIImagePickerControllerOriginalImage] as? UIImage {
   imageView.contentMode = .scaleAspectFit
   imageView.image = pickedImage
  }

  dismiss(animated: true, completion: nil)
  self.detect()
 }

 func imagePickerControllerDidCancel(_ picker: UIImagePickerController) {
  dismiss(animated: true, completion: nil)
 }
}
前面幾行設置UIImagePicker委托為當前視圖類,在didFinishPickingMediaWithInfo方法(UIImagePicker的委托方法)中設置imageView為在方法中所選擇的圖像,接著返回上一視圖調用detect函數。
還沒有實現detect函數,插入下面代碼並分析一下:
func detect() {
 let imageOptions = NSDictionary(object: NSNumber(value: 5) as NSNumber, forKey: CIDetectorImageOrientation as NSString)
 let personciImage = CIImage(cgImage: imageView.image!.cgImage!)
 let accuracy = [CIDetectorAccuracy: CIDetectorAccuracyHigh]
 let faceDetector = CIDetector(ofType: CIDetectorTypeFace, context: nil, options: accuracy)
 let faces = faceDetector?.features(in: personciImage, options: imageOptions as? [String : AnyObject])

 if let face = faces?.first as? CIFaceFeature {
  print("found bounds are \(face.bounds)")

  let alert = UIAlertController(title: "提示", message: "檢測到了人臉", preferredStyle: UIAlertControllerStyle.alert)
  alert.addAction(UIAlertAction(title: "確定", style: UIAlertActionStyle.default, handler: nil))
  self.present(alert, animated: true, completion: nil)

  if face.hasSmile {
   print("face is smiling");
  }

  if face.hasLeftEyePosition {
   print("左眼的位置: \(face.leftEyePosition)")
  }

  if face.hasRightEyePosition {
   print("右眼的位置: \(face.rightEyePosition)")
  }
 } else {
  let alert = UIAlertController(title: "提示", message: "未檢測到人臉", preferredStyle: UIAlertControllerStyle.alert)
  alert.addAction(UIAlertAction(title: "確定", style: UIAlertActionStyle.default, handler: nil))
  self.present(alert, animated: true, completion: nil)
 }
}
這個detect()函數與之前實現的detect函數非常像,不過這次只用它來獲取圖像不做變換。當識別到人臉後顯示一個警告信息“檢測到了人臉!”,否則顯示“未檢測到人臉”。運行app測試一下:


我們已經使用到了一些CIFaceFeature的屬性與方法,比如,若想檢測人物是否微笑,可以調用.hasSmile,它會返回一個布爾值。可以分別使用.hasLeftEyePosition與.hasRightEyePosition檢測是否存在左右眼。
同樣,可以調用hasMouthPosition來檢測是否存在嘴,若存在則可以使用mouthPosition屬性,如下所示:
if (face.hasMouthPosition) {
 print("mouth detected")
}
如你所見,使用Core Image來檢測面部特征是非常簡單的。除了檢測嘴、笑容、眼睛外,也可以調用leftEyeClosed與rightEyeClosed檢測左右眼是否睜開,這裡就不在貼出代碼了。
總結
在這篇教程中嘗試了CoreImage的人臉識別API與如何在一個相機app中應用它,構建了一個簡單的UIImagePicker來選取照片並檢測圖像中是否存在人物。
如你所見,Core Image的人臉識別是個強大的API!希望這篇教程能給你提供一些關於這個鮮為人知的iOS API有用的信息。
Github地址:點擊swift版地址,OC版地址下載
本地下載:點擊swift版地址,OC版地址下載
好了,以上就是這篇文章的全部內容了,希望本文的內容對大家的學習或者工作能帶來一定的幫助,如果有疑問大家可以留言交流,謝謝大家對本站的支持。