詳解iOS中Button按鈕的狀況和點擊事宜
1、按鈕的狀況
1.UIControlStateNormal
1> 除開UIControlStateHighlighted、UIControlStateDisabled、UIControlStateSelected之外的其他情形,都是normal狀況
2> 這類狀況下的按鈕【可以】吸收點擊事宜
2.UIControlStateHighlighted
1> 【當按住按鈕不松開】或許【highlighted = YES】時就可以到達這類狀況
2> 這類狀況下的按鈕【可以】吸收點擊事宜
3.UIControlStateDisabled
1> 【button.enabled = NO】時就可以到達這類狀況
2> 這類狀況下的按鈕【沒法】吸收點擊事宜
4.UIControlStateSelected
1> 【button.selected = YES】時就可以到達這類狀況
2> 這類狀況下的按鈕【可以】吸收點擊事宜
2、讓按鈕沒法點擊的2種辦法
1> button.enabled = NO;
*【會】進入UIControlStateDisabled狀況
2> button.userInteractionEnabled = NO;
*【不會】進入UIControlStateDisabled狀況,持續堅持以後狀況
3、IOS中按鈕點擊事宜處置方法
在IOS開辟中,經常會用到按鈕,經由過程按鈕的點擊來完成界面的跳轉等功效。按鈕事宜的完成方法有多種,個中
較為經常使用的是目的-舉措對形式。但這類方法使得view與controller之間的耦合水平較高,不推舉應用;
另外一種方法是署理方法,按鈕的事宜在view中綁定,controller作為view的署理完成署理辦法。
目的-舉措對完成方法
詳細來講,假定我們有一個包括一個Button的veiw,view將Button放在頭文件中,以便內部拜訪。然後controller將view作為本身的view,在viewcontroller中完成按鈕的點擊事宜。
文字描寫起來似乎不敷直不雅,直接上代碼
1、MyView.h
包括一個可被內部拜訪的按鈕的view
@interface MyView : UIView

@property (strong, nonatomic) UIButton *myBtn;

@end
2、MyView.m
#import "MyView.h"
@implementation MyView
//view的初始化辦法
- (id)initWithFrame:(CGRect)frame
{
self = [super initWithFrame:frame];
if (self)
{ //初始化按鈕
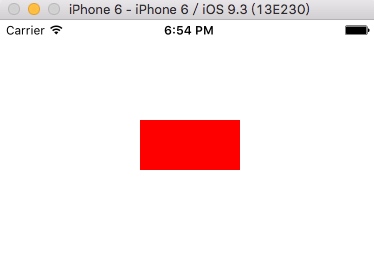
_myBtn = [[UIButton alloc] initWithFrame:CGRectMake(140, 100, 100, 50)];
_myBtn.backgroundColor = [UIColor redColor];
//將按鈕添加到本身
[self addSubview:_myBtn];
}
return self;
}
@end
3、MyViewController.h
#import <UIKit/UIKit.h>

@interface MyViewController : UIViewController

@end
4、MyViewController.m
添加MyView作為本身view
#import "MyViewController.h"
#import "MyView.h"

@interface MyViewController ()

@property (strong, nonatomic) MyView *myview;

@end

@implementation MyViewController

- (void)loadView
{
 MyView *myView = [[MyView alloc] initWithFrame: [[UIScreen mainScreen] bounds] ];
 self.view = myView;
 self.myview = myView;

 //在controller中設置按鈕的目的-舉措,個中目的是self,也就是掌握器本身,舉措是用目的供給的BtnClick:辦法,
 [self.myview.myBtn addTarget:self
    action:@selector(BtnClick:)
  forControlEvents:UIControlEventTouchUpInside];
}

//MyView中的按鈕的事宜
- (void)BtnClick:(UIButton *)btn
{
 NSLog(@"Method in controller.");
 NSLog(@"Button clicked.");
}
5、 AppDelegate.m
 #import "AppDelegate.h"
#import "MyViewController.h"

@interface AppDelegate ()

@end

@implementation AppDelegate

- (BOOL)application:(UIApplication *)application didFinishLaunchingWithOptions:(NSDictionary *)launchOptions {

 self.Window = [ [UIWindow alloc] initWithFrame: [[UIScreen mainScreen] bounds ] ];

 MyViewController *myVC = [[MyViewController alloc] init];
 self.Window.rootViewController = myVC;

 self.window.backgroundColor = [UIColor whiteColor];
 [self.window makeKeyAndVisible];

 return YES;
}
6、運轉成果
界面:
輸入:

總結
以上就是這篇文章的全體內容了,願望能對年夜家的進修或許任務帶來必定的贊助,假如有疑問年夜家可以留言交換。
【詳解iOS中Button按鈕的狀況和點擊事宜】的相關資料介紹到這裡,希望對您有所幫助! 提示:不會對讀者因本文所帶來的任何損失負責。如果您支持就請把本站添加至收藏夾哦!
- 簡單設置,讓iPhone可控制車庫門
- iPhone使用技巧:利用QQ影音隱藏電影
- iTunesConnect後台狀態指示器全揭秘,紅燈代表下架或被拒?
- 蘋果5S ios7.1.1升級到ios7.1.2資料會刪除嗎?怎麼備份?
- ios10.2怎麼降iOS9.3.3?ios10.2正式版降級教程[圖]
- 蘋果6怎麼恢復通訊錄?手機通訊錄沒有了怎麼辦
- 深不可測!盤點iOS 10的23個隱藏新特性
- 無需越獄iPhone上如何查看網頁的源代碼
- UIWebView保存圖片
- How to resolve valid signing identity not found in provisioning profiles library