iOS開發--仿舊事首頁效果WMPageController的運用詳解
編輯:IOS開發綜合
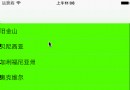
這一篇記載的是IOS開發中第三方庫WMPageController控件的運用辦法,次要是用來分頁顯示內容的,可以經過手勢滑動來切換頁面,也可以經過點擊標題局部來切換頁面,如下圖所示:
運用辦法:
新建工程DemoTest1,然後經過cocoapods引入WMPageController到項目中,Podfile文件的內容如下:
platform :IOS,'7.0'

target 'DemoTest1' do

 pod 'WMPageController', '~> 1.6.4'

end
辦法一:
(1)創立幾個ViewController承繼自UIViewController測試用:
(2)翻開AppDelegate.m文件,在其中參加上面一個辦法:
#import "WMPageController.h"

#import "OneViewController.h"
#import "ViewController.h"
#import "TwoViewController.h"

@interface AppDelegate ()

@property(nonatomic,strong) WMPageController *createPages;

@end

@implementation AppDelegate

- (WMPageController *)createPages {


  //WMPageController中包括的頁面數組
  NSArray *controllers = [NSArray arrayWithObjects:[ViewController class], [OneViewController class],[TwoViewController class], nil];
  //WMPageController控件的標題數組
  NSArray *titles = [NSArray arrayWithObjects:@"體育舊事", @"文娛舊事",@"直播舊事", nil];
  //用下面兩個數組初始化WMPageController對象
  WMPageController *pageController = [[WMPageController alloc] initWithViewControllerClasses:controllers andTheirTitles:titles];
  pageController.menuViewStyle = WMMenuViewStyleLine;
  pageController.titleColorSelected = [UIColor whiteColor];
  pageController.titleColorNormal = [UIColor colorWithRed:168.0/255.0 green:20.0/255.0 blue:4/255.0 alpha:1];
  pageController.progressColor = [UIColor colorWithRed:168.0/255.0 green:20.0/255.0 blue:4/255.0 alpha:1];
  //  pageController.itemsWidths = @[@(70),@(100),@(70)]; // 這裡可以設置不同的寬度

  //設置WMPageController每個標題的寬度
  pageController.menuItemWidth = 375/3;
  //設置WMPageController標題欄的高度
  pageController.menuHeight = 35;
  //設置WMPageController選中的標題的顏色
  pageController.titleColorSelected = [UIColor colorWithRed:200 green:0 blue:0 alpha:1];
  return pageController;
}


- (BOOL)application:(UIApplication *)application didFinishLaunchingWithOptions:(NSDictionary *)launchOptions {


 self.Window = [[UIWindow alloc] initWithFrame:[UIScreen mainScreen].bounds];


  WMPageController *page = [self createPages];

  UINavigationController *na = [[UINavigationController alloc] initWithRootViewController:page];

  self.Window.rootViewController = na;

  [self.window makeKeyAndVisible];

  return YES;
}
辦法二:
(1)創立個ViewController承繼自WMPageController
(2)編輯ViewController.m文件,代碼如下:
初始化設置:
#import "TwoViewController.h"
#import "OneViewController.h"
#import "TableViewController.h"

#import "ThreeViewController.h"

@interface ThreeViewController ()

@property (nonatomic, strong) NSArray *titleData;
@end

@implementation ThreeViewController

#pragma mark 標題數組
- (NSArray *)titleData {
  if (!_titleData) {
    _titleData = @[@"單曲", @"概況", @"歌詞",@"歌詞"];
  }
  return _titleData;
}
#pragma mark 初始化代碼
- (instancetype)init {
  if (self = [super init]) {


    self.titleSizeNormal = 15;
    self.titleSizeSelected = 15;
    self.menuViewStyle = WMMenuViewStyleLine;
    self.menuItemWidth = [UIScreen mainScreen].bounds.size.width / self.titleData.count;
    self.menuHeight = 50;
  }
  return self;
}
WMPageController --Datasource & Delegate
#pragma mark - Datasource & Delegate

#pragma mark 前往子頁面的個數
- (NSInteger)numbersOfChildControllersInPageController:(WMPageController *)pageController {
  return self.titleData.count;
}

#pragma mark 前往某個index對應的頁面
- (UIViewController *)pageController:(WMPageController *)pageController viewControllerAtIndex:(NSInteger)index {


  switch (index) {
      case 0:{

        TwoViewController  *vcClass = [[TwoViewController alloc] init];
        vcClass.title = @"1";

        return vcClass;
      }

        break;
      case 1:{

        OneViewController *vcClass = [OneViewController new];
        vcClass.title = @"2";
        return vcClass;

      }
        break;
      case 2:{

        TableViewController *vcClass = [TableViewController new];
        vcClass.title = @"3";
        return vcClass;

      }
        break;

      default:{

        OneViewController *vcClass = [OneViewController new];
        vcClass.title = @"4";
        return vcClass;

      }

        break;
    }


}

#pragma mark 前往index對應的標題
- (NSString *)pageController:(WMPageController *)pageController titleAtIndex:(NSInteger)index {

  return self.titleData[index];
}
相關設置:
/**
 * Values and keys can set properties when initialize child controlelr (it's KVC)
 * values keys 屬性可以用於初始化控制器的時分為控制器傳值(應用 KVC 來設置)
  運用時請確保 key 與控制器的屬性名字分歧!!(例如:控制器有需求設置的屬性 type,那麼 keys 所放的就是字符串 @"type")
 */
@property (nonatomic, strong) NSMutableArray<id> *values;
@property (nonatomic, strong) NSMutableArray<NSString *> *keys;

/**
 * 各個控制器的 class, 例如:[UITableViewController class]
 * Each controller's class, example:[UITableViewController class]
 */
@property (nonatomic, copy) NSArray<Class> *viewControllerClasses;

/**
 * 各個控制器標題
 * Titles of view controllers in page controller.
 */
@property (nonatomic, copy) NSArray<NSString *> *titles;
@property (nonatomic, strong, readonly) UIViewController *currentViewController;

/**
 * 設置選中幾號 item
 * To select item at index
 */
@property (nonatomic, assign) int selectIndex;

/**
 * 點擊相鄰的 MenuItem 能否觸發翻頁動畫 (當以後選中與點擊Item相差大於1是不觸發)
 * Whether to animate when press the MenuItem, if distant between the selected and the pressed is larger than 1,never animate.
 */
@property (nonatomic, assign) BOOL pageAnimatable;

/**
 * 選中時的標題尺寸
 * The title size when selected (animatable)
 */
@property (nonatomic, assign) CGFloat titleSizeSelected;

/**
 * 非選中時的標題尺寸
 * The normal title size (animatable)
 */
@property (nonatomic, assign) CGFloat titleSizeNormal;

/**
 * 標題選中時的顏色, 顏色是可動畫的.
 * The title color when selected, the color is animatable.
 */
@property (nonatomic, strong) UIColor *titleColorSelected;

/**
 * 標題非選擇時的顏色, 顏色是可動畫的.
 * The title's normal color, the color is animatable.
 */
@property (nonatomic, strong) UIColor *titleColorNormal;

/**
 * 標題的字體名字
 * The name of title's font
 */
@property (nonatomic, copy) NSString *titleFontName;

/**
 * 導航欄高度
 * The menu view's height
 */
@property (nonatomic, assign) CGFloat menuHeight;

// 當一切item的寬度加起來小於屏幕寬時,PageController會自動協助排版,添加每個item之間的間隙以填充整個寬度
// When the sum of all the item's width is smaller than the screen's width, pageController will add gap to each item automatically, in order to fill the width.

/**
 * 每個 MenuItem 的寬度
 * The item width,when all are same,use this property
 */
@property (nonatomic, assign) CGFloat menuItemWidth;

/**
 * 各個 MenuItem 的寬度,可不等,數組內為 NSNumber.
 * Each item's width, when they are not all the same, use this property, Put `NSNumber` in this array.
 */
@property (nonatomic, copy) NSArray<NSNumber *> *itemsWidths;

/**
 * 導航欄背風光
 * The background color of menu view
 */
@property (nonatomic, strong) UIColor *menuBGColor;

/**
 * Menu view 的款式,默許為無下劃線
 * Menu view's style, now has two different styles, 'Line','default'
 */
@property (nonatomic, assign) WMMenuViewStyle menuViewStyle;

@property (nonatomic, assign) WMMenuViewLayoutMode menuViewLayoutMode;

/**
 * 進度條的顏色,默許和選中顏色分歧(假如 style 為 Default,則該屬性無用)
 * The progress's color,the default color is same with `titleColorSelected`.If you want to have a different color, set this property.
 */
@property (nonatomic, strong) UIColor *progressColor;

/**
 * 定制進度條在各個 item 下的寬度
 */
@property (nonatomic, strong) NSArray *progressViewWidths;

/// 定制進度條,若每個進度條長度相反,可設置該屬性
@property (nonatomic, assign) CGFloat progressWidth;

/// 淘氣效果,用於完成騰訊視頻新效果,請設置一個較小的 progressWidth
@property (nonatomic, assign) BOOL progressViewIsNaughty;

/**
 * 能否發送在創立控制器或許視圖完全展示在用戶眼前時告訴察看者,默許為不開啟,如需應用告訴請開啟
 * Whether notify observer when finish init or fully displayed to user, the default is NO.
 * See `WMPageConst.h` for more information.
 */
@property (nonatomic, assign) BOOL postNotification;

/**
 * 能否記載 Controller 的地位,並在下次回來的時分回到相應地位,默許為 NO (若以後緩存中存在不會觸發)
 * Whether to remember controller's positon if it's a kind of scrollView controller,like UITableViewController,The default value is NO.
 * 比方 `UITabelViewController`, 當然你也可以在自己的控制器中自行設置, 假如將 Controller.view 交換為 scrollView 或許在Controller.view 上添加了一個和本身 bounds 一樣的 scrollView 也是OK的
 */
@property (nonatomic, assign) BOOL rememberLocation __deprecated_msg("Because of the cache policy,this property can abondon now.");

/** 緩存的機制,默許為有限制 (假如收到內存正告, 會自動切換) */
@property (nonatomic, assign) WMPageControllerCachePolicy cachePolicy;

/** 預加載機制,在中止滑動的時分預加載 n 頁 */
@property (nonatomic, assign) WMPageControllerPreloadPolicy preloadPolicy;

/** Whether ContentView bounces */
@property (nonatomic, assign) BOOL bounces;

/**
 * 能否作為 NavigationBar 的 titleView 展現,默許 NO
 * Whether to show on navigation bar, the default value is `NO`
 */
@property (assign, nonatomic) BOOL showOnNavigationBar;

/**
 * 用代碼設置 contentView 的 contentOffset 之前,請設置 startDragging = YES
 * Set startDragging = YES before set contentView.contentOffset = xxx;
 */
@property (nonatomic, assign) BOOL startDragging;

/** 下劃線進度條的高度 */
@property (nonatomic, assign) CGFloat progressHeight;

/** WMPageController View' frame */
@property (nonatomic, assign) CGRect viewFrame;

/**
 * Menu view items' margin / make sure it's count is equal to (controllers' count + 1),default is 0
  頂部菜單欄各個 item 的間隙,由於包括頭尾兩端,所以確保它的數量等於控制器數量 + 1, 默許間隙為 0
 */
@property (nonatomic, copy) NSArray<NSNumber *> *itemsMargins;

/**
 * set itemMargin if all margins are the same, default is 0
  假如各個間隙都想同,設置該屬性,默許為 0
 */
@property (nonatomic, assign) CGFloat itemMargin;

/** 頂部 menuView 和 scrollView 之間的間隙 */
@property (nonatomic, assign) CGFloat menuViewBottomSpace;

/** progressView 到 menuView 底部的間隔 */
@property (nonatomic, assign) CGFloat progressViewBottomSpace;

/** progressView's cornerRadius */
@property (nonatomic, assign) CGFloat progressViewCornerRadius;
/** 頂部導航欄 */
@property (nonatomic, weak) WMMenuView *menuView;

/** 外部容器 */
@property (nonatomic, weak) WMScrollView *scrollView;

/** MenuView 外部視圖與左右的間距 */
@property (nonatomic, assign) CGFloat menuViewContentMargin;

/**
 * 左滑時同時啟用其他手勢,比方零碎左滑、sidemenu左滑。默許 NO
  (會惹起一個小問題,第一個和最後一個控制器會變得可以斜滑, 還未處理)
 */
@property (assign, nonatomic) BOOL otherGestureRecognizerSimultaneously;
/**
 * 結構辦法,請運用該辦法創立控制器. 或許完成數據源辦法. /
 * Init method,recommend to use this instead of `-init`. Or you can implement datasource by yourself.
 *
 * @param classes 子控制器的 class,確保數量與 titles 的數量相等
 * @param titles 各個子控制器的標題,用 NSString 描繪
 *
 * @return instancetype
 */
- (instancetype)initWithViewControllerClasses:(NSArray<Class> *)classes andTheirTitles:(NSArray<NSString *> *)titles;

/**
 * A method in order to reload MenuView and child view controllers. If you had set `itemsMargins` or `itemsWidths` `values` and `keys` before, make sure you have update them also before you call this method. And most important, PAY ATTENTION TO THE COUNT OF THOSE ARRAY.
  該辦法用於重置刷新父控制器,該刷新包括頂部 MenuView 和 childViewControllers.假如之前設置過 `itemsMargins` 和 `itemsWidths` `values` 以及 `keys` 屬性,請確保在調用 reload 之前也同時更新了這些屬性。並且,最最最重要的,留意數組的個數以避免溢出。
 */
- (void)reloadData;

/**
 * Update designated item's title
  更新指定序號的控制器的標題
 *
 * @param title 新的標題
 * @param index 目的序號
 */
- (void)updateTitle:(NSString *)title atIndex:(NSInteger)index;

/**
 * Update designated item's title and width
  更新指定序號的控制器的標題以及他的寬度
 *
 * @param title 新的標題
 * @param index 目的序號
 * @param width 對應item的新寬度
 */
- (void)updateTitle:(NSString *)title andWidth:(CGFloat)width atIndex:(NSInteger)index;

/** 當 app 行將進入後台接納到的告訴 */
- (void)willResignActive:(NSNotification *)notification;
/** 當 app 行將回到前台接納到的告訴 */
- (void)willEnterForeground:(NSNotification *)notification;
源碼demo:源碼下載
以上就是本文的全部內容,希望對大家的學習有所協助,也希望大家多多支持本站。
【iOS開發--仿舊事首頁效果WMPageController的運用詳解】的相關資料介紹到這裡,希望對您有所幫助! 提示:不會對讀者因本文所帶來的任何損失負責。如果您支持就請把本站添加至收藏夾哦!

相關文章
+