unity工程導入到iOS項目
編輯:IOS開發綜合
由於公司需求,需求把在IOS項目裡添加unity工程,所以在網上搜索了材料和結合自己遇到的問題,做出的總結。
先刪除項目裡的Main.storyboard 文件(聽說是為了方便切換Window)先在自己項目裡創立一個文件夾,用來寄存unity文件,然後把unity項目裡的Classes,Libraries,MapFileParser.sh拖入到項目(選中Copy
items if needed,選中Create groups)將Data拖入到項目(選中Copy
items if needed,選中Create folder references),如下圖這樣:  添加所需的framework:
  other C Flags -> -DINIT_SCRIPTING_BACKEND=1
 將Unity/Classes/Prefix.pch的代碼復制到項目裡的pch文件(留意pch裡有用到impot的都要用
#ifdef __OBJC__
#endif
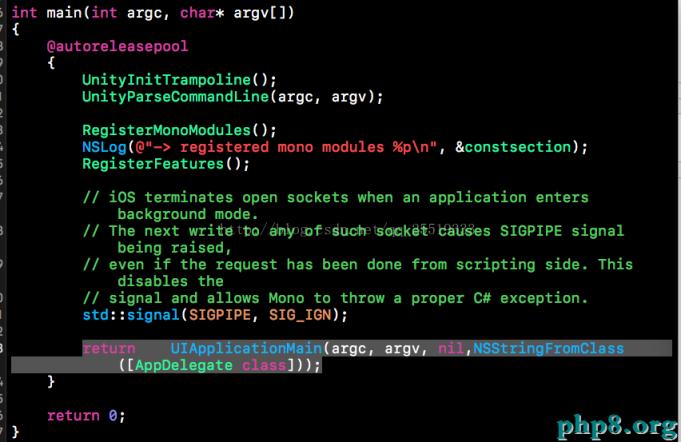
給括起來,這是由於unity裡的項目有很多cpp文件,等下會發作混編錯誤)將Classes/main.mm全部內容復制到main.m 並把擴展名改為.mm, 然後刪除Classes/main.mm文件,修正如下代碼
修正UnityAppController.h如下代碼
inline UnityAppController*	GetAppController()
{
    return (UnityAppController*)[[UIApplication sharedApplication] valueForKeyPath:@"delegate.unityController"];
}
在AppDelegate.h .m中添加如下代碼#import <UIKit/UIKit.h> #import "UnityAppController.h" @interface AppDelegate : UIResponder <UIApplicationDelegate> @property (strong, nonatomic) UIWindow *Window; @property (strong, nonatomic) UIWindow *unityWindow; @property (strong, nonatomic) UnityAppController *unityController; - (void)showUnityWindow; - (void)hideUnityWindow;
#import "AppDelegate.h"
#import "ViewController.h"
@interface AppDelegate ()

@end

@implementation AppDelegate

- (UIWindow *)unityWindow{
    return UnityGetMainWindow();
}

- (void)showUnityWindow{
    [self.unityWindow makeKeyAndVisible];
}

- (void)hideUnityWindow{
    [self.window makeKeyAndVisible];
}

- (BOOL)application:(UIApplication *)application didFinishLaunchingWithOptions:(NSDictionary *)launchOptions {
    // Override point for customization after application launch.
    self.window = [[UIWindow alloc] initWithFrame:[UIScreen mainScreen].bounds];
    self.window.backgroundColor = [UIColor whiteColor];
    ViewController * vc = [[ViewController alloc]init];
    self.window.rootViewController = vc;

    self.unityController = [[UnityAppController alloc]init];
    [self.unityController application:application didFinishLaunchingWithOptions:launchOptions];

    [self.window makeKeyAndVisible];
    return YES;
}


- (void)applicationWillResignActive:(UIApplication *)application {
    [self.unityController applicationWillResignActive:application];
}


- (void)applicationDidEnterBackground:(UIApplication *)application {
    [self.unityController applicationDidEnterBackground:application];
}


- (void)applicationWillEnterForeground:(UIApplication *)application {
    [self.unityController applicationWillEnterForeground:application];
}


- (void)applicationDidBecomeActive:(UIApplication *)application {
    [self.unityController applicationDidBecomeActive:application];
}


- (void)applicationWillTerminate:(UIApplication *)application {
    [self.unityController applicationWillTerminate:application];
}


@end
把UnityAppController裡的
UnityViewControllerBase* _viewControllerForOrientation[5];改為
UIViewController* _viewControllerForOrientation[5];先在viewcontroller裡切換到unity
#import "ViewController.h"
#import "AppDelegate.h"
@interface ViewController ()
@property(strong, nonatomic) UIButton *Btn;
@end

@implementation ViewController

- (void)viewDidLoad {
    [super viewDidLoad];


    _Btn = [[UIButton alloc]initWithFrame:CGRectMake(40, 200, 80, 70)];
    _Btn.backgroundColor = [UIColor cyanColor];
    [_Btn setTitle:@"開啟" forState:UIControlStateNormal];
    [_Btn addTarget:self action:@selector(go) forControlEvents:UIControlEventTouchDown];
    [self.view addSubview:_Btn];
    // Do any additional setup after loading the view, typically from a nib.
}

-(void)go{

    //進入unity界面
    [(AppDelegate *)[UIApplication sharedApplication].delegate showUnityWindow];
    UnityPause(false);
}
- (void)didReceiveMemoryWarning {
    [super didReceiveMemoryWarning];
    // Dispose of any resources that can be recreated.
}

@end
把導進項目unity裡的一切.cpp文件的type改為Objectvie-C++ Source(防止呈現混編錯誤) 【unity工程導入到iOS項目】的相關資料介紹到這裡,希望對您有所幫助!
提示:不會對讀者因本文所帶來的任何損失負責。如果您支持就請把本站添加至收藏夾哦!
【unity工程導入到iOS項目】的相關資料介紹到這裡,希望對您有所幫助!
提示:不會對讀者因本文所帶來的任何損失負責。如果您支持就請把本站添加至收藏夾哦!
- 上一頁:iOS webSocket之單利復雜完成即時通訊
- 下一頁:git 命令

相關文章
+- IOS中UITableView轉動到指定地位
- iOS中修正UITextField占位符字體色彩的辦法總結
- 應用UITextField限制只可輸出中,英文,數字的辦法
- IOS 粒子體系 (CAEmitterLayer)實例詳解
- iOS開辟之UITableView左滑刪除等自界說功效
- IOS計步器功效完成之Healthkit和CMPedometer
- iOS Runntime 靜態添加類辦法並挪用-class_addMethod
- iOS應用runtime修正文本框(TextField)的占位文字色彩
- Android中getActivity()為null的處理方法
- 總結iOS中runtime的應用
- iOS的CoreAnimation開辟框架中的Layer層動畫制造解析
- iOS中的導航欄UINavigationBar與對象欄UIToolBar要點解析
- 實例講授iOS中的CATransition轉場動畫應用
- iOS App應用SQLite之句柄的界說及數據庫的根本操作
- IOS CoreAnimation中layer動畫閃耀的處理辦法