iOS開發-UI (八)TableView
知識點:
1.UITableView運用
2.UITableView分段功用
3.UITableViewCell重用機制
=======================
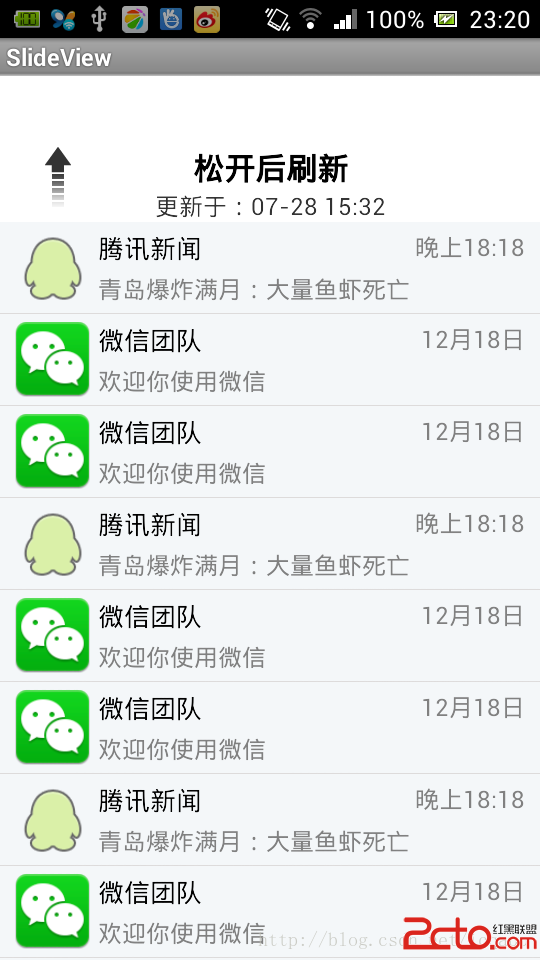
UITableView運用
1.UITableView作用
2.UITableView創立
- (id)initWithFrame:(CGRect)frame style:(UITableViewStyle)style;
UITableViewStyle:
UITableViewStylePlain 列表形式
UITableViewStyleGrouped 分組形式
// 實例化一個表格視圖
//UITableViewStylePlain 列表形式
//UITableViewStyleGrouped 分組形式
UITableView *tableView = [[UITableView alloc] initWithFrame:self.view.bounds style:UITableViewStyleGrouped];

    //設置代理

    tableView.delegate = self;

    tableView.dataSource = self;

    [self.view addSubview:tableView];
3.UITableView關聯數據(下面)
1)tableView經過代理關聯數據
4.NSIndexPath
次要用來標識以後cell的在tableView中的地位
該對象有section和row兩個屬性,
前者標識以後cell處於第幾個section中
後者代表在該section中的第幾行
5.UITableViewCell引見
1)創立方式
- (id)initWithStyle:(UITableViewCellStyle)style
reuseIdentifier:(NSString *)reuseIdentifier
//當某一個視圖控制器遭到導航控制器管理的時分,假如在self.view之上添加的第一個子視圖是UIScrollView或許UIScrollView的子類,那麼這個對象的坐標會自動往下偏移64個單位
//封閉此優化機制
//self.automaticallyAdjustsScrollVieWinsets = NO;
UITableViewCellStyle:
UITableViewCellStyleDefault
UITableViewCellStyleValue1
UITableViewCellStyleValue2
UITableViewCellStyleSubtitle
UITableViewCell *cell = [[UITableViewCell alloc] initWithStyle:UITableViewCellStyleDefault reuseIdentifier:nil];
=======================
UITableView分段功用
1.設置tableView的款式
UITableViewStyleGrouped
2.設置代理
1)設置段數:默許前往1
- (NSInteger)numberOfSectionsInTableView:(UITableView *)tableView
=======================
UITableView常用辦法
UITableViewDataSource
UITableViewDelegate
@interface RootViewController ()<UITableViewDelegate,UITableViewDataSource>

 #pragma mark- UITableViewDelegate&UITableViewDataSource

//前往組數 (可選完成)

-(NSInteger)numberOfSectionsInTableView:(UITableView *)tableView{

        return 2;

}
//前往一組外面有幾行(默許為1組)
-(NSInteger)tableView:(UITableView *)tableView numberOfRowsInSection:(NSInteger)section{
return 20;
}
//每一行都需求前往一個UITableViewCell類型的對象
-(UITableViewCell *)tableView:(UITableView *)tableView cellForRowAtIndexPath:(NSIndexPath *)indexPath{
//NSIndexPath 表格視圖中的坐標對象
// section->組
// row->行
//創立UITableViewCell類型的對象
/*
參數1:cell的類型
參數2:復用標識
*/
UITableViewCell *cell = [[UITableViewCell alloc] initWithStyle:UITableViewCellStyleDefault reuseIdentifier:nil];
//設置cell的標題為
cell.textLabel.text = @"大家好";
//設置圖片
cell.imageView.image = [UIImage imageNamed:[NSString stringWithFormat:@"%03ld", indexPath.section * 20 + indexPath.row + 1]];
return cell;
}
1)設置行高
- (CGFloat)tableView:(UITableView *)tableView
heightForRowAtIndexPath:(NSIndexPath *)indexPath
//設置行高

-(CGFloat)tableView:(UITableView *)tableView heightForRowAtIndexPath:(NSIndexPath *)indexPath{
    return 100;
}
2)設置段頭標題
- (NSString *)tableView:(UITableView *)tableView
titleForHeaderInSection:(NSInteger)section
//前往組頭標題

-(NSString *)tableView:(UITableView *)tableView titleForHeaderInSection:(NSInteger)section{
    return [NSString stringWithFormat:@"第%ld組組頭",section];
}
3)設置段尾標題
- (NSString *)tableView:(UITableView *)tableView
titleForFooterInSection:(NSInteger)section
//前往組尾標題

-(NSString *)tableView:(UITableView *)tableView titleForFooterInSection:(NSInteger)section{

    return @"我是組尾";

}
4)刪除/拔出一行(兩個一同用)
//編輯事情的回調辦法

-(void)tableView:(UITableView *)tableView commitEditingStyle:(UITableViewCellEditingStyle)editingStyle forRowAtIndexPath:(NSIndexPath *)indexPath{

    if (editingStyle == UITableViewCellEditingStyleDelete) {

        //刪除

        //首先刪除數據源

        [self.dataArr removeObjectAtIndex:indexPath.row];

        //刷新UI

        //reloadData 重新加載一遍數據

        //[_tableView reloadData];

        //帶動畫刷新(刪除)

        [_tableView deleteRowsAtIndexPaths:@[indexPath] withRowAnimation:UITableViewRowAnimationRight];

    }else{

        //拔出
        //首先在數據源當中拔出新數據

        [self.dataArr insertObject:@"西安" atIndex:indexPath.row];

        //刷新UI

        //[_tableView reloadData];

        //帶動畫刷新(拔出)

        [_tableView insertRowsAtIndexPaths:@[indexPath] withRowAnimation:UITableViewRowAnimationRight];
    }
}

//前往的編輯類型

-(UITableViewCellEditingStyle)tableView:(UITableView *)tableView editingStyleForRowAtIndexPath:(NSIndexPath *)indexPath{

    /*

     UITableViewCellEditingStyleDelete //刪除

     UITableViewCellEditingStyleInsert  //拔出


     */

    //return UITableViewCellEditingStyleDelete;

    return UITableViewCellEditingStyleInsert;

}
5)定制刪除下面的文字
- (NSString *)tableView:(UITableView *)tableView titleForDeleteConfirmationButtonForRowAtIndexPath:(NSIndexPath *)indexPath
//tableView調用
- (void)insertRowsAtIndexPaths:(NSArray *)indexPaths
withRowAnimation:(UITableViewRowAnimation)animation;
- (void)deleteRowsAtIndexPaths:(NSArray *)indexPaths
withRowAnimation:(UITableViewRowAnimation)animation;
6)進入編輯和取消編輯形式
@property(nonatomic,getter=isEditing) BOOL editing
7)如何讓指定行可以編輯
- (BOOL)tableView:(UITableView *)tableView
canEditRowAtIndexPath:(NSIndexPath *)indexPath
 //能否允許編輯

-(BOOL)tableView:(UITableView *)tableView canEditRowAtIndexPath:(NSIndexPath *)indexPath{

    //第一行不允許編輯例子

    /*

    if (indexPath.row == 0) {

        return NO;

    }

     */
    return YES;
}
8)如何做索引
- (NSArray *)sectionIndexTitlesForTableView:(UITableView *)tableView
  //前往索引

-(NSArray *)sectionIndexTitlesForTableView:(UITableView *)tableView{

    NSMutableArray *newArr = [NSMutableArray new];

    //留意:索引的數量應該跟組數相等,假如索引的數量大於組數,則剩余的索引將有效

    for (char i  = 'A'; i <= 'Z'; i++) {

        [newArr addObject:[NSString stringWithFormat:@"%c組",i]];
    }
    return newArr;

}
9)如何跳轉到指定某一段某一行
- (void)scrollToRowAtIndexPath:(NSIndexPath *)indexPath
atScrollPosition:(UITableViewScrollPosition)scrollPosition
animated:(BOOL)animated;
10)如何挪動一行
- (void)tableView:(UITableView *)tableView moveRowAtIndexPath:(NSIndexPath *)
sourceIndexPath toIndexPath: (NSIndexPath *)destinationIndexPath{
//挪動某一行

-(void)tableView:(UITableView *)tableView moveRowAtIndexPath:(NSIndexPath *)sourceIndexPath toIndexPath:(NSIndexPath *)destinationIndexPath{

    //sourceIndexPath 初始行數

    //destinationIndexPath 目的行數

  //保管一份

    id obj = self.dataArr[sourceIndexPath.row];
    //刪除

    [self.dataArr removeObjectAtIndex:sourceIndexPath.row];

    //拔出到目的地位
    [self.dataArr insertObject:obj atIndex:destinationIndexPath.row];

    for (NSString *str in self.dataArr) {

        NSLog(@"str = %@",str);
    }
}
11)選中指定行
- (void)tableView:(UITableView *)tableView
didSelectRowAtIndexPath:(NSIndexPath *)indexPath;
//選中某一行
//didSelectRowAtIndexPath 正確
//didDeselectRowAtIndexPath 錯誤
-(void)tableView:(UITableView *)tableView didSelectRowAtIndexPath:(NSIndexPath *)indexPath{

    NSLog(@"選中的行數為%ld",indexPath.row);

    /*

     UITableViewScrollPositionTop 挪動某一行到屏幕的頂部

     UITableViewScrollPositionMiddle 挪動某一行到屏幕的兩頭

     UITableViewScrollPositionBottom 挪動某一行到屏幕的底部

     */

    [tableView scrollToRowAtIndexPath:indexPath atScrollPosition:UITableViewScrollPositionMiddle animated:YES];
}
12)處置AccessoryButton按下的事情
- (void)tableView:(UITableView *)tableView
AccessoryButtonTappedForRowWithIndexPath:(NSIndexPath *)indexPath
=======================
UITableViewCell復用機制
1.cell重用方式
- (id)dequeueReusableCellWithIdentifier:(NSString *)identifier;
2.復用的問題
第一次dequeue的時分能夠還不存在該cell,所以需求判別
假如隊列中沒有該cell的話,則需求alloc一個
#pragma mark- UITableViewDelegate&UITableViewDataSource

//前往一組外面有幾行(默許為1組)

-(NSInteger)tableView:(UITableView *)tableView numberOfRowsInSection:(NSInteger)section{

    return 20;

}

//每一行都需求前往一個UITableViewCell類型的對象

-(UITableViewCell *)tableView:(UITableView *)tableView cellForRowAtIndexPath:(NSIndexPath *)indexPath{


    //在每一個UITableView當中,都會擁有一個復用隊列(數組),每當需求前往一個UITableViewCell類型的對象的時分,首先去復用隊列外面查找能否擁有相反類型的對象,假如有,就拿出來再次運用

    UITableViewCell *cell = [tableView dequeueReusableCellWithIdentifier:@"cell"];

    //假如復用隊列當中沒有找到,就創立新對象

    if (cell == nil) {

        cell = [[UITableViewCell alloc] initWithStyle:UITableViewCellStyleDefault reuseIdentifier:@"cell"];

    }
    NSLog(@"修正前顯示的內容為%@",cell.textLabel.text);

    //設置cell的標題為

    cell.textLabel.text = [NSString stringWithFormat:@"%ld行",indexPath.row + 1];
    NSLog(@"修正後顯示的內容為%@",cell.textLabel.text);
    return cell;

}
【iOS開發-UI (八)TableView】的相關資料介紹到這裡,希望對您有所幫助! 提示:不會對讀者因本文所帶來的任何損失負責。如果您支持就請把本站添加至收藏夾哦!