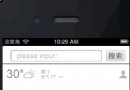
iOS中searchBar(搜索框)光標初始位置後移
編輯:IOS開發綜合
廢話不多說了,直接給大家貼關鍵代碼了,具體代碼如下所示:
#import <UIKit/UIKit.h>
@interface SearchBar : UITextField
@property (nonatomic,strong) UIButton *button;
+ (instancetype)searchBar;
@end
#import "SearchBar.h"
@implementation SearchBar
- (id)initWithFrame:(CGRect)frame
{
self = [super initWithFrame:frame];
if (self) {
self.font = [UIFont systemFontOfSize:15];
self.placeholder = @" 輸入品種關鍵字";
//設置邊框和邊框顏色
self.borderStyle=UITextBorderStyleNone;
self.layer.cornerRadius=15.0f;
self.layer.masksToBounds=YES;
self.layer.borderColor=[[UIColor colorWithRed:224/255.0 green:243/255.0 blue:223/255.0 alpha:1.0]CGColor];
self.layer.borderWidth= 2.0f;
UIButton *button = [[UIButton alloc] initWithFrame:CGRectMake(0, 0, 40, 30)];
[button setBackgroundImage:[UIImage imageNamed:@"seachBar_rightView"] forState:UIControlStateNormal];
[button setTitle:@"搜索" forState:UIControlStateNormal];
[button setTitleColor:[UIColor colorWithRed:119/255.0 green:166/255.0 blue:16/255.0 alpha:1.0] forState:UIControlStateNormal];
button.titleLabel.font = [UIFont systemFontOfSize:18.0];
button.titleLabel.textColor = [UIColor colorWithRed:119/255.0 green:166/255.0 blue:16/255.0 alpha:1.0];
button.titleLabel.textColor = [UIColor redColor];
self.rightView = button;
self.rightViewMode = UITextFieldViewModeAlways;
//這裡設置光標位置,讓光標位置後移10
self.leftView = [[UIView alloc]initWithFrame:CGRectMake(0, 0, 10, 0)];
self.leftViewMode = UITextFieldViewModeAlways;
}
return self;
}
+ (instancetype)searchBar
{
return [[self alloc] init];
}
下面介紹下iOS中設置輸入框的光標位置
//這裡設置光標位置,讓光標位置後移10
textField.leftView = [[UIView alloc]initWithFrame:CGRectMake(0, 0, 10, 0)];
textField.leftViewMode = UITextFieldViewModeAlways;
以上所述是小編給大家介紹的iOS中searchBar(搜索框)光標初始位置後移 ,希望對大家有所幫助,如果大家有任何疑問請給我留言,小編會及時回復大家的。在此也非常感謝大家對本站網站的支持!
- 上一頁:淺析IOS開發TouchID指紋解鎖功能
- 下一頁:iOS微信支付開發案例

相關文章
+