iOS+PHP注冊登錄系統 iOS部分(下)
接著上篇《iOS+PHP注冊登錄系統 PHP部分(上)》進行學習
3.iOS部分
上一次我們寫完了數據庫部分和PHP部分這次我們來完成iOS部分。
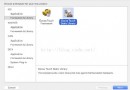
首先先在storyboard中一陣狂拖,弄成如下圖。
可以先在text Field中輸入用戶名和密碼 方便以後調試。

3.1登錄部分代碼
創建一個新的UIViewController 名為registViewController(用於注冊用戶,ViewController用於登錄)。
在ViewController.h中importregistViewController
#import "registViewController.h"
然後設置登錄界面中的控件 用來寫用戶名的控件名設置為txtUser,密碼的控件名設置為txtPwd,確定按鈕的方法名稱為
LoginClick,注冊按鈕的方法名為registButton。
然後開始寫ViewController.m中的代碼
//
// ViewController.m
// iosLogin
//
// Created by 曹晗 on 16/2/25.
// Copyright :emoji: 2016年 CaoHan. All rights reserved.
//

#import "ViewController.h"

@interface ViewController ()
@property (weak, nonatomic) IBOutlet UITextField *txtUser;
@property (weak, nonatomic) IBOutlet UITextField *txtPwd;

@end

@implementation ViewController

- (void)viewDidLoad {
  [super viewDidLoad];
  // Do any additional setup after loading the view, typically from a nib.
}

- (void)didReceiveMemoryWarning {
  [super didReceiveMemoryWarning];
  // Dispose of any resources that can be recreated.
}
- (IBAction)LoginClick:(id)sender {
  //前後去空格
  NSString *userName = [_txtUser.text stringByTrimmingCharactersInSet:[NSCharacterSet whitespaceCharacterSet]];
  NSString *userPwd = [_txtPwd.text stringByTrimmingCharactersInSet:[NSCharacterSet whitespaceCharacterSet]];

  NSDictionary *jsonDic = [self getJsonData:userName userpwd:userPwd];
  NSString* loginFlag = [jsonDic objectForKey:@"loginFlag"];
  NSLog(@"%@",loginFlag);

  [self aletrInfo:loginFlag];
}
- (IBAction)registButton:(id)sender {
  UIStoryboard *storboard = self.storyboard;
  registViewController *vc2 = [storboard instantiateViewControllerWithIdentifier:@"vc2"];
  [self presentViewController:vc2 animated:YES completion:nil];
}
//用於請求PHP 獲得JSON
- (NSDictionary *)getJsonData:(NSString *)user_name userpwd:(NSString *)user_pwd {
  NSError *error;
  NSString *urlString = [NSString stringWithFormat:@"http://192.168.1.106/iosLogin/index.php?action=login&user_name=%@&user_pwd=%@",user_name,user_pwd];
  //加載一個NSURL對象
  NSURLRequest *request = [NSURLRequest requestWithURL:[NSURL URLWithString:urlString]];
  //將請求的url數據放到NSData對象中
  NSData *response = [NSURLConnection sendSynchronousRequest:request returningResponse:nil error:nil];
  //IOS5自帶解析類NSJSONSerialization從response中解析出數據放到字典中
  NSDictionary *jsonDic = [NSJSONSerialization JSONObjectWithData:response options:NSJSONReadingMutableLeaves error:&error];
  NSLog(@"接收到的數據為%@",jsonDic);
  return jsonDic;
}
//彈出信息
- (void)aletrInfo:(NSString *)loginFlag{
  UIAlertView *alert = [[UIAlertView alloc]init];
  [alert setTitle:@"提示"]; [alert setDelegate:nil];
  [alert addButtonWithTitle:@"確定"];

  if ([loginFlag isEqual: @"0"]) {
    [alert setMessage:@"賬號或密碼錯誤"];
  }
  if ([loginFlag isEqual:@"1"]) {
    [alert setMessage:@"登陸成功"];
  }
  [alert show];
}

@end
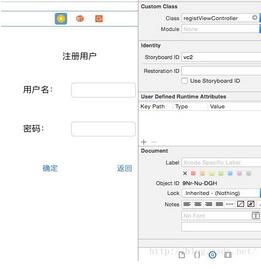
在注冊按鈕能夠跳轉界面前,要先將stroyboard中的注冊界面的stroyboard ID設置為vc2才可以進行跳轉。
復制代碼 代碼如下:NSString *urlString = [NSString stringWithFormat:@"http://192.168.1.106/iosLogin/index.php?action=login&user_name=%@&user_pwd=%@",user_name,user_pwd];
其中這裡的192.168.1.106可以寫localhost也可以寫自己的ip地址。
寫到這裡就可以先進行調試一下登錄了。後面的注冊用戶代碼也和這裡差不多。
3.2注冊界面代碼
先在registViewCongroller.h中import ViewController.h
#import "ViewController.h"
然後是registViewController.m中的代碼。
//
// registViewController.m
// iosLogin
//
// Created by 曹晗 on 16/2/27.
// Copyright 2016年 CaoHan. All rights reserved.
//

#import "registViewController.h"

@interface registViewController ()
@property (weak, nonatomic) IBOutlet UITextField *txtUser;
@property (weak, nonatomic) IBOutlet UITextField *txtPwd;

@end

@implementation registViewController

- (void)viewDidLoad {
  [super viewDidLoad];
  // Do any additional setup after loading the view.
}

- (void)didReceiveMemoryWarning {
  [super didReceiveMemoryWarning];
  // Dispose of any resources that can be recreated.
}
//這個是注冊按鈕
- (IBAction)registButton:(id)sender {
  NSString *userName = [_txtUser.text stringByTrimmingCharactersInSet:[NSCharacterSet whitespaceCharacterSet]];
  NSString *userPwd = [_txtPwd.text stringByTrimmingCharactersInSet:[NSCharacterSet whitespaceCharacterSet]];

  NSDictionary *jsonDic = [self getJsonData:userName userpwd:userPwd];
  NSString* registFlag = [jsonDic objectForKey:@"registFlag"];
  NSLog(@"%@",registFlag);

  [self aletrInfo:registFlag];

}
//這個是返回按鈕
- (IBAction)returnButton:(id)sender {
  [self dismissModalViewControllerAnimated:YES];
}

- (NSDictionary *)getJsonData:(NSString *)user_name userpwd:(NSString *)user_pwd {
  NSError *error;
  NSString *urlString = [NSString stringWithFormat:@"http://192.168.1.106/iosLogin/index.php?action=regist&user_name=%@&user_pwd=%@",user_name,user_pwd];
  //加載一個NSURL對象
  NSURLRequest *request = [NSURLRequest requestWithURL:[NSURL URLWithString:urlString]];
  //將請求的url數據放到NSData對象中
  NSData *response = [NSURLConnection sendSynchronousRequest:request returningResponse:nil error:nil];
  //IOS5自帶解析類NSJSONSerialization從response中解析出數據放到字典中
  NSDictionary *jsonDic = [NSJSONSerialization JSONObjectWithData:response options:NSJSONReadingMutableLeaves error:&error];
  NSLog(@"接收到的數據為%@",jsonDic);
  return jsonDic;
}

- (void)aletrInfo:(NSString *)registFlag{
  UIAlertView *alert = [[UIAlertView alloc]init];
  [alert setTitle:@"提示"]; [alert setDelegate:nil];
  [alert addButtonWithTitle:@"確定"];

  if ([registFlag isEqual: @"0"]) {
    [alert setMessage:@"用戶名已存在"];
  }
  if ([registFlag isEqual:@"1"]) {
    [alert setMessage:@"注冊成功"];
  }
  [alert show];
}

@end
到這裡所有的代碼都已經寫完了,我是一個新手,如果有不足或者代碼錯誤之處還請指出。謝謝各位讀者。
以上就是本文的全部內容,希望對大家的學習有所幫助,也希望大家多多支持本站。