IOS開發—數據存儲(直接寫入、NSUserDefaults、NSkeyedArchiver)
數據存儲(直接寫入、NSUserDefaults、NSkeyedArchiver)
ios中常用文件存取的方法有:
1、直接寫文件的方式,可以存儲的對象有NSString、NSArray、NSDictionary、NSData、NSNumber,數據全部存放在一個屬性列表文件(*.plist文件)中。
2、NSUeserDefaults(偏好設置),用來存儲應用設置信息,文件放在perference目錄下。
3、歸檔操作(NSkeyedArchiver),不同於前面兩種,它可以把自定義對象存放在文件中。
首先每個開發者都應該知道,對於一個應用來說,有唯一的沙盒與之對應,即每個應用不能跨沙盒操作文件。
一、獲取沙盒路徑,通過寫文件的方式存儲數據
直接來看代碼:
#import "ViewController.h"
@interface ViewController ()
@end
@implementationViewController
- (void)viewDidLoad
{
    [super viewDidLoad];
    // Do any additional setup after loading the view,typically from a nib.
    [self mainOperation];
}
- (void)mainOperation
{
    //獲取沙盒中緩存文件夾路徑
    //方法一
    //沙盒主目錄
    NSString *homePath = NSHomeDirectory();
    //拼接路徑
    NSString *path = [homePath stringByAppendingPathComponent:@"Library/Caches"];

    //方法二
    //第一個參數目標文件夾目錄(NSCachesDirectory查找緩存文件夾),第二個參數為查找目錄的域(NSUserDomainMask為在用戶目錄下查找),第三個參數為結果中主目錄是否展開,不展開則顯示為~
    NSArray *arr = NSSearchPathForDirectoriesInDomains(NSCachesDirectory, NSUserDomainMask, YES);
    //雖然該方法返回的是一個數組,但是由於一個目標文件夾只有一個目錄,所以數組中只有一個元素。
    NSString *cachePath = [arr lastObject];
    //或者
//    NSString *cachePath = [arr objectAtIndex:0];

/**
    //獲取沙盒中Document文件夾或者tmp文件夾路徑都可使用上面兩種方法
    //tmp文件夾路徑可直接這樣獲取
    NSString *tmpPath = NSTemporaryDirectory();
    NSLog(@"%@",tmpPath);
**/

    //拼接路徑(目標路徑),這個時候如果目錄下不存在這個lotheve.plist文件,這個目錄實際上是不存在的。
    NSString *filePath = [cachePath stringByAppendingPathComponent:@"tese.plist"];
    NSLog(@"%@",filePath);

    //創建數據
    NSDictionary *content = @{@"字典數據測試1":@"1",@"字典數據測試2":@"2",@"字典數據測試":@"3"};
    //將數據存到目標路徑的文件中(這個時候如果該路徑下文件不存在將會自動創建)
    //用writeToFile方法寫文件會覆蓋掉原來的內容
    [content writeToFile:filePath atomically:YES];

    //讀取數據(通過字典的方式讀出文件中的內容)
    NSDictionary *dic = [NSDictionary dictionaryWithContentsOfFile:filePath];
    NSLog(@"%@",dic);
}
@end
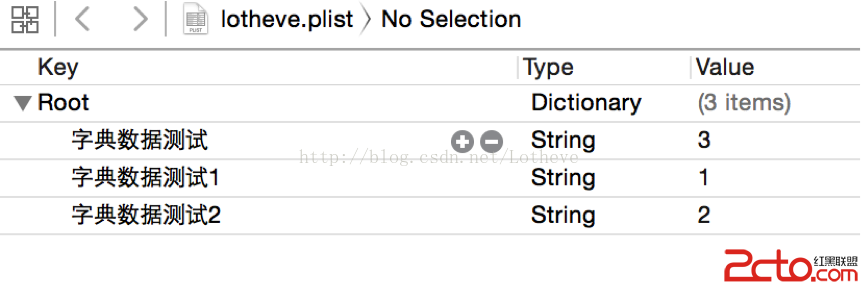
沙盒中Library/Caches目錄下多了lotheve.plist文件

文件內容:
二、使用NSUeserDefaults(偏好設置)實現數據存儲
每個應用都有一個NSUesrDefaults實例,通過它可以存儲應用配置信息以及用戶信息,比如保存用戶名、密碼、字體大小、是否自動登錄等等。數據自動保存在沙盒的Libarary/ Preferences目錄下。同樣,該方法只能存取NSString、NSArray、NSDictionary、NSData、NSNumber類型的數據。
代碼示例:
#import "LXXViewController.h"
@interface LXXViewController ()
@end
@implementationLXXViewController
- (void)viewDidLoad
{
    [super viewDidLoad];
    self.title = @"NSUserDefaults Demo";
}
//點擊button保存數據
- (IBAction)saveData:(id)sender {
    //獲取NSUserDefaults對象
    NSUserDefaults *userDefaults = [NSUserDefaults standardUserDefaults];
    //存數據,不需要設置路勁,NSUserDefaults將數據保存在preferences目錄下
    [userDefaults setObject:@"Lotheve" forKey:@"name"];
    [userDefaults setObject:@"NSUserDefaults" forKey:@"demo"];
    //立刻保存(同步)數據(如果不寫這句話,會在將來某個時間點自動將數據保存在preferences目錄下)
    [userDefaults synchronize];
    NSLog(@"數據已保存");
}
//點擊button讀取數據
- (IBAction)getData:(id)sender
{
    //獲取NSUserDefaults對象
    NSUserDefaults *userDefaults = [NSUserDefaults standardUserDefaults];
    //讀取數據
    NSString *name  = [userDefaults objectForKey:@"name"];
    NSString *demo = [userDefaults objectForKey:@"demo"];
    //打印數據
    NSLog(@"name = %@ demo =%@",name,demo);
}
@end
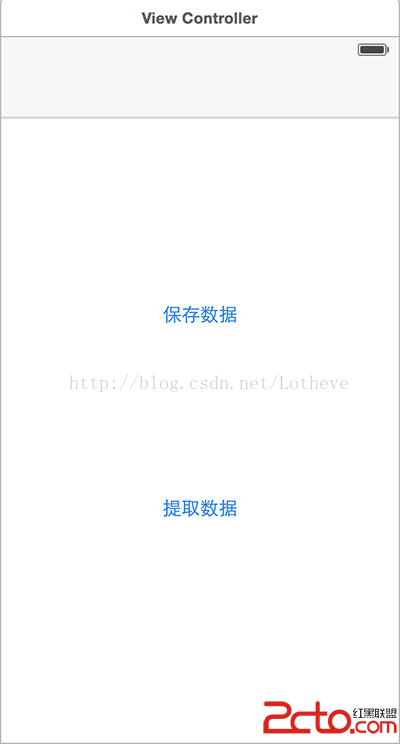
Interface Building中設置了兩個按鈕:
點擊“保存數據”後,查看沙盒中的Libarary/ Preferences目錄:
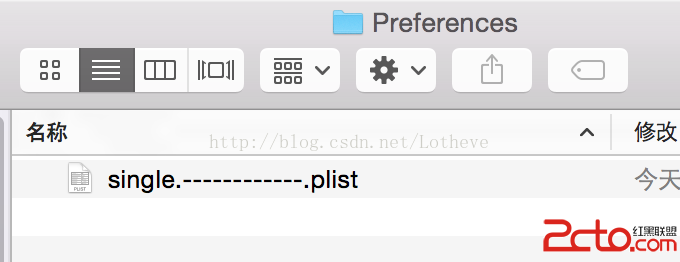
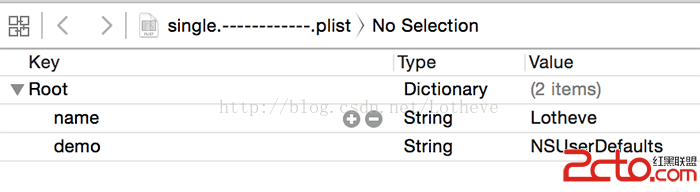
數據以plist的格式寫入磁盤中了。點開查看數據:
三、NSKeyedArchiver(歸檔操作)
使用歸檔操作存儲數據的主要好處是,不同於前面兩種方法只能存儲幾個常用的數據類型的數據,NSKeyedArchiver可以存儲自定義的對象。
代碼示例:
需要注意的是,需要保存的對象類一定要引用NSCoding協議,並且實現
- (void)encodeWithCoder:(NSCoder *)aCoder
- (id)initWithCoder:(NSCoder *)aDecoder
1、文件結構:
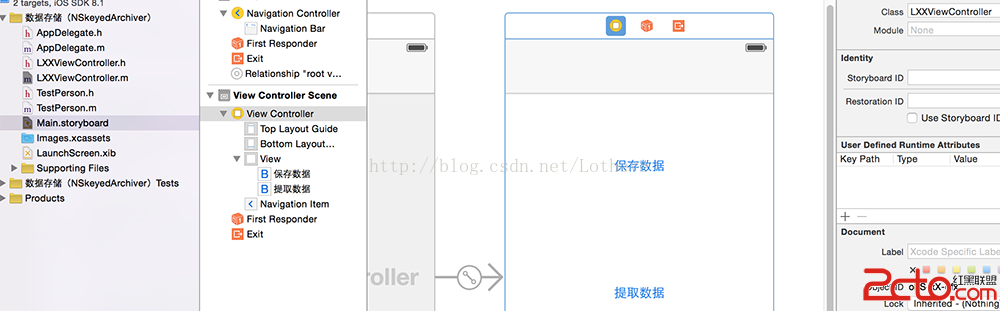
2、代碼示例:
LXXViewController.m
#import "LXXViewController.h"
#import "TestPerson.h"
@interface LXXViewController ()
@property (nonatomic ,strong) TestPerson *p;
@end
@implementationLXXViewController
- (void)viewDidLoad {
    [super viewDidLoad];
}
- (IBAction)saveData:(id)sender
{
    //創建一個自定義類的實例
    _p = [[TestPerson alloc]init];
    _p.name = @"Lotheve";
    _p.age = 20;
    _p.sex = @"m";
    _p.familyMumbers = @[@"Father",@"Mather",@"Me"];

    //獲取文件路徑
    NSString *docPath = [NSSearchPathForDirectoriesInDomains(NSDocumentDirectory, NSUserDomainMask, YES) lastObject];
    //文件類型可以隨便取,不一定要正確的格式
    NSString *targetPath = [docPath stringByAppendingPathComponent:@"lotheve.plist"];

    //將自定義對象保存在指定路徑下
    [NSKeyedArchiver archiveRootObject:_p toFile:targetPath];
    NSLog(@"文件已儲存");
}
- (IBAction)getData:(id)sender
{
    //獲取文件路徑
    NSString *docPath = [NSSearchPathForDirectoriesInDomains(NSDocumentDirectory, NSUserDomainMask, YES) lastObject];
    NSString *targetPath = [docPath stringByAppendingPathComponent:@"lotheve.plist"];

    TestPerson *person = [NSKeyedUnarchiver unarchiveObjectWithFile:targetPath];
    NSLog(@"name = %@ , age =%ld , sex = %@ , familyMubers = %@",person.name,person.age,person.sex,person.familyMumbers);
    NSLog(@"文件已提取");
}
@end
TestPerson.h
#import@interface TestPerson : UIViewController @property (nonatomic, copy) NSString *name; @property (nonatomic, assign) NSInteger age; @property (nonatomic, copy) NSString *sex; @property (nonatomic, strong) NSArray *familyMumbers; @end
TestPerson.m
#import "TestPerson.h"
@interface TestPerson ()
@end
@implementationTestPerson
- (void)viewDidLoad
{
    [super viewDidLoad];
}

#pragma mark - NSCoding協議方法 (一定要實現)
//當進行歸檔操作的時候就會調用該方法
//在該方法中要寫清楚要存儲對象的哪些屬性
- (void)encodeWithCoder:(NSCoder *)aCoder
{
    NSLog(@"調用了encodeWithCoder方法");
    [aCoder encodeObject:_name forKey:@"name"];
    [aCoder encodeInteger:_age forKey:@"age"];
    [aCoder encodeObject:_sex forKey:@"sex"];
    [aCoder encodeObject:_familyMumbers forKey:@"familyMumbers"];
}

//當進行解檔操作的時候就會調用該方法
//在該方法中要寫清楚要提取對象的哪些屬性
- (id)initWithCoder:(NSCoder *)aDecoder
{
    NSLog(@"調用了initWithCoder方法");
    if (self = [super init]) {
        self.name = [aDecoder decodeObjectForKey:@"name"];
        self.age = [aDecoder decodeIntegerForKey:@"age"];
        self.sex = [aDecoder decodeObjectForKey:@"sex"];
        _familyMumbers = [aDecoder decodeObjectForKey:@"familyMumbers"];
    }
    return self;
}
@end
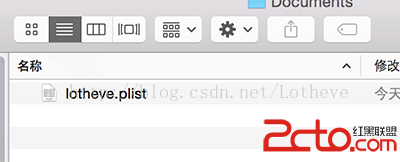
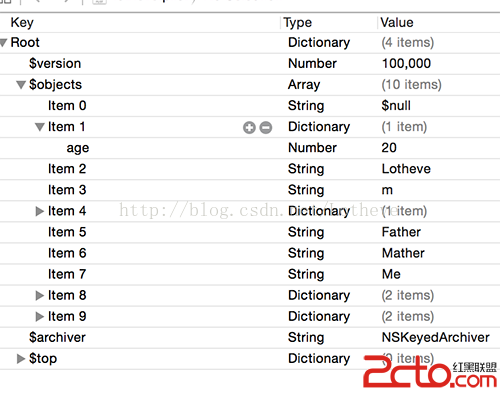
點擊“保存數據”後,查看沙盒中Documents目錄:
點擊查看文件內容:
點擊“提取數據”後打印結果: