
用 XMPPFramework 打造 iOS 聊天客戶端:連線、好友狀態與訊息收发
要自己做一個即時聊天 App,XMPP 是相當成熟的選擇。iOS 端有 XMPPFramework 這個開源庫可用,它底層靠 KissXML 處理 XML。這篇把串流連線、好友上下線、訊息收發串成一個可運行的骨架。
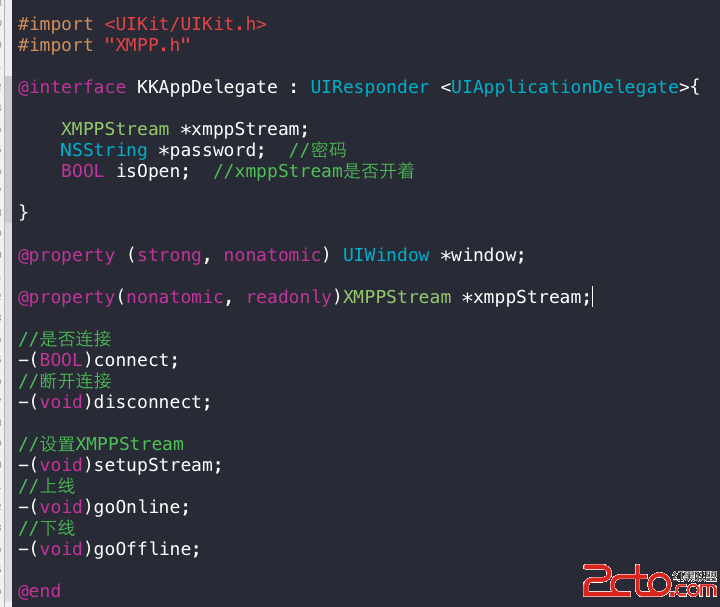
一、把核心方法集中在 AppDelegate
為了讓各頁面都能方便取用,XMPP 的主要操作都寫在 AppDelegate:
- (void)setupStream
{
    // 初始化 XMPPStream
    xmppStream = [[XMPPStream alloc] init];
    [xmppStream addDelegate:self delegateQueue:dispatch_get_current_queue()];
}

- (void)goOnline
{
    XMPPPresence *presence = [XMPPPresence presence];
    [[self xmppStream] sendElement:presence];
}

- (void)goOffline
{
    XMPPPresence *presence = [XMPPPresence presenceWithType:@"unavailable"];
    [[self xmppStream] sendElement:presence];
}

- (BOOL)connect
{
    [self setupStream];

    // 從本地取出帳號、密碼與伺服器位址
    NSUserDefaults *defaults = [NSUserDefaults standardUserDefaults];
    NSString *userId = [defaults stringForKey:USERID];
    NSString *pass   = [defaults stringForKey:PASS];
    NSString *server = [defaults stringForKey:SERVER];

    if (![xmppStream isDisconnected]) return YES;
    if (userId == nil || pass == nil) return NO;

    [xmppStream setMyJID:[XMPPJID jidWithString:userId]];
    [xmppStream setHostName:server];
    password = pass;

    NSError *error = nil;
    if (![xmppStream connect:&error])
    {
        NSLog(@"cant connect %@", server);
        return NO;
    }
    return YES;
}

- (void)disconnect
{
    [self goOffline];
    [xmppStream disconnect];
}
注意 XMPP 的「連線」與「登入」是兩步:connect: 只建立 TCP 與串流,帳密驗證要等 xmppStreamDidConnect: 回呼後才做。
二、串流 delegate:接收狀態與訊息
// 串流已連上 → 進行驗證
- (void)xmppStreamDidConnect:(XMPPStream *)sender
{
    isOpen = YES;
    NSError *error = nil;
    [[self xmppStream] authenticateWithPassword:password error:&error];
}

// 驗證通過 → 上線
- (void)xmppStreamDidAuthenticate:(XMPPStream *)sender
{
    [self goOnline];
}

// 收到訊息
- (void)xmppStream:(XMPPStream *)sender didReceiveMessage:(XMPPMessage *)message
{
    NSString *msg  = [[message elementForName:@"body"] stringValue];
    NSString *from = [[message attributeForName:@"from"] stringValue];

    NSMutableDictionary *dict = [NSMutableDictionary dictionary];
    [dict setObject:msg  forKey:@"msg"];
    [dict setObject:from forKey:@"sender"];

    [messageDelegate newMessageReceived:dict];
}

// 收到好友狀態
- (void)xmppStream:(XMPPStream *)sender didReceivePresence:(XMPPPresence *)presence
{
    NSString *presenceType = [presence type];              // available / unavailable
    NSString *userId = [[sender myJID] user];
    NSString *presenceFromUser = [[presence from] user];

    if (![presenceFromUser isEqualToString:userId])
    {
        if ([presenceType isEqualToString:@"available"])
            [chatDelegate newBuddyOnline:
                [NSString stringWithFormat:@"%@@%@", presenceFromUser, @"nqc1338a"]];
        else if ([presenceType isEqualToString:@"unavailable"])
            [chatDelegate buddyWentOffline:
                [NSString stringWithFormat:@"%@@%@", presenceFromUser, @"nqc1338a"]];
    }
}這裡出現兩個自訂委托:chatDelegate 負責更新好友列表,messageDelegate 負責接收訊息。之所以要拆成兩個,是因為好友列表與聊天室分屬不同的 Controller。
三、好友列表頁實作 KKChatDelegate
- (KKAppDelegate *)appDelegate
{
    return (KKAppDelegate *)[[UIApplication sharedApplication] delegate];
}

- (XMPPStream *)xmppStream
{
    return [[self appDelegate] xmppStream];
}

- (void)newBuddyOnline:(NSString *)buddyName
{
    if (![onlineUsers containsObject:buddyName])
    {
        [onlineUsers addObject:buddyName];
        [self.tView reloadData];
    }
}

- (void)buddyWentOffline:(NSString *)buddyName
{
    [onlineUsers removeObject:buddyName];
    [self.tView reloadData];
}
在 viewDidLoad 中把自己登記為委托:
KKAppDelegate *del = [self appDelegate];
del.chatDelegate = self;
viewWillAppear 則負責判斷是否已登入:
[super viewWillAppear:animated];

NSString *login = [[NSUserDefaults standardUserDefaults] objectForKey:@"userId"];

if (login)
{
    if ([[self appDelegate] connect])
        NSLog(@"show buddy list");
}
else
{
    [self Account:self];   // 導向登入頁
}
關鍵就是那一句 connect——成功後頁面自然會顯示好友列表。點選某一列時,透過 segue 把對方名稱帶進聊天頁:
- (void)tableView:(UITableView *)tableView didSelectRowAtIndexPath:(NSIndexPath *)indexPath
{
    chatUserName = (NSString *)[onlineUsers objectAtIndex:indexPath.row];
    [self performSegueWithIdentifier:@"chat" sender:self];
}

- (void)prepareForSegue:(UIStoryboardSegue *)segue sender:(id)sender
{
    if ([segue.identifier isEqualToString:@"chat"])
    {
        KKChatController *chatController = segue.destinationViewController;
        chatController.chatWithUser = chatUserName;
    }
}
四、聊天頁:顯示與發送
KKChatController.h 中準備一個陣列存放訊息,每筆訊息用字典表示:
NSMutableArray *messages;cell 的設定:
- (UITableViewCell *)tableView:(UITableView *)tableView cellForRowAtIndexPath:(NSIndexPath *)indexPath
{
    static NSString *identifier = @"msgCell";
    UITableViewCell *cell = [tableView dequeueReusableCellWithIdentifier:identifier];
    if (cell == nil)
    {
        cell = [[UITableViewCell alloc] initWithStyle:UITableViewCellStyleSubtitle
                                     reuseIdentifier:identifier];
    }
    NSMutableDictionary *dict = [messages objectAtIndex:indexPath.row];
    cell.textLabel.text        = [dict objectForKey:@"msg"];
    cell.detailTextLabel.text  = [dict objectForKey:@"sender"];
    cell.accessoryType = UITableViewCellAccessoryNone;
    return cell;
}
同樣需要 appDelegate 與 xmppStream 兩個輔助方法,並在 viewDidLoad 登記訊息委托:
KKAppDelegate *del = [self appDelegate];
del.messageDelegate = self;

// 收到新訊息
- (void)newMessageReceived:(NSDictionary *)messageContent
{
    [messages addObject:messageContent];
    [self.tView reloadData];
}
最後是發送——XMPPFramework 透過 NSXMLElement 組出 XML stanza:
- (IBAction)sendButton:(id)sender
{
    NSString *message = self.messageTextField.text;

    if (message.length > 0)
    {
        // <body> 承載實際內容
        NSXMLElement *body = [NSXMLElement elementWithName:@"body"];
        [body setStringValue:message];

        // <message> 為外層信封
        NSXMLElement *mes = [NSXMLElement elementWithName:@"message"];
        [mes addAttributeWithName:@"type" stringValue:@"chat"];
        [mes addAttributeWithName:@"to"   stringValue:chatWithUser];
        [mes addAttributeWithName:@"from" stringValue:
            [[NSUserDefaults standardUserDefaults] stringForKey:USERID]];
        [mes addChild:body];

        [[self xmppStream] sendElement:mes];

        self.messageTextField.text = @"";
        [self.messageTextField resignFirstResponder];

        // 自己的訊息也立刻上屏
        NSMutableDictionary *dictionary = [NSMutableDictionary dictionary];
        [dictionary setObject:message forKey:@"msg"];
        [dictionary setObject:@"you"   forKey:@"sender"];
        [messages addObject:dictionary];
        [self.tView reloadData];
    }
}
五、這個骨架還缺什麼
上面跑得起來,但要變成能用的產品,至少還有幾塊要補:訊息不區分方向(目前只靠 sender 欄位硬寫 "you" 判斷,正式版應比對 from 是否為自己 JID);沒有 ACK 與離線訊息,使用者離線期間的訊息會永久遺失,需要 XMPP 的 Message Carbons 或離線儲存機制;缺少群組與 roster 訂閱,好友請求(subscribe/subscribed)尚未處理;訊息列表也應改為可差異更新的資料來源並自動捲到底部。
另外提醒:帳密目前明文存在 NSUserDefaults,正式環境應改用 Keychain。後續可以再往檔案傳輸、語音訊息與訊息界面美化延伸。