
iOS 6 新特性實作:用自訂 CircleLayout 打造圓形 UICollectionView
UICollectionView 是 iOS 6 引入的重要新穎元件,相較於 UITableView,它的客製化彈性大幅提升——因為版面配置被抽成獨立的 Layout 物件,開發者可以自由替換。本文以一個圓形排列的實作為例,走過完整的開發流程。
一、成果預覽
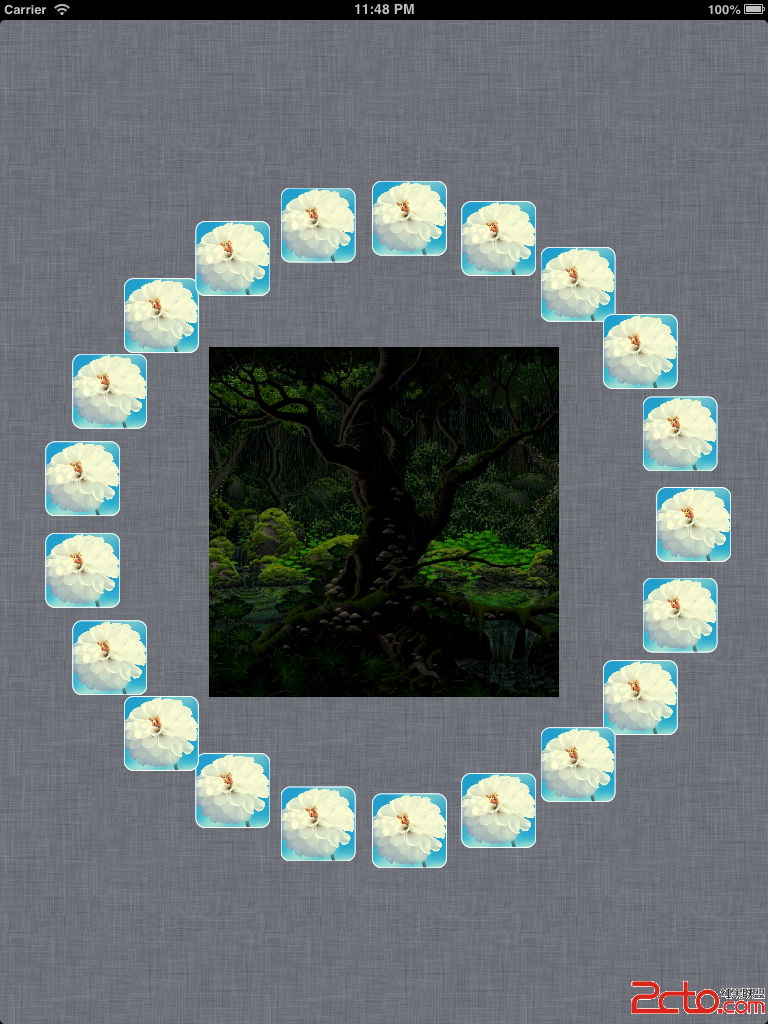
實作了一個圓形排列的 UICollectionView:點擊非圓周區域時 Cell 增加,點擊圓周上的 Cell(小圖片)時該 Cell 消除。中央的 GIF 動畫是另外實作的顯示效果。
順帶分享一個取 GIF 幀的方法:在 Mac 上用系統內建的「預覽」開啟 GIF,就能看到一張張的影格,依序「另存為」即可取得順序圖片,後續就能自行組裝成動畫。
二、AppDelegate 中的初始化
建立繼承自 UICollectionViewController 的 controller,初始化時必須指定 Layout:
#import "AppDelegate.h"
#import "ViewController.h"
#import "CircleLayout.h"

@implementation AppDelegate

- (BOOL)application:(UIApplication *)application
didFinishLaunchingWithOptions:(NSDictionary *)launchOptions
{
    self.window = [[UIWindow alloc] initWithFrame:[[UIScreen mainScreen] bounds]];

    self.viewController = [[ViewController alloc]
        initWithCollectionViewLayout:[[CircleLayout alloc] init]];

    self.window.rootViewController = self.viewController;
    [self.window makeKeyAndVisible];
    return YES;
}
@end
CircleLayout 就是決定畫面呈現樣式的關鍵類別。
三、UICollectionView 的三要素
理解這三個概念是寫自訂 Layout 的前提:
Cells:Layout 像管理者,cell 是被管理者。每個 cell 代表 collection view 中的一個 item,使用時機與位置都由 Layout 物件定義。
Supplementary Views:純顯示用途,不能被使用者選取,可有可無。想為某個 section 或整個 collection view 加上頁首頁尾時就會用到。
Decoration Views:裝飾用的視圖,同樣不可被選取,使用與位置也由 Layout 定義。
還有一個關鍵觀念:Layout 只負責配置樣式,不負責建立 view。view 的建立是透過 datasource 委派方法完成的。Layout 物件中定義的是 view 的位置與尺寸資訊。
使用 UICollectionViewLayout 時請牢記「先子類化,後使用」——它是抽象基類,必須繼承實作後才能用。
四、自訂 CircleLayout
需要覆寫的方法包括:
1. collectionViewContentSize
2. shouldInvalidateLayoutForBoundsChange:
3. layoutAttributesForElementsInRect:
4. layoutAttributesForItemAtIndexPath:
5. layoutAttributesForSupplementaryViewOfKind:atIndexPath:(若支援 supplementary views)
6. layoutAttributesForDecorationViewWithReuseIdentifier:atIndexPath:(若支援 decoration views)
此外,當 collection view 中的 item 數量改變時,需要重新檢索 Layout 資訊以得到新的顯示結果。對應的方法有:
· initialLayoutAttributesForInsertedItemAtIndexPath:
· initialLayoutAttributesForInsertedSupplementaryElementOfKind:atIndexPath:
· finalLayoutAttributesForDeletedItemAtIndexPath:
· finalLayoutAttributesForDeletedSupplementaryElementOfKind:atIndexPath:
這個範例只需要插入與刪除的動畫,因此只覆寫前兩個對應的 item 版本即可。
標頭檔:
#import <UIKit/UIKit.h>

@interface CircleLayout : UICollectionViewLayout

// 定義圓的圓心、半徑與 cell 數量
@property (nonatomic, assign) CGPoint  center;
@property (nonatomic, assign) CGFloat  radius;
@property (nonatomic, assign) NSInteger cellCount;

@end
實作檔:
#import "CircleLayout.h"

#define ITEM_SIZE 70

@implementation CircleLayout

// 為建立圓形做準備
- (void)prepareLayout {
    [super prepareLayout];

    CGSize size = self.collectionView.frame.size;
    _cellCount = [[self collectionView] numberOfItemsInSection:0];
    _center = CGPointMake(size.width / 2.0, size.height / 2.0);
    _radius = MIN(size.width, size.height) / 2.5;
}

- (CGSize)collectionViewContentSize {
    return self.collectionView.frame.size;
}

// 決定每個 cell 的位置與尺寸
- (UICollectionViewLayoutAttributes *)layoutAttributesForItemAtIndexPath:(NSIndexPath *)indexPath {
    UICollectionViewLayoutAttributes *attributes =
        [UICollectionViewLayoutAttributes layoutAttributesForCellWithIndexPath:indexPath];
    attributes.size = CGSizeMake(ITEM_SIZE, ITEM_SIZE);
    attributes.center = CGPointMake(
        _center.x + _radius * cosf(2 * indexPath.item * M_PI / _cellCount),
        _center.y + _radius * sinf(2 * indexPath.item * M_PI / _cellCount));
    return attributes;
}

- (NSArray *)layoutAttributesForElementsInRect:(CGRect)rect {
    NSMutableArray *attributes = [NSMutableArray array];
    for (NSInteger i = 0; i < self.cellCount; i++) {
        NSIndexPath *indexPath = [NSIndexPath indexPathForItem:i inSection:0];
        [attributes addObject:[self layoutAttributesForItemAtIndexPath:indexPath]];
    }
    return attributes;
}

#pragma mark -- Layout init & final

// 插入時的起始狀態:從圓心浮現
- (UICollectionViewLayoutAttributes *)initialLayoutAttributesForInsertedItemAtIndexPath:(NSIndexPath *)itemIndexPath
{
    UICollectionViewLayoutAttributes *attributes = [self layoutAttributesForItemAtIndexPath:itemIndexPath];
    attributes.alpha = 0.0;
    attributes.center = CGPointMake(_center.x, _center.y);
    return attributes;
}

// 刪除時的最終狀態:縮回圓心並消失
- (UICollectionViewLayoutAttributes *)finalLayoutAttributesForDeletedItemAtIndexPath:(NSIndexPath *)itemIndexPath
{
    UICollectionViewLayoutAttributes *attributes = [self layoutAttributesForItemAtIndexPath:itemIndexPath];
    attributes.alpha = 0.0;
    attributes.center = CGPointMake(_center.x, _center.y);
    attributes.transform3D = CATransform3DMakeScale(0.1, 0.1, 1.0);
    return attributes;
}
@end
圓形排列的數學很直接:把 2π 依 cell 數量等分,第 i 個 cell 的角度就是 2 × i × π / cellCount,再配合半徑用 sin/cos 換算成座標即可。prepareLayout 在每次版面計算前被呼叫,因此 cellCount 改變時圓周會自動重新均分。
另外注意 layoutAttributesForElementsInRect: 回傳的是「該矩形範圍內可見的 attributes」。這個範例直接回傳全部 cell,是因為數量不多;實作大量 cell 時應該真的做矩形交集判斷,否則效能會很差。
五、自訂 Cell
UICollectionViewCell 和 UITableViewCell 一樣可以客製化,這讓需要精緻視覺效果的 App 有更大發揮空間。自訂 Cell 只管理可視範圍內的 item。
#import <UIKit/UIKit.h>

@interface CircleCell : UICollectionViewCell
@property (nonatomic, strong) UIImageView *imageView;
@end

#import "CircleCell.h"
#import <QuartzCore/QuartzCore.h>

@implementation CircleCell

@synthesize imageView;

- (id)initWithFrame:(CGRect)frame
{
    self = [super initWithFrame:frame];
    if (self) {
        self.contentView.layer.cornerRadius = 10.0f;
        self.contentView.frame = CGRectMake(0, 0, 75, 75);
        self.contentView.layer.borderWidth = 1.0f;
        self.contentView.layer.borderColor = [UIColor whiteColor].CGColor;
        self.contentView.backgroundColor = [UIColor underPageBackgroundColor];

        self.imageView = [[UIImageView alloc] initWithImage:[UIImage imageNamed:@"1_120103225810_1.jpeg"]];
        self.imageView.layer.masksToBounds = YES;
        self.imageView.layer.cornerRadius = 10.0f;
        self.imageView.frame = self.contentView.frame;
        [self.contentView addSubview:self.imageView];
    }
    return self;
}
@end
六、ViewController:委派與手勢
最後在 UICollectionViewController 子類中實作 delegate 與 dataSource,並加上 tap 手勢以支援互動。
#import <UIKit/UIKit.h>

@interface ViewController : UICollectionViewController
@property (nonatomic, assign) NSInteger cellCount;
@end

#import "ViewController.h"
#import "GifLayoutView.h"
#import "CircleCell.h"

@implementation ViewController

- (void)viewDidLoad
{
    [super viewDidLoad];

    // 加上中央的 GIF 顯示 view
    GifLayoutView *gifView = [[GifLayoutView alloc] initWithFrame:CGRectMake(0, 0, 350, 350)];
    gifView.center = self.collectionView.center;
    [self.collectionView addSubview:gifView];

    self.cellCount = 20;

    UITapGestureRecognizer *tapGesture =
        [[UITapGestureRecognizer alloc] initWithTarget:self action:@selector(handleTapGesture:)];
    [self.collectionView addGestureRecognizer:tapGesture];

    [self.collectionView registerClass:[CircleCell class]
           forCellWithReuseIdentifier:@"Circle_Cell"];
    [self.collectionView reloadData];
    self.collectionView.backgroundColor = [UIColor scrollViewTexturedBackgroundColor];
}

- (NSInteger)collectionView:(UICollectionView *)view numberOfItemsInSection:(NSInteger)section
{
    return self.cellCount;
}

- (UICollectionViewCell *)collectionView:(UICollectionView *)collectionView
                  cellForItemAtIndexPath:(NSIndexPath *)indexPath
{
    CircleCell *cell = [collectionView dequeueReusableCellWithReuseIdentifier:@"Circle_Cell"
                                                                forIndexPath:indexPath];
    return cell;
}

- (void)handleTapGesture:(UITapGestureRecognizer *)sender
{
    if (sender.state == UIGestureRecognizerStateEnded)
    {
        CGPoint p = [sender locationInView:self.collectionView];
        NSIndexPath *tappedCellPath = [self.collectionView indexPathForItemAtPoint:p];

        if (tappedCellPath != nil)
        {
            // 點到 cell:刪除
            self.cellCount = self.cellCount - 1;
            [self.collectionView performBatchUpdates:^{
                [self.collectionView deleteItemsAtIndexPaths:[NSArray arrayWithObject:tappedCellPath]];
            } completion:nil];
        }
        else
        {
            // 點到空白處:新增
            self.cellCount = self.cellCount + 1;
            [self.collectionView performBatchUpdates:^{
                [self.collectionView insertItemsAtIndexPaths:
                    [NSArray arrayWithObject:[NSIndexPath indexPathForItem:0 inSection:0]]];
            } completion:nil];
        }
    }
}
@end
這裡的關鍵是 indexPathForItemAtPoint:——它讓你能反查某個座標落在哪個 cell 上,是實作「點擊空白處」與「點擊 cell」分支判斷的核心。回傳 nil 就代表點在空白處。
另外,插入與刪除必須包在 performBatchUpdates:completion: 中,讓系統能批次計算動畫。這也是 initialLayoutAttributesForInsertedItemAtIndexPath: 與 finalLayoutAttributesForDeletedItemAtIndexPath: 被觸發的時機。
七、幾點實作檢討
這個範例能跑,但有幾處在正式專案中值得修正:
cell 數量下限。cellCount 減到 0 時,圓周計算會出現除以零。應該加上 if (self.cellCount > 0) 的保護。
cellForItemAtIndexPath 未設定內容。範例中所有 cell 都顯示同一張寫死的圖片。實作時應在這裡依 indexPath 設定對應的 imageView.image。
layout 應實作 invalidation。當 self.view 尺寸改變(例如旋轉)時,prepareLayout 會重算,但通常需要搭配 shouldInvalidateLayoutForBoundsChange: 回傳 YES 才能確保版面正確刷新。
大量 cell 時的效能。如前所述,layoutAttributesForElementsInRect: 應該真的做可視範圍過濾。
儘管如此,這個範例清楚展示了 UICollectionView 相對於 UITableView 的核心進步:把「排列規則」從元件本身抽離成可替換的 Layout 物件。從此 circular、 Cover Flow、拼貼瀑布流這類版面,都能透過寫一個 Layout 子類來實現,不必再回頭做 cell 的手動定位。