
iPhone 開發筆記(5):UIScrollView 與 UIPageControl 的搭配使用
編輯:iOS 開發綜合
UIScrollView 加上 UIPageControl,是 App 首頁做「推薦橫幅 / 圖片輪播」最經典的組合:手指滑動換圖,下方的頁碼小圓點也跟著更新。以下記錄實作方式。
效果預覽
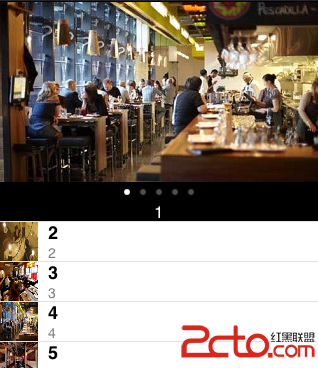
1. 在 viewDidLoad 中建立元件
先建立 scrollView 並開啟分頁模式(pagingEnabled),再逐一加入 imageView,最後建立 pageControl 與說明 label:
// 建立 scrollView
scrollView = [[UIScrollView alloc] initWithFrame:CGRectMake(0, 0, 320, 180)];
[scrollView setBackgroundColor:[UIColor blackColor]];
[scrollView setCanCancelContentTouches:NO];
scrollView.indicatorStyle = UIScrollViewIndicatorStyleWhite;
scrollView.clipsToBounds = YES;
scrollView.scrollEnabled = YES;
scrollView.pagingEnabled = YES;          // 分頁滑動的關鍵
scrollView.delegate = self;
scrollView.tag = 1;
scrollView.showsHorizontalScrollIndicator = NO;

// 為 scrollView 加入點擊手勢
UITapGestureRecognizer *singleTap = [[UITapGestureRecognizer alloc]
    initWithTarget:self action:@selector(singleTapGestureCaptured:)];
singleTap.cancelsTouchesInView = NO;
[scrollView addGestureRecognizer:singleTap];

// 逐一加入 imageView
for (NSUInteger i = 1; i <= kNumImages1; i++) {
    NSString *imageName = [NSString stringWithFormat:@"image%d.jpg", i];
    UIImage *image = [UIImage imageNamed:imageName];
    UIImageView *imageView = [[UIImageView alloc] initWithImage:image];
    CGRect rect = imageView.frame;
    rect.size.height = kScrollObjHeight1;
    rect.size.width = kScrollObjWidth1;
    imageView.frame = rect;
    imageView.tag = i;
    [scrollView addSubview:imageView];
    [imageView release];
}
[self layoutScrollImages1];              // 配置圖片位置
[featureView addSubview:scrollView];

// 建立 pageControl
pageControl = [[UIPageControl alloc] initWithFrame:CGRectMake(0, 180, 320, 20)];
[pageControl setBackgroundColor:[UIColor blackColor]];
pageControl.currentPage = 0;
pageControl.numberOfPages = kNumImages1;
[featureView addSubview:pageControl];

// 建立說明 label
featureLabel = [[UILabel alloc] initWithFrame:CGRectMake(0, 200, 320, 20)];
featureLabel.textAlignment = UITextAlignmentCenter;
featureLabel.backgroundColor = [UIColor blackColor];
featureLabel.textColor = [UIColor whiteColor];
featureLabel.text = [array objectAtIndex:0];
[featureView addSubview:featureLabel];
2. 配置圖片與處理 delegate
把每張圖片依序水平排列,並設定 contentSize 讓它可以捲動:
- (void)layoutScrollImages1 {
    CGFloat curXLoc = 0;
    for (UIImageView *view in [scrollView subviews]) {
        if ([view isKindOfClass:[UIImageView class]] && view.tag > 0) {
            CGRect frame = view.frame;
            frame.origin = CGPointMake(curXLoc, 0);
            view.frame = frame;
            curXLoc += kScrollObjWidth1;
        }
    }
    [scrollView setContentSize:CGSizeMake((kNumImages1 * kScrollObjWidth1),
                                          [scrollView bounds].size.height)];
}
當 scrollView 停止滾動時,算出目前在第幾頁,同步更新 pageControl 與 label:
- (void)scrollViewDidEndDecelerating:(UIScrollView *)sView {
    if (sView.tag == 1) {
        NSInteger index = fabs(sView.contentOffset.x) / sView.frame.size.width;
        [pageControl setCurrentPage:index];
        featureLabel.text = [array objectAtIndex:index];
    }
}
點擊時則依點擊位置判斷點到哪一頁,並跳轉到詳情頁:
- (void)singleTapGestureCaptured:(UITapGestureRecognizer *)gesture {
    CGPoint touchPoint = [gesture locationInView:scrollView];
    NSInteger index = touchPoint.x / 320;
    shopDetailView = [[ShopDetailViewController alloc] init];
    [self.navigationController pushViewController:shopDetailView animated:YES];
    [shopDetailView release];
}
這樣就實現了兩個功能:一是 scrollView 的滑動換圖,二是下方 label 文字能隨著圖片變化。一般 App 首頁的推薦輪播區,用 UIScrollView 搭配 UIPageControl 是最合適的選擇。若要加上「自動播放」,只需再用 NSTimer 週期性呼叫 setContentOffset:animated: 前進到下一頁即可。