
iOS 的 Bundle 資源束製作與圖片載入封裝
Bundle 的製作其實是靜態庫打包的延伸。靜態庫往往伴隨圖片與多媒體資源,直接散落在專案裡可行,但不易管理——特別是給第三方插件使用時。把資源打包成一個 .bundle,日後要移除只需刪一個檔案。
為什麼要用 bundle
我們專案中使用的銀聯支付插件就是這樣:
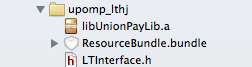
直接把 xxx.bundle 加入專案即可,要移除時也乾淨俐落。
有人會說用 group 管理也一樣方便。的確可行,但打包成 bundle 在目錄結構上更簡潔,也是 Three20、銀聯等成熟專案的共同做法。
製作步驟
1. 建立 bundle 目錄
新建一個資料夾,改名為你要的名稱並加上 .bundle 副檔名,Finder 會自動把它變成 bundle 樣式的圖示。
2. 加入資源並分類

建議在裡面建立幾個分類子目錄,其中 images 資料夾最好一定要有,後續載入圖片時會用到這個路徑。
3. 加入專案

4. 讀取使用
UILabel *la = [[UILabel alloc] initWithFrame:CGRectMake(50, 100, 50, 50)];
la.text = @"陳凱";

NSString *image_url = [[[NSBundle mainBundle] resourcePath]
                        stringByAppendingPathComponent:@"nono.bundle/images/android.png"];
la.backgroundColor = [UIColor colorWithPatternImage:[UIImage imageWithContentsOfFile:image_url]];
問題:路徑太長
過去我們取得 UIImage 大多直接用:
[UIImage imageNamed:@"android.png"]這個 API 其實也是靠相對路徑找到資源的,但它無法找到自製 bundle 內部的圖片。於是每次都要傳入一長串路徑,寫起來相當麻煩。
借鏡 Three20 的 scheme 思路
Three20 的做法是定義一個宏:
TTIMAGE(@"bundle://Three20.bundle/images/backIcon.png")回傳的就是一個 UIImage 物件。它背後用了 scheme 的概念——bundle:// 與 document:// 分別代表不同來源:載入時先取得 App 的絕對路徑(mainBundle 的 resourcePath),再把 bundle:// 後面的相對路徑接上去,組出完整檔案路徑。
我們的簡化版:用 Category 封裝
-(UIImage *)imagesNamedFromCustomBundle:(NSString *)name {
    NSString *main_images_dir_path =
        [[[NSBundle mainBundle] resourcePath] stringByAppendingPathComponent:@"nono.bundle/images"];

    // NSAssert(main_images_dir_path, @"main_images_dir_path is null");

    NSString *image_path = [main_images_dir_path stringByAppendingPathComponent:name];
    return [UIImage imageWithContentsOfFile:image_path];
}
為 UIImage 建立一個 Category,把這個方法掛上去,之後就能像 imageNamed: 一樣只傳檔名:
[UIImage imagesNamedFromCustomBundle:@"android.png"]幾個實務提醒
用 imageWithContentsOfFile: 讀進來的 UIImage 不會被系統快取,同一張圖讀兩次就是解碼兩次。若圖片會重複使用,建議在 Category 中加一層 dictionary 快取,或改用 [UIImage imageNamed:] 搭配正確的 bundle 參數。
另外,bundle 內的檔案若需要在執行期修改,必須放在 Documents 或 Caches 目錄而非 bundle——App bundle 是唯讀的,且每次從 App Store 更新都會被完整替換。