
iOS 開發(94)之 SQLite 資料庫實作
SQLite 可視為 MySQL 的精簡版,廣泛用於行動裝置與小型裝置。它的優點是可移植性高、不需要伺服器即可運行;缺點則是沒有提供便利的資料庫建立工具(必須自行下 SQL 指令),而且沒有物件導向介面,只能使用 C 風格的 API。相對於 Objective-C 的優雅語法,這套 API 顯得笨重難用。不過若把「用檔案儲存」與「用 SQLite 儲存」相比,後者在查詢與結構化程度上仍明顯勝出。
專案結構
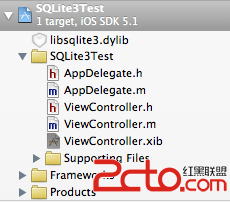
建立一個 Single View Application,命名為 SQLite3Test,打開 ViewController.xib 佈置三個 UITextField 與一個背景可點擊的 view。
在 xib 中把三個 UITextField 的 tag 分別設為 1、2、3,這個設定位於右側屬性檢視器中:
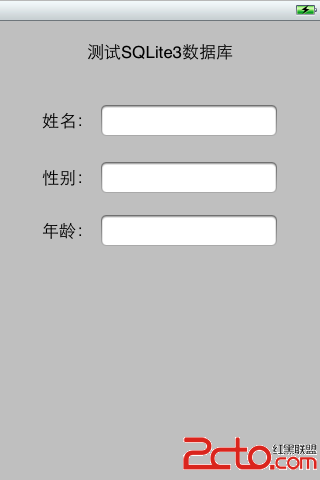
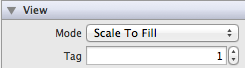
設 tag 的用意是:後續可以用 [self.view viewWithTag:i] 直接取出對應的輸入框,類似 Android 的 findViewById,省去為每個控件都拉一條 outlet。
ViewController.h
#import <UIKit/UIKit.h>

@interface ViewController : UIViewController
@property (copy, nonatomic) NSString *databaseFilePath;

// App 即將進入背景時執行(由通知中心觸發)
-(void)applicationWillResignActive:(NSNotification *)notification;

// 點擊空白處收起鍵盤
-(IBAction)backgroundTapped:(id)sender;
@end
實作前別忘了把 libsqlite3.dylib(或 .tbd)加入專案,否則會找不到 sqlite3 相關符號。
ViewController.m:開啟資料庫與建表查詢
#import "ViewController.h"
#import <sqlite3.h>

#define kDatabaseName @"database.sqlite3"

@implementation ViewController
@synthesize databaseFilePath;

- (void)viewDidLoad {
    [super viewDidLoad];

    // 1. 取得 Documents 路徑並指定 DB 檔位置
    NSArray *path = NSSearchPathForDirectoriesInDomains(NSDocumentDirectory, NSUserDomainMask, YES);
    NSString *docDir = [path objectAtIndex:0];
    self.databaseFilePath = [docDir stringByAppendingPathComponent:kDatabaseName];

    // 2. 開啟資料庫;UTF8String 將 OC 字串轉為 C 字串
    sqlite3 *database;
    if (sqlite3_open([self.databaseFilePath UTF8String], &database) != SQLITE_OK) {
        sqlite3_close(database);
        NSAssert(0, @"資料庫打開失敗");
    }

    // 3. 建立資料表
    NSString *createSql = @"CREATE TABLE IF NOT EXISTS STUDENT (TAG INTEGER PRIMARY KEY, FIELD_DATA TEXT);";
    char *errorMsg;
    if (sqlite3_exec(database, [createSql UTF8String], NULL, NULL, &errorMsg) != SQLITE_OK) {
        sqlite3_close(database);
        NSAssert(0, @"建立表錯誤:%s", errorMsg);
    }

    // 4. 查詢並回填到畫面
    NSString *querySql = @"SELECT * FROM STUDENT ORDER BY TAG";
    sqlite3_stmt *statement;
    if (sqlite3_prepare_v2(database, [querySql UTF8String], -1, &statement, nil) == SQLITE_OK) {
        while (sqlite3_step(statement) == SQLITE_ROW) {
            int tag = sqlite3_column_int(statement, 0);
            char *rowData = (char *)sqlite3_column_text(statement, 1);

            UITextField *textField = (UITextField *)[self.view viewWithTag:tag];
            textField.text = [[NSString alloc] initWithUTF8String:rowData];
        }
        sqlite3_finalize(statement);   // 釋放編譯後的 statement
    }
    sqlite3_close(database);

    // 5. 註冊通知,App 將進入背景時保存資料
    [[NSNotificationCenter defaultCenter] addObserver:self
                                            selector:@selector(applicationWillResignActive:)
                                                name:UIApplicationWillResignActiveNotification
                                              object:[UIApplication sharedApplication]];
}
這裡有幾個關鍵 API 需要理解:sqlite3_exec 用於沒有結果集的指令(建表、插入、刪除);sqlite3_prepare_v2 把 SQL 編譯成 statement 並回傳指標;sqlite3_step 讓游標往前移動一列,回傳 SQLITE_ROW 代表還有資料,SQLITE_DONE 代表已完成。
App 進入背景時寫入資料
-(void)applicationWillResignActive:(NSNotification *)notification {
    sqlite3 *database;
    if (sqlite3_open([self.databaseFilePath UTF8String], &database) != SQLITE_OK) {
        NSAssert(0, @"打開資料庫錯誤");
        sqlite3_close(database);
        return;
    }

    for (int i = 1; i <= 3; i++) {
        UITextField *textField = (UITextField *)[self.view viewWithTag:i];

        // 使用佔位符綁定參數,避免 SQL 注入與引號問題
        char *update = "INSERT OR REPLACE INTO STUDENT VALUES (?,?)";
        sqlite3_stmt *statement;
        if (sqlite3_prepare_v2(database, update, -1, &statement, nil) == SQLITE_OK) {
            sqlite3_bind_int(statement, 1, i);
            // 第四個參數 -1 代表整串;第五個參數為回呼,可在此做記憶體清理
            sqlite3_bind_text(statement, 2, [textField.text UTF8String], -1, NULL);
        }

        if (sqlite3_step(statement) != SQLITE_DONE) {
            NSAssert(0, @"更新資料出錯");
        }
        sqlite3_finalize(statement);
    }
    sqlite3_close(database);
}
INSERT OR REPLACE 搭配 PRIMARY KEY,讓同一筆 tag 在重複寫入時被覆蓋而非新增,這正是我們想要的重複儲存行為。
收起鍵盤
-(IBAction)backgroundTapped:(id)sender {
    // xib 設定:選中整個 view,把屬性中的 class 由 UIView 改為 UIControl,
    // 接著在事件選擇器中把 Touch Down 連到這個 method
    for (int i = 1; i <= 3; i++) {
        [(UITextField *)[self.view viewWithTag:i] resignFirstResponder];
    }
}
執行結果
輸入資料後按下 Home 鍵,再次進入 App,可看到資料在每次退出前都被保存,重新進入時則從 SQLite 查詢並顯示:
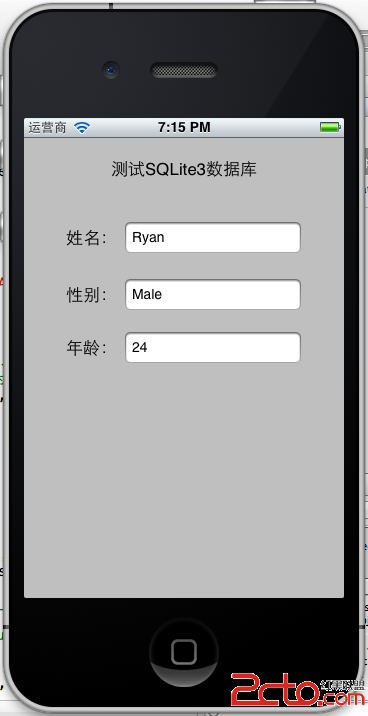
最後提醒:使用原生 SQLite API 時,sqlite3_open 與 sqlite3_finalize 必須成對出現,否則會造成檔案鎖定與記憶體洩漏。若覺得這套 C API 過於繁瑣,可改用 FMDB 或 Core Data 這類封装層。
- 上一篇文章: iPhone 開發基礎觀念筆記整理
- 下一篇文章: iOS 開發(93)之 常用加密方法:AES、MD5、Base64