
iOS 鍵盤完全攻略:自訂鍵盤外觀、收起虛擬鍵盤與解決輸入框被遮擋
在正式動手處理鍵盤問題之前,先把 iOS 鍵盤可以調整的幾個項目一次說清楚。掌握這些設定,之後無論是「按 Return 收起鍵盤」還是「鍵盤上不擋住輸入框」,都會順手很多。
一、鍵盤能調整的六個地方
1. 鍵盤類型(UIKeyboardType)
UIKit 一共提供八種鍵盤樣式,依輸入情境挑選合適的一種,可以大幅降低使用者輸入的摩擦。
typedef enum {
    UIKeyboardTypeDefault,             // 預設鍵盤,支援全部字元
    UIKeyboardTypeASCIICapable,        // 支援 ASCII 的預設鍵盤
    UIKeyboardTypeNumbersAndPunctuation,// 數字與標點符號(含 + * # 等)
    UIKeyboardTypeURL,                 // 網址鍵盤,帶 .com 快速鍵
    UIKeyboardTypeNumberPad,           // 純數字鍵盤
    UIKeyboardTypePhonePad,            // 電話鍵盤
    UIKeyboardTypeNamePhonePad,        // 電話鍵盤,同時可輸入人名
    UIKeyboardTypeEmailAddress         // 電子郵件地址鍵盤
} UIKeyboardType;
textField.keyboardType = UIKeyboardTypeNumberPad;
2. 鍵盤外觀(UIKeyboardAppearance)
typedef enum {
    UIKeyboardAppearanceDefault,  // 預設淺灰色
    UIKeyboardAppearanceAlert     // 深灰/石墨色,適合警示或輸入密碼的情境
} UIKeyboardAppearance;
textField.keyboardAppearance = UIKeyboardAppearanceDefault;
3. Return 鍵樣式(UIReturnKeyType)
typedef enum {
    UIReturnKeyDefault,      // 灰色按鈕,標示 Return
    UIReturnKeyGo,           // 藍色 Go
    UIReturnKeyGoogle,       // 藍色 Google,常用於搜尋
    UIReturnKeyJoin,         // 藍色 Join
    UIReturnKeyNext,         // 藍色 Next
    UIReturnKeyRoute,        // 藍色 Route
    UIReturnKeySearch,       // 藍色 Search
    UIReturnKeySend,         // 藍色 Send
    UIReturnKeyYahoo,        // 藍色 Yahoo!
    UIReturnKeyDone,         // 藍色 Done
    UIReturnKeyEmergencyCall // 緊急通話
} UIReturnKeyType;
textField.returnKeyType = UIReturnKeyGo;
4. 自動大寫(UITextAutocapitalizationType)
typedef enum {
    UITextAutocapitalizationTypeNone,          // 不自動大寫
    UITextAutocapitalizationTypeWords,         // 每個單字首字母大寫
    UITextAutocapitalizationTypeSentences,     // 每句開頭大寫
    UITextAutocapitalizationTypeAllCharacters  // 全部大寫
} UITextAutocapitalizationType;
textField.autocapitalizationType = UITextAutocapitalizationTypeWords;
5. 自動更正(UITextAutocorrectionType)
typedef enum {
    UITextAutocorrectionTypeDefault, // 依系統預設
    UITextAutocorrectionTypeNo,      // 關閉自動更正
    UITextAutocorrectionTypeYes      // 開啟自動更正
} UITextAutocorrectionType;
textField.autocorrectionType = UITextAutocorrectionTypeNo;
6. 安全輸入(secureTextEntry)
textField.secureTextEntry = YES;
打開安全輸入後,輸入內容會以圓點遮蔽,同時系統會停用自動更正與學習詞庫,避免密碼被記住。這是一般密碼欄位的標準做法。
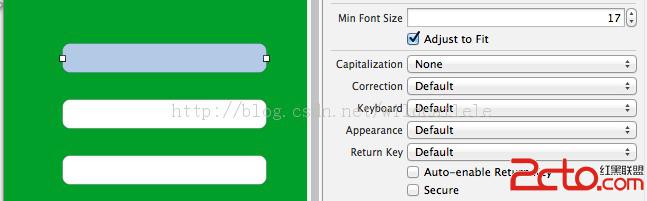
以上六項都可以直接在 Interface Builder 的屬性檢查器中設定,不必寫程式:
二、按 Return 鍵收起鍵盤
最直覺的收鍵盤方式,就是讓 Return 鍵具備「結束編輯」的效果。做法是攔截文字輸入框的 Did End On Exit 事件。
先在 ViewController.h 宣告方法:
- (IBAction)textFiledReturnEditing:(id)sender;
再在 ViewController.m 實作,重點是讓送出事件的那個物件放棄第一回應者身分:
- (IBAction)textFiledReturnEditing:(id)sender {
    [sender resignFirstResponder];
}
接著把畫面上的三個輸入框都連到這個方法。操作步驟:
1. 打開 Assistant Editor,左側顯示 ViewController.xib,右側顯示 ViewController.h。
2. 在 Xcode 右側工具列打開 Connection Inspector。
3. 選中第一個輸入框,在 Connection Inspector 找到 Did End On Exit,從右側小圓圈拉出一條連線,指向 ViewController.h 的 textFiledReturnEditing:。
4. 另外兩個輸入框重複同樣動作。
完成後,輕觸鍵盤上的 Return 鍵即可收起鍵盤。
三、點擊背景收起鍵盤
除了 Return 鍵,讓使用者點一下空白處就收鍵盤,是更常見的互動。
宣告方法:
- (IBAction)backgroundTap:(id)sender;
實作時,把所有輸入框的第一回應者狀態解除:
- (IBAction)backgroundTap:(id)sender {
    [firstField resignFirstResponder];
    [secondField resignFirstResponder];
    [thirdField resignFirstResponder];
}
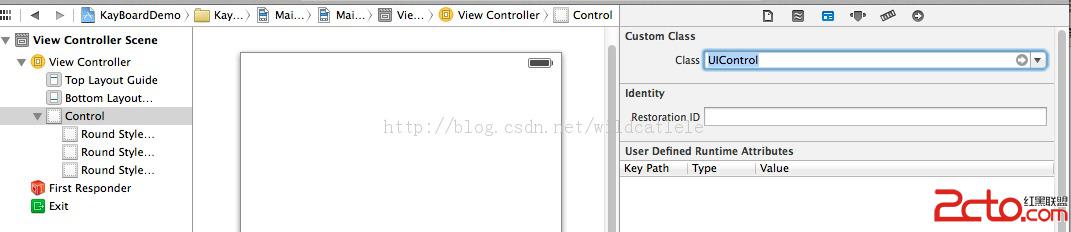
這裡有個關鍵細節:UIView 本身不接收觸控事件,所以要先把它改成 UIControl。
1. 打開 xib,選中 View。
2. 開啟 Identity Inspector,把 Class 由 UIView 改為 UIControl。
3. 回到 Assistant Editor,在 Connection Inspector 找到 Touch Down,拉線連到 backgroundTap:。
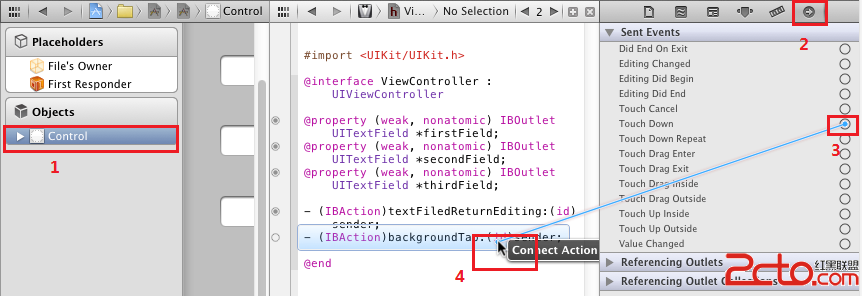
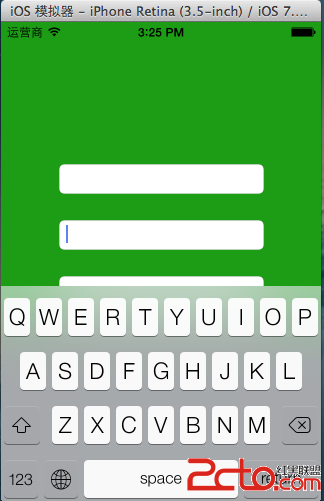
執行結果:鍵盤彈出後,點一下背景區域,鍵盤就會向下收起。
四、解決鍵盤遮住 UITextField
螢幕空間有限,鍵盤一彈出往往直接蓋住下方的輸入框。解法是在鍵盤出現時把整個畫面上移,鍵盤消失時再移回來。
#pragma mark - 解決虛擬鍵盤擋住 UITextField 的方法

// 鍵盤即將出現:把畫面上推
- (void)keyboardWillShow:(NSNotification *)noti {
    float height = 216.0; // 鍵盤高度
    CGRect frame = self.view.frame;
    frame.size = CGSizeMake(frame.size.width, frame.size.height - height);

    [UIView beginAnimations:@"Curl" context:nil];
    [UIView setAnimationDuration:0.30];
    [UIView setAnimationDelegate:self];
    [self.view setFrame:frame];
    [UIView commitAnimations];
}

// 按下 Return:畫面復位並結束編輯
- (BOOL)textFieldShouldReturn:(UITextField *)textField {
    NSTimeInterval animationDuration = 0.30f;
    [UIView beginAnimations:@"ResizeForKeyboard" context:nil];
    [UIView setAnimationDuration:animationDuration];
    CGRect rect = CGRectMake(0.0f, 0.0f,
                             self.view.frame.size.width,
                             self.view.frame.size.height);
    self.view.frame = rect;
    [UIView commitAnimations];

    [textField resignFirstResponder];
    return YES;
}

// 開始編輯:依輸入框位置決定要上移多少
- (void)textFieldDidBeginEditing:(UITextField *)textField {
    CGRect frame = textField.frame;
    int offset = frame.origin.y + 32 - (self.view.frame.size.height - 216.0);

    NSTimeInterval animationDuration = 0.30f;
    [UIView beginAnimations:@"ResizeForKeyBoard" context:nil];
    [UIView setAnimationDuration:animationDuration];

    float width  = self.view.frame.size.width;
    float height = self.view.frame.size.height;
    if (offset > 0) {
        self.view.frame = CGRectMake(0.0f, -offset, width, height);
    }
    [UIView commitAnimations];
}
使用這組程式碼有兩個前提:
1. 控制器要採用 UITextFieldDelegate 協定:
@interface ViewController : UIViewController <UITextFieldDelegate>
2. 在 viewDidLoad 中把 delegate 指向自己:
- (void)viewDidLoad {
    [super viewDidLoad];
    self.firstTextField.delegate  = self;
    self.secondTextField.delegate = self;
    self.thirdTextField.delegate  = self;
}
常見後遺症:畫面上移後回不來
實務上最常遇到的問題是畫面被推上去之後沒有復位。把復位邏輯一併寫進 backgroundTap: 就能解決:
- (IBAction)backgroundTap:(id)sender {
    [self.firstTextField  resignFirstResponder];
    [self.secondTextField resignFirstResponder];
    [self.thirdTextField  resignFirstResponder];

    NSTimeInterval animationDuration = 0.30f;
    [UIView beginAnimations:@"ResizeForKeyboard" context:nil];
    [UIView setAnimationDuration:animationDuration];
    CGRect rect = CGRectMake(0.0f, 0.0f,
                             self.view.frame.size.width,
                             self.view.frame.size.height);
    self.view.frame = rect;
    [UIView commitAnimations];
}
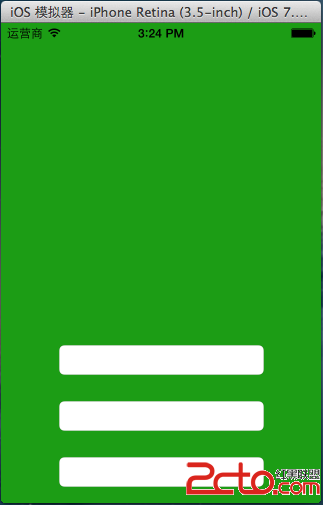
執行後可以看到,鍵盤彈出時畫面上移、輸入框完整露出;使用者點背景或按下 Return,畫面即平滑回到原位。
小提醒:硬編碼 216 點的鍵盤高度在螢幕尺寸多樣化的機型上並不保險。實務上更穩妥的做法,是從 NSNotification 的 userInfo 中讀取鍵盤實際 frame,再據此計算位移量。
- 上一篇文章: iOS 沙盒機制詳解:App 的資料存儲結構
- 下一篇文章: UIDevice uniqueIdentifier 停用後的三種替代方案