
UICollectionView 詳解與自訂 Cell 完整實例
本文先總覽 UICollectionView 及其常用方法,再透過一個完整實例說明實際用法。
UICollectionView 與 UICollectionViewController 是 iOS 6 引入的 API,用於展示集合檢視,布局比 UITableView 靈活得多,可以輕鬆做到多列、瀑布流、自訂排版。用法與 UITableView 相當接近,但少了系統提供的預設 Cell。
使用 UICollectionView 通常需要實作三個協議:UICollectionViewDataSource、UICollectionViewDelegate、UICollectionViewDelegateFlowLayout。
常用方法速查
#pragma mark -- UICollectionViewDataSource

// 每個 section 的項目數量
- (NSInteger)collectionView:(UICollectionView *)collectionView
     numberOfItemsInSection:(NSInteger)section {
    return 30;
}

// section 數量
- (NSInteger)numberOfSectionsInCollectionView:(UICollectionView *)collectionView {
    return 1;
}

// 每個 cell 的內容
- (UICollectionViewCell *)collectionView:(UICollectionView *)collectionView
                    cellForItemAtIndexPath:(NSIndexPath *)indexPath {
    static NSString *CellIdentifier = @"GradientCell";
    UICollectionViewCell *cell = [collectionView dequeueReusableCellWithReuseIdentifier:CellIdentifier
                                                                           forIndexPath:indexPath];
    cell.backgroundColor = [UIColor colorWithRed:((10 * indexPath.row) / 255.0)
                                           green:((20 * indexPath.row) / 255.0)
                                            blue:((30 * indexPath.row) / 255.0)
                                           alpha:1.0f];
    return cell;
}

#pragma mark -- UICollectionViewDelegateFlowLayout

// 每個 cell 的尺寸
- (CGSize)collectionView:(UICollectionView *)collectionView
                  layout:(UICollectionViewLayout *)collectionViewLayout
  sizeForItemAtIndexPath:(NSIndexPath *)indexPath {
    return CGSizeMake(96, 100);
}

// 每個 section 的內距
- (UIEdgeInsets)collectionView:(UICollectionView *)collectionView
                        layout:(UICollectionViewLayout *)collectionViewLayout
        insetForSectionAtIndex:(NSInteger)section {
    return UIEdgeInsetsMake(5, 5, 5, 5);
}

#pragma mark -- UICollectionViewDelegate

// 點擊時的處理
- (void)collectionView:(UICollectionView *)collectionView
didSelectItemAtIndexPath:(NSIndexPath *)indexPath {
    UICollectionViewCell *cell = [collectionView cellForItemAtIndexPath:indexPath];
    cell.backgroundColor = [UIColor whiteColor];
}

// 是否可被選取
- (BOOL)collectionView:(UICollectionView *)collectionView
shouldSelectItemAtIndexPath:(NSIndexPath *)indexPath {
    return YES;
}
實例:自訂 CollectionCell
由於 CollectionView 沒有預設的 Cell 布局,自訂幾乎是必然選擇,而且更快更可控。
步驟一:建立 Cell 類別
新增類別 CollectionCell,繼承自 UICollectionViewCell。
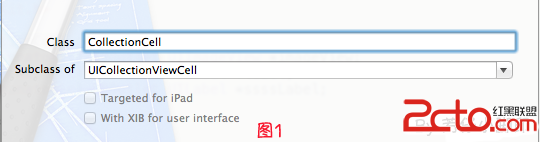
步驟二:建立 Xib
新增 Xib 檔並命名為 CollectionCell.xib。

a. 選取 CollectionCell.xib,刪掉預設的 View,從物件庫拖一個 Collection View Cell 到畫布上,尺寸設為 95 × 116。
b. 選取剛加入的 Cell,把它的類別改為 CollectionCell。

c. 在 Cell 中放入一個 ImageView 與一個 Label。

d. 建立 Outlet 映射。


e. 在 CollectionCell.m 中覆寫 init 方法,讓 Cell 從 Xib 載入:
- (id)initWithFrame:(CGRect)frame {
    self = [super initWithFrame:frame];
    if (self) {
        NSArray *arrayOfViews = [[NSBundle mainBundle] loadNibNamed:@"CollectionCell"
                                                             owner:self
                                                           options:nil];
        if (arrayOfViews.count < 1) {
            return nil;   // 路徑不存在
        }
        if (![[arrayOfViews objectAtIndex:0] isKindOfClass:[UICollectionViewCell class]]) {
            return nil;   // 型別不符
        }
        self = [arrayOfViews objectAtIndex:0];
    }
    return self;
}
f. 把 Xib 中的 Cell 識別符(Identifier)設為 CollectionCell。
步驟三:在畫面上放 CollectionView
1. 從物件庫拖一個 Collection View 到 ViewController 的 view 上。
2. 連上 dataSource 與 delegate,並建立 Outlet 取名為 collectionView。
3. 在尺寸檢查器中把 Cell Size 的寬高改成與自訂 Cell 一致的 95 × 116。

4. 在屬性檢查器中可設定滾動方向(Vertical / Horizontal)等。
5. 選取 CollectionViewCell,把它的 Class 改為 CollectionCell。

6. 在 viewDidLoad 中註冊 Cell,這一句若漏掉會導致 App 崩潰:
[self.collectionView registerClass:[CollectionCell class]
        forCellWithReuseIdentifier:@"CollectionCell"];
7. 在 header 中宣告代理:
@interface ViewController : UIViewController <UICollectionViewDataSource, UICollectionViewDelegate>
8. 實作代理方法:
// 每個 section 的項目數量
- (NSInteger)collectionView:(UICollectionView *)collectionView
     numberOfItemsInSection:(NSInteger)section {
    return 12;
}

- (UICollectionViewCell *)collectionView:(UICollectionView *)collectionView
                    cellForItemAtIndexPath:(NSIndexPath *)indexPath {
    CollectionCell *cell = (CollectionCell *)[collectionView
        dequeueReusableCellWithReuseIdentifier:@"CollectionCell"
                                 forIndexPath:indexPath];

    NSString *imageToLoad = [NSString stringWithFormat:@"%ld.png", (long)indexPath.row];
    cell.imageView.image = [UIImage imageNamed:imageToLoad];
    cell.label.text = [NSString stringWithFormat:@"{%ld,%ld}",
                       (long)indexPath.row, (long)indexPath.section];
    return cell;
}
9. 成果如下:

10. 點擊後的跳轉與 UITableView 類似,實作:
- (void)collectionView:(UICollectionView *)collectionView
didSelectItemAtIndexPath:(NSIndexPath *)indexPath
兩個實務補充
第一,若使用 Storyboard 或 Xib 裡預先放好的 prototype cell,就不需要自己寫 loadNibNamed 那一段,直接 dequeueReusableCellWithReuseIdentifier: 即可。上面的寫法適用於 Cell 獨立成 Xib 的情況。
第二,dequeueReusableCellWithReuseIdentifier:forIndexPath: 在 iOS 6 之後必須先註冊類別或 Xib,否則會拋出例外。這是最常見的入門錯誤,錯誤訊息通常長得像「unable to dequeue a cell with identifier ... must register a nib or a class for the identifier」。
學習的路上,與君共勉。