
iOS 圖片拉伸方案:讓按鈕背景兩端固定、中間延展
編輯:iOS 開發綜合
做按鈕、氣泡、輸入框這類「四角圓弧、中間純色」的介面元素時,同一張小圖要撐成不同寬度,靠的就是九宮格式拉伸。iOS 提供了兩條路。
方法一:stretchableImage(推薦)
直接對 UIImage 做處理,設定好左右上下的「端帽」寬度即可,之後把這張圖放到任何控制項中都會自動拉伸:
UIImage *image = [UIImage imageNamed:@"image.png"];
image = [image stretchableImageWithLeftCapWidth:floorf(image.size.width / 2)
                                  topCapHeight:floorf(image.size.height / 2)];
設定了 leftCapWidth 之後,系統會把 rightCapWidth = image.size.width - (leftCapWidth + 1),也就是中間那一個像素被當成可拉伸的區域;垂直方向同理。因此實務上通常把端帽設為「圓角半徑」的大小,而不是單純的寬度一半。
應用在 UIButton 上的完整範例:
UIImage *buttonImage = [UIImage imageNamed:@"contact.png"];
buttonImage = [buttonImage stretchableImageWithLeftCapWidth:floorf(buttonImage.size.width / 2)
                                              topCapHeight:floorf(buttonImage.size.height / 2)];

UIImage *buttonImageSelected = [UIImage imageNamed:@"contactselected.png"];
buttonImageSelected = [buttonImageSelected stretchableImageWithLeftCapWidth:floorf(buttonImageSelected.size.width / 2)
                                                              topCapHeight:floorf(buttonImageSelected.size.height / 2)];

UIButton *button = [UIButton buttonWithType:UIButtonTypeCustom];
button.frame = CGRectMake(0, 0, 240, 44);

[button setBackgroundImage:buttonImage        forState:UIControlStateNormal];
[button setBackgroundImage:buttonImageSelected forState:UIControlStateHighlighted];

button.center = CGPointMake(160, 240);
[button setTitle:@"button"      forState:UIControlStateNormal];
[button setTitle:@"buttonClick" forState:UIControlStateHighlighted];

[self.view addSubview:button];
這個方法的關鍵優點是「一次處理、到處可用」——圖片本身已經帶有拉伸資訊,不必改變任何控制項的設定。
方法二:在 UIButton 內放一個拉伸過的 UIImageView
先把 imageView 的 contentStretch 設定好,調整寬度後塞進 button 並移到最底層,button 背景設為透明:
UIImageView *stretchTest = [[UIImageView alloc] initWithImage:[UIImage imageNamed:@"contact.png"]];
[stretchTest setContentStretch:CGRectMake(0.5f, 0.5f, 0.f, 0.f)];

CGRect frame = stretchTest.frame;
frame.size.width += 100;
stretchTest.frame = frame;

UIButton *button = [UIButton buttonWithType:UIButtonTypeCustom];
button.frame = frame;
button.center = CGPointMake(160, 140);

[button addSubview:stretchTest];
[button sendSubviewToBack:stretchTest];
[button setBackgroundColor:[UIColor clearColor]];
[button setTitle:@"button"      forState:UIControlStateNormal];
[button setTitle:@"buttonClick" forState:UIControlStateHighlighted];

[self.view addSubview:button];
contentStretch 的四個參數是 (left, top, width, height),代表「可拉伸區域」的比例,這裡設為水平與垂直各從 50% 開始、寬高為 0,意思是只拉伸右半與下半。
效果
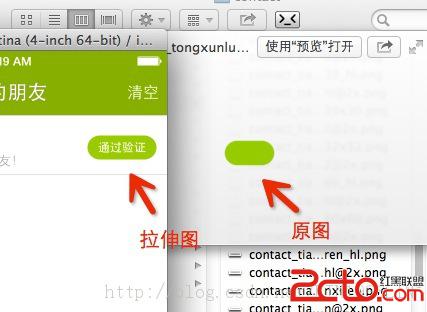
兩種方法的取捨與新版替代方案
- 方法一更簡潔,因為拉伸資訊寫進了圖片物件本身,可跨控制項複用。這也是它適用性更廣的原因。
- 方法二在需要「同時控制圖片位置與拉伸範圍」時較有彈性,但多了一層視圖,改動 button 的 frame 時要記得同步調整 imageView。
- 要注意
stretchableImageWithLeftCapWidth:topCapHeight:與UIView的contentStretch在 iOS 6 之後都已被標記為不建議使用。新專案請改用 Resizable Image with CapInsets:在 Xcode 的 Images.xcassets 中把圖片設為 Sliced → Left/Right Cap、Top/Bottom Cap,程式碼中呼叫[image resizableImageWithCapInsets:UIEdgeInsetsMake(top, left, bottom, right)]即可,效果相同但效能更好。 - 若拉 gleichen 的圖片是純色或漸層,也可以完全不靠圖片,改用
CALayer的cornerRadius、borderWidth搭配UIColor畫出來,解析度永遠銳利,也不必準備多套素材。