
iOS 學習筆記(十二):UITableView 相關類、屬性與實作(下)
編輯:iOS 開發綜合
上一篇我們把表視圖(UITableView)的基本概念摸了一遍。這次接著往下走,把圍繞在 UITableView 身邊的類別關係、常用屬性與方法一次整理清楚,最後動手做一個可運行的範例。
一、UITableView 的類別結構
先看繼承關係:
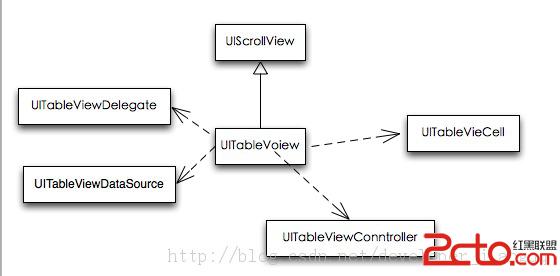
掌握這張圖,很多行為就解釋得通了:
- UITableView 繼承自 UIScrollView,所以滾動、慣性、橡皮筋回彈這些能力都是現成的,不需要自己實作。
- UITableViewCell 是每一列的內容容器。
- UITableViewDataSource 負責回答「有幾列、每一列長什麼樣」,是資料的來源。
- UITableViewDelegate 負責處理「使用者做了什麼」,例如選中了哪一列、要不要編輯。
- UITableViewHeaderFooterView 則用於自訂節(section)的頭尾。
兩個協定的分工可以這樣記:資料從 dataSource 來,互動交給 delegate 處理。
二、兩個協定的重點方法
2.1 UITableViewDataSource:必寫的兩個方法
// 回傳每個 section 有多少列
- (NSInteger)tableView:(UITableView *)tableView numberOfRowsInSection:(NSInteger)section;

// 為指定位置提供 cell
- (UITableViewCell *)tableView:(UITableView *)tableView cellForRowAtIndexPath:(NSIndexPath *)indexPath;
第二個方法的官方註解特別提醒:實作者應「永遠」嘗試重用 cell,也就是設定 reuseIdentifier,並用 dequeueReusableCellWithIdentifier: 取得可重用的實例。這是 UITableView 效能表現的核心機制,模擬器啟動時其實只會配置可見範圍內的 cell,捲動時才動態索取新的,離開視野就回收。
2.2 常見的選用方法
// section 的數量,不實作時預設為 1
- (NSInteger)numberOfSectionsInTableView:(UITableView *)tableView;

// section 頭部標題
- (NSString *)tableView:(UITableView *)tableView titleForHeaderInSection:(NSInteger)section;

// section 尾部標題
- (NSString *)tableView:(UITableView *)tableView titleForFooterInSection:(NSInteger)section;

// 是否可編輯、是否可移動
- (BOOL)tableView:(UITableView *)tableView canEditRowAtIndexPath:(NSIndexPath *)indexPath;
- (BOOL)tableView:(UITableView *)tableView canMoveRowAtIndexPath:(NSIndexPath *)indexPath;

// 右側索引列的字串陣列,例如 "A"..."Z"、"#"
- (NSArray *)sectionIndexTitlesForTableView:(UITableView *)tableView;
- (NSInteger)tableView:(UITableView *)tableView sectionForSectionIndexTitle:(NSString *)title atIndex:(NSInteger)index;

// 提交編輯結果、移動列
- (void)tableView:(UITableView *)tableView commitEditingStyle:(UITableViewCellEditingStyle)editingStyle forRowAtIndexPath:(NSIndexPath *)indexPath;
- (void)tableView:(UITableView *)tableView moveRowAtIndexPath:(NSIndexPath *)sourceIndexPath toIndexPath:(NSIndexPath *)destinationIndexPath;
2.3 UITableViewDelegate:自訂頭尾與回應點擊
// 自訂 section 的頭部視圖(高度仍由 delegate 決定)
- (UIView *)tableView:(UITableView *)tableView viewForHeaderInSection:(NSInteger)section;

// 自訂 section 的尾部視圖
- (UIView *)tableView:(UITableView *)tableView viewForFooterInSection:(NSInteger)section;

// 選中前後的攔截機會
- (NSIndexPath *)tableView:(UITableView *)tableView willSelectRowAtIndexPath:(NSIndexPath *)indexPath;

// 選中後的處理
- (void)tableView:(UITableView *)tableView didSelectRowAtIndexPath:(NSIndexPath *)indexPath;
還有大量方法沒有列出,需要時直接查官方 UITableViewDelegate 的說明文件即可。
三、常用屬性與方法速查
3.1 屬性
@property(nonatomic) UITableViewCellSeparatorStyle separatorStyle;  // 分隔線樣式,預設 SingleLine
@property(nonatomic, retain) UIColor *separatorColor;               // 分隔線顏色
@property(nonatomic, retain) UIView  *tableHeaderView;              // 表頭視圖
@property(nonatomic, retain) UIView  *tableFooterView;              // 表尾視圖
@property(nonatomic) CGFloat rowHeight;            // 列的統一高度
@property(nonatomic) CGFloat sectionHeaderHeight;  // 節頭高度
@property(nonatomic) CGFloat sectionFooterHeight;  // 節尾高度
@property(nonatomic, retain) UIView  *backgroundView;
@property(nonatomic, readonly) UITableViewStyle style;
3.2 方法
- (void)reloadData;                    // 重新向 dataSource 索取全部資料
- (void)reloadSectionIndexTitles;      // 只刷新右側索引列
- (NSInteger)numberOfSections;         // 節的數量
- (NSInteger)numberOfRowsInSection:(NSInteger)section;

- (CGRect)rectForSection:(NSInteger)section;        // 含 header、footer 與所有列
- (CGRect)rectForHeaderInSection:(NSInteger)section;
- (CGRect)rectForFooterInSection:(NSInteger)section;
- (CGRect)rectForRowAtIndexPath:(NSIndexPath *)indexPath;

- (NSIndexPath *)indexPathForRowAtPoint:(CGPoint)point;  // 點不在表內時回傳 nil
- (NSIndexPath *)indexPathForCell:(UITableViewCell *)cell;
- (NSArray *)indexPathsForRowsInRect:(CGRect)rect;

- (UITableViewCell *)cellForRowAtIndexPath:(NSIndexPath *)indexPath; // cell 不可見時回傳 nil
- (NSArray *)visibleCells;
- (NSArray *)indexPathsForVisibleRows;

- (void)scrollToRowAtIndexPath:(NSIndexPath *)indexPath
              atScrollPosition:(UITableViewScrollPosition)scrollPosition
                      animated:(BOOL)animated;
- (void)scrollToNearestSelectedRowAtScrollPosition:(UITableViewScrollPosition)scrollPosition
                                          animated:(BOOL)animated;
這批方法在 iOS 6 之後還多了 headerViewForSection: 與 footerViewForSection:,可以取得節的實際 header/footer 視圖。
四、動手做一個表視圖
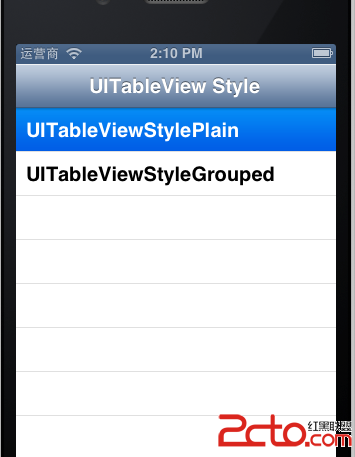
流程其實只有三步:配置資料來源、實作 dataSource 方法、設定 delegate。以下範例示範兩個不同風格的表視圖切換。
#import "ZTTRootViewController.h"
#import "ZTTDetailsViewController.h"

#define kDeviceHeight [UIScreen mainScreen].bounds.size.height

@implementation ZTTRootViewController

- (id)initWithNibName:(NSString *)nibNameOrNil bundle:(NSBundle *)nibBundleOrNil {
    self = [super initWithNibName:nibNameOrNil bundle:nibBundleOrNil];
    if (self) {
        self.title = @"UITableView Style";
    }
    return self;
}

- (void)loadView {
    UIView *view = [[UIView alloc] initWithFrame:[UIScreen mainScreen].applicationFrame];
    self.view = view;

    // 1. 準備資料
    self.listArray = @[@"UITableViewStylePlain", @"UITableViewStyleGrouped"];

    // 2. 建立表視圖
    _tableView = [[UITableView alloc] initWithFrame:CGRectMake(0, 0, 320, kDeviceHeight - 20 - 44)
                                             style:UITableViewStylePlain];
    _tableView.dataSource = self;
    _tableView.delegate = self;
    [self.view addSubview:_tableView];
}

#pragma mark - UITableViewDataSource

- (NSInteger)numberOfSectionsInTableView:(UITableView *)tableView {
    return 1;
}

- (NSInteger)tableView:(UITableView *)tableView numberOfRowsInSection:(NSInteger)section {
    return [_listArray count];
}

- (UITableViewCell *)tableView:(UITableView *)tableView cellForRowAtIndexPath:(NSIndexPath *)indexPath {
    static NSString *cellIdentifier = nil;
    UITableViewCell *cell = [tableView dequeueReusableCellWithIdentifier:cellIdentifier];
    if (cell == nil) {
        cell = [[UITableViewCell alloc] initWithStyle:UITableViewCellStyleDefault
                                    reuseIdentifier:cellIdentifier];
    }
    cell.textLabel.text = [self.listArray objectAtIndex:indexPath.row];
    return cell;
}

#pragma mark - UITableViewDelegate

- (void)tableView:(UITableView *)tableView didSelectRowAtIndexPath:(NSIndexPath *)indexPath {
    ZTTDetailsViewController *detailsVC = [[ZTTDetailsViewController alloc] init];
    detailsVC.isPlain = (indexPath.row == 0);
    [self.navigationController pushViewController:detailsVC animated:YES];
}
@end
運行結果:
加上表頭與表尾
上面是一個乾淨的清單。若要加上節的標題文字,只要再實作兩個 dataSource 方法:
- (NSString *)tableView:(UITableView *)tableView titleForHeaderInSection:(NSInteger)section;
- (NSString *)tableView:(UITableView *)tableView titleForFooterInSection:(NSInteger)section;
執行後:
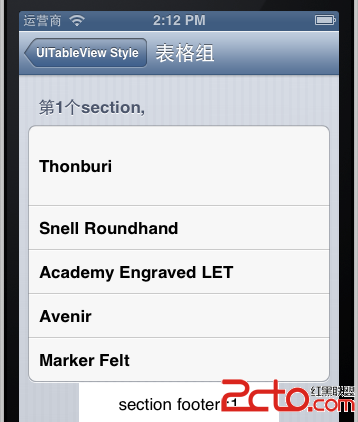
如果對字型或樣式有更高要求,就别用這兩個方法,改實作 delegate 的 viewForHeaderInSection: 放一個自訂的 UILabel 或整塊 UIView 上去,自由度會大很多。