
iOS 7 自訂 ViewController 轉場動畫完整教學
ViewController(以下簡稱 VC)無疑是 MVC 架構下最花心思的一層。蘋果向來重視使用者體驗,而畫面之間如何過渡,正是體驗的關鍵細節。iOS 7 首次提供了一套完整、統一的 VC 轉場自訂方案,為過去各家五花八門的實作指出了官方道路。
iOS 7 之前怎麼做?
在 iOS 5 與 iOS 6 時代,除了標準的 push、tab 與 presentModal,自訂轉場多半得靠 Child View Controller(VC 容器)。典型寫法如下:
// ContainerVC.m
[self addChildViewController:toVC];
[fromVC willMoveToParentViewController:nil];
[self.view addSubview:toVC.view];

__weak id weakSelf = self;
[self transitionFromViewController:fromVC
                toViewController:toVC
                          duration:0.3
                           options:UIViewAnimationOptionTransitionCrossDissolve
                        animations:^{}
                        completion:^(BOOL finished) {
    [fromVC.view removeFromSuperview];
    [fromVC removeFromParentViewController];
    [toVC didMoveToParentViewController:weakSelf];
}];
VC 容器的主要目的是把多個 VC 正確地組在同一個螢幕上,並確保旋轉、viewDidLoad: 等事件能準確傳遞給每個子 VC。在容器情境下,往自己的 view 上加其他 VC 的 view 是正確做法(搭配 addChildViewController:);但在非容器情境下,這種寫法就是典型的 VC 誤用。
然而 VC 容器對自訂轉場的支持相當有限:程式碼高度耦合在容器類別裡難以重用,效果也只能靠 UIView 動畫拼接,管理起來頗為繁瑣。iOS 7 的新 API 正是為了解決這兩個問題。
三個核心協定
相關介面都定義在 UIKit/UIViewControllerTransitioning.h 中。名稱相似,但職責分明。
1. UIViewControllerContextTransitioning —— 轉場上下文
提供「從哪個 VC 到哪個 VC」這類資訊,由系統實作,開發者不需自行實作。動畫實作中最常用的方法:
-containerView:轉場發生的容器,切入的 view 加進來、切出的 view 移出去-viewControllerForKey::以UITransitionContextFromViewControllerKey或ToViewControllerKey取出對應 VC-initialFrameForViewController:/-finalFrameForViewController::動畫的起點與終點 frame-completeTransition::向系統報告轉場結束
2. UIViewControllerAnimatedTransitioning —— 動畫內容
決定「轉場中應該發生什麼」,自訂效果時大部分程式碼都在這裡。只需實作兩個方法:
-transitionDuration::回傳動畫所需時間-animateTransition::所有 view 設定與動畫都在此完成
3. UIViewControllerTransitioningDelegate —— 派工窗口
系統在轉場時會向遵循此協定的物件詢問要不要使用自訂效果,共四個方法:
-animationControllerForPresentedController:presentingController:sourceController:-animationControllerForDismissedController:-interactionControllerForPresentation:-interactionControllerForDismissal:
前兩個用於動畫轉場,後兩個涉及手勢驅動的交互式轉場。
Demo:彈簧效果的 Modal 呈現
我們先寫一個標準的 modal VC,透過 delegate 回報「使用者按了關閉鈕」:
// ModalViewController.h
@class ModalViewController;

@protocol ModalViewControllerDelegate <NSObject>
- (void)modalViewControllerDidClickedDismissButton:(ModalViewController *)viewController;
@end

@interface ModalViewController : UIViewController
@property (nonatomic, weak) id<ModalViewControllerDelegate> delegate;
@end

// ModalViewController.m
- (void)viewDidLoad
{
    [super viewDidLoad];
    self.view.backgroundColor = [UIColor lightGrayColor];

    UIButton *button = [UIButton buttonWithType:UIButtonTypeRoundedRect];
    button.frame = CGRectMake(80.0, 210.0, 160.0, 40.0);
    [button setTitle:@"Dismiss me" forState:UIControlStateNormal];
    [button addTarget:self action:@selector(buttonClicked:) forControlEvents:UIControlEventTouchUpInside];
    [self.view addSubview:button];
}

- (void)buttonClicked:(id)sender
{
    if (self.delegate &&
        [self.delegate respondsToSelector:@selector(modalViewControllerDidClickedDismissButton:)]) {
        [self.delegate modalViewControllerDidClickedDismissButton:self];
    }
}
順帶一提:有些人喜歡在 buttonClicked: 裡直接對 self 發送 dismiss 訊息。雖然系統會把訊息轉發給呈現它的 VC,但這違反了職責分離原則,也容易踩坑。用 delegate 讓呈現方自己決定何時關閉,才是乾淨的設計。
呈現方:
// MainViewController.m
- (void)buttonClicked:(id)sender
{
    ModalViewController *mvc = [[ModalViewController alloc] init];
    mvc.delegate = self;
    [self presentViewController:mvc animated:YES completion:nil];
}

- (void)modalViewControllerDidClickedDismissButton:(ModalViewController *)viewController
{
    [self dismissViewControllerAnimated:YES completion:nil];
}
實作彈簧動畫
新建一個類別遵循 UIViewControllerAnimatedTransitioning:
// BouncePresentAnimation.h
@interface BouncePresentAnimation : NSObject <UIViewControllerAnimatedTransitioning>
@end

// BouncePresentAnimation.m
- (NSTimeInterval)transitionDuration:(id<UIViewControllerContextTransitioning>)transitionContext
{
    return 0.8f;
}

- (void)animateTransition:(id<UIViewControllerContextTransitioning>)transitionContext
{
    // 1. 從 context 取得參與轉場的 VC
    UIViewController *toVC = [transitionContext viewControllerForKey:UITransitionContextToViewControllerKey];

    // 2. 把 toVC 的初始位置設到螢幕下緣
    CGRect screenBounds = [[UIScreen mainScreen] bounds];
    CGRect finalFrame = [transitionContext finalFrameForViewController:toVC];
    toVC.view.frame = CGRectOffset(finalFrame, 0, screenBounds.size.height);

    // 3. 加入容器
    UIView *containerView = [transitionContext containerView];
    [containerView addSubview:toVC.view];

    // 4. 播放彈簧動畫
    NSTimeInterval duration = [self transitionDuration:transitionContext];
    [UIView animateWithDuration:duration
                          delay:0.0
         usingSpringWithDamping:0.6
          initialSpringVelocity:0.0
                        options:UIViewAnimationOptionCurveLinear
                     animations:^{
        toVC.view.frame = finalFrame;
    }
                     completion:^(BOOL finished) {
        // 5. 一定要向 context 報告完成
        [transitionContext completeTransition:YES];
    }];
}
五個步驟依序是:取得 VC 參照、設定起始 frame、加入 containerView、播放動畫、回報完成。最後一步特別關鍵——少了 completeTransition:,系統不會更新 VC 狀態,畫面可能停留在半完成狀態。
usingSpringWithDamping: 是 iOS 7 新增的 UIView 動畫 API,用阻尼參數模擬彈簧手感。 damping 越小彈得越明顯。另外 iOS 7 也為 UIView 動畫加入了 UIViewKeyframeAnimations 分類,可做關鍵幀動畫。
接著讓 delegate 生效:
@interface MainViewController () <ModalViewControllerDelegate, UIViewControllerTransitioningDelegate>
@property (nonatomic, strong) BouncePresentAnimation *presentAnimation;
@end

@implementation MainViewController

- (id)initWithNibName:(NSString *)nibNameOrNil bundle:(NSBundle *)nibBundleOrNil
{
    self = [super initWithNibName:nibNameOrNil bundle:nibBundleOrNil];
    if (self) {
        _presentAnimation = [BouncePresentAnimation new];
    }
    return self;
}

- (void)buttonClicked:(id)sender
{
    ModalViewController *mvc = [[ModalViewController alloc] init];
    mvc.delegate = self;
    mvc.transitioningDelegate = self;   // 關鍵一行
    [self presentViewController:mvc animated:YES completion:nil];
}

- (id<UIViewControllerAnimatedTransitioning>)
    animationControllerForPresentedController:(UIViewController *)presented
                     presentingController:(UIViewController *)presenting
                         sourceController:(UIViewController *)source
{
    return self.presentAnimation;
}

@end
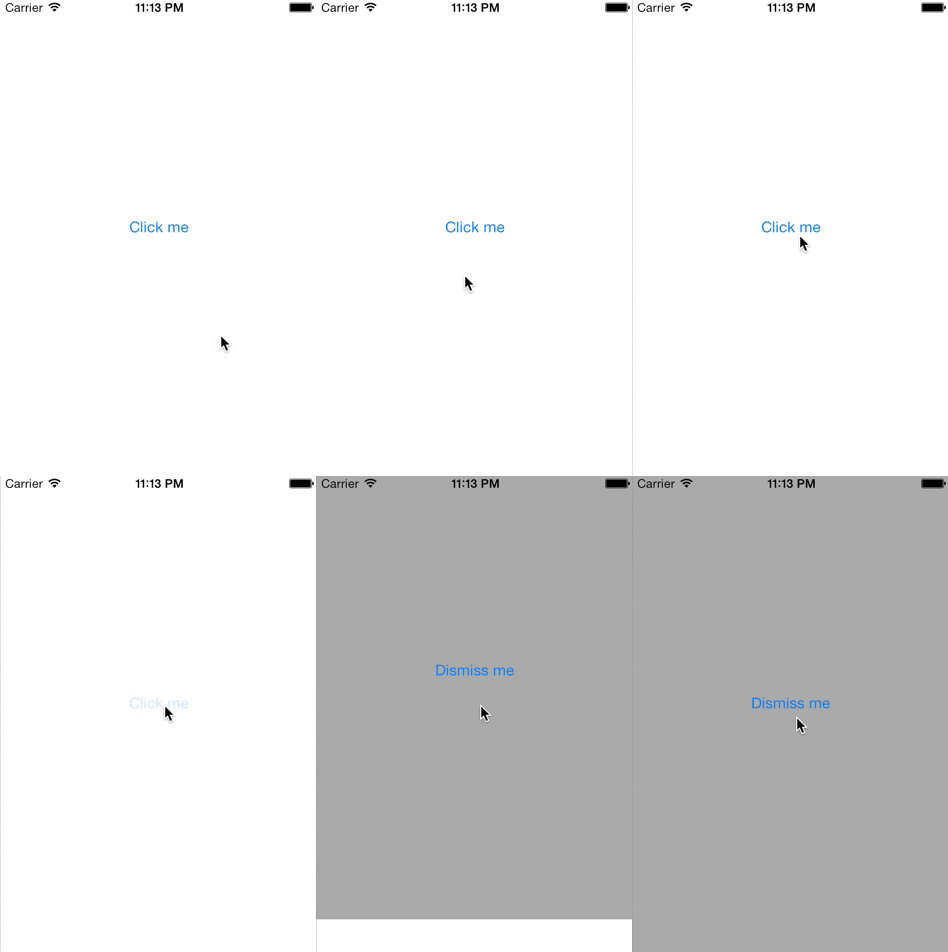
執行後,modal VC 會帶著彈性手感從下方彈出。
手勢驅動的百分比轉場
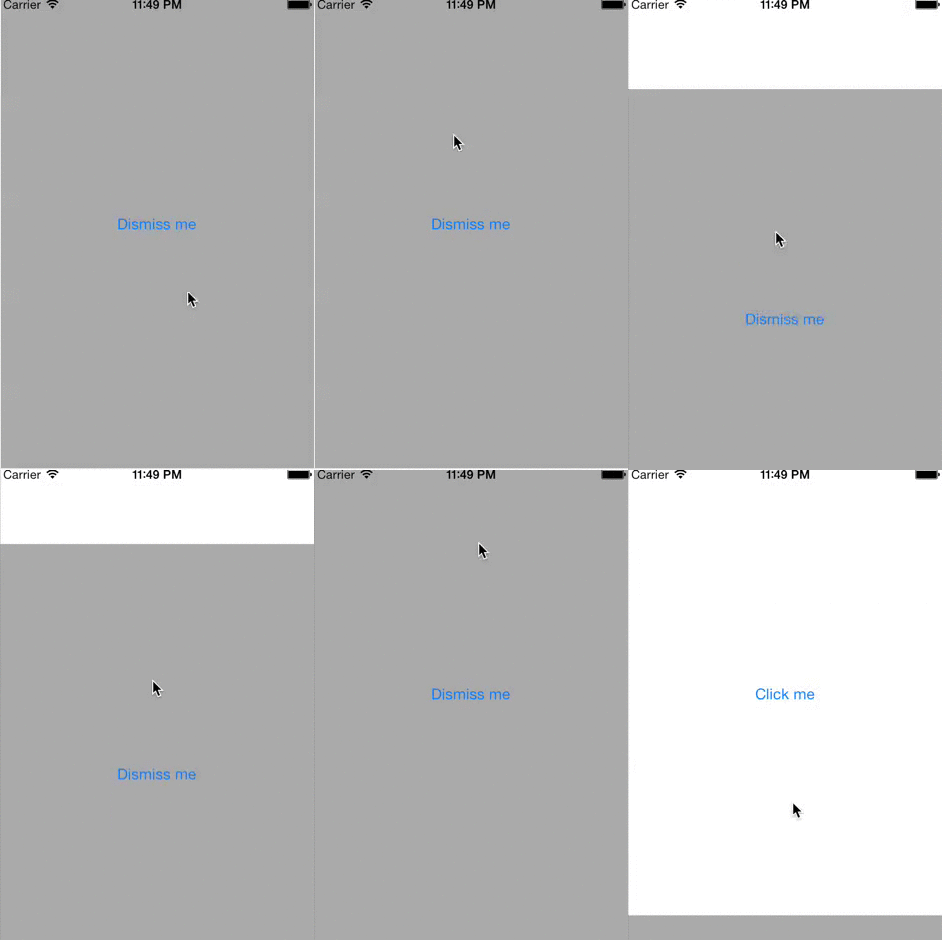
iOS 7 另一個亮眼特性是交互式轉場。在系統自家 App 中,你可以在 nav 堆疊裡用「從左側往右滑」手勢返回,而且滑到一半放開還能取消這次轉場——Safari 甚至用同樣手勢做網頁後退。要自己實作,得先認識一個現成的類別。
UIPercentDrivenInteractiveTransition
它遵循 UIViewControllerInteractiveTransitioning 協定,預先實作了「用百分比控制轉場進度」這件事,通常繼承它即可。三個關鍵方法:
-updateInteractiveTransition::更新完成百分比(0.0 ~ 1.0)-cancelInteractiveTransition::回報取消,退回原狀態-finishInteractiveTransition:回報完成,前進到目標狀態
實作上滑關閉
// SwipeUpInteractiveTransition.h
@interface SwipeUpInteractiveTransition : UIPercentDrivenInteractiveTransition
@property (nonatomic, assign) BOOL interacting;
- (void)wireToViewController:(UIViewController *)viewController;
@end

// SwipeUpInteractiveTransition.m
@interface SwipeUpInteractiveTransition ()
@property (nonatomic, assign) BOOL shouldComplete;
@property (nonatomic, strong) UIViewController *presentingVC;
@end

@implementation SwipeUpInteractiveTransition

- (void)wireToViewController:(UIViewController *)viewController
{
    self.presentingVC = viewController;
    [self prepareGestureRecognizerInView:viewController.view];
}

- (void)prepareGestureRecognizerInView:(UIView *)view
{
    UIPanGestureRecognizer *gesture =
        [[UIPanGestureRecognizer alloc] initWithTarget:self action:@selector(handleGesture:)];
    [view addGestureRecognizer:gesture];
}

- (CGFloat)completionSpeed
{
    return 1 - self.percentComplete;
}

- (void)handleGesture:(UIPanGestureRecognizer *)gestureRecognizer
{
    CGPoint translation = [gestureRecognizer translationInView:gestureRecognizer.view.superview];

    switch (gestureRecognizer.state) {
        case UIGestureRecognizerStateBegan:
            // 1. 標記正在互動,delegate 會用到這個旗標
            self.interacting = YES;
            [self.presentingVC dismissViewControllerAnimated:YES completion:nil];
            break;

        case UIGestureRecognizerStateChanged: {
            // 2. 依位移算出百分比(此處以 400pt 為 100%)
            CGFloat fraction = translation.y / 400.0;
            fraction = fminf(fmaxf(fraction, 0.0), 1.0);
            self.shouldComplete = (fraction > 0.5);
            [self updateInteractiveTransition:fraction];
            break;
        }

        case UIGestureRecognizerStateEnded:
        case UIGestureRecognizerStateCancelled:
            // 3. 手勢結束,依是否過半決定完成或取消
            self.interacting = NO;
            if (!self.shouldComplete ||
                gestureRecognizer.state == UIGestureRecognizerStateCancelled) {
                [self cancelInteractiveTransition];
            } else {
                [self finishInteractiveTransition];
            }
            break;

        default:
            break;
    }
}

@end
邏輯分三段:手勢開始時設旗標並啟動 dismiss;移動時把位移換算成百分比並夾在 0~1 之間,同時記錄是否已過半;結束時依旗標決定完成或退回。
再補上一個負責「往下滑走」的動畫類別(實作 UIViewControllerAnimatedTransitioning,寫法與 BouncePresentAnimation 幾乎相同,這裡從略),然後調整主 VC:
// MainViewController.m
@interface MainViewController () <ModalViewControllerDelegate, UIViewControllerTransitioningDelegate>

// 1. 新增 dismiss 動畫與交互式轉場控制器
@property (nonatomic, strong) NormalDismissAnimation *dismissAnimation;
@property (nonatomic, strong) SwipeUpInteractiveTransition *transitionController;

@end

@implementation MainViewController

- (id)initWithNibName:(NSString *)nibNameOrNil bundle:(NSBundle *)nibBundleOrNil
{
    self = [super initWithNibName:nibNameOrNil bundle:nibBundleOrNil];
    if (self) {
        _dismissAnimation = [NormalDismissAnimation new];
        _transitionController = [SwipeUpInteractiveTransition new];
    }
    return self;
}

- (void)buttonClicked:(id)sender
{
    ModalViewController *mvc = [[ModalViewController alloc] init];
    mvc.delegate = self;
    mvc.transitioningDelegate = self;

    // 2. 為交互式控制器綁定要操作的 VC
    [self.transitionController wireToViewController:mvc];

    [self presentViewController:mvc animated:YES completion:nil];
}

// 3. 回傳 dismiss 動畫
- (id<UIViewControllerAnimatedTransitioning>)
    animationControllerForDismissedController:(UIViewController *)dismissed
{
    return self.dismissAnimation;
}

// 4. 只有在手勢進行中才回傳交互式控制器,否則回傳 nil
- (id<UIViewControllerInteractiveTransitioning>)
    interactionControllerForDismissal:(id<UIViewControllerAnimatedTransitioning>)animator
{
    return self.transitionController.interacting ? self.transitionController : nil;
}

@end
最後那個三元判斷很重要:若無條件回傳交互式控制器,一般點擊關閉鈕也會被當成交互式轉場,導致畫面卡住。
總結與延伸
Demo 示範的是 modal 的 present 與 dismiss。Navigation Controller 的 push 與 pop 也有一整套對應方法,做法幾乎相同,只是把 delegate 的詢問對象從 UIViewControllerTransitioningDelegate 換成 UINavigationControllerDelegate。而且蘋果已經為標準 nav 的 pop 實作了手勢返回,不必每個專案重造一次。
那麼既然有了 VC 容器,為何還需要自訂轉場?因為兩者解決的是不同問題:VC 容器負責「組織結構」,確保事件能正確傳遞;自訂轉場只負責「視覺效果」,並透過協定把動畫內容與動畫驅動解耦,因此重用性極佳——一套精心寫好的轉場動畫,可以輕易套用到不同 VC,甚至不同專案。
開源的 VCTransitionsLibrary(Colin Eberhardt)就基於這套設計收集了大量現成效果,多數專案直接取用即可;需要更獨特的效果,在其基礎上擴充也很容易。隨著越來越多 App 針對 iOS 7 設計,自訂轉場已成為互動實作的基礎環節。