
iOS 团购專案:Popover 適配 iPad 橫豎屏切換
編輯:iOS 開發綜合
最終效果圖:
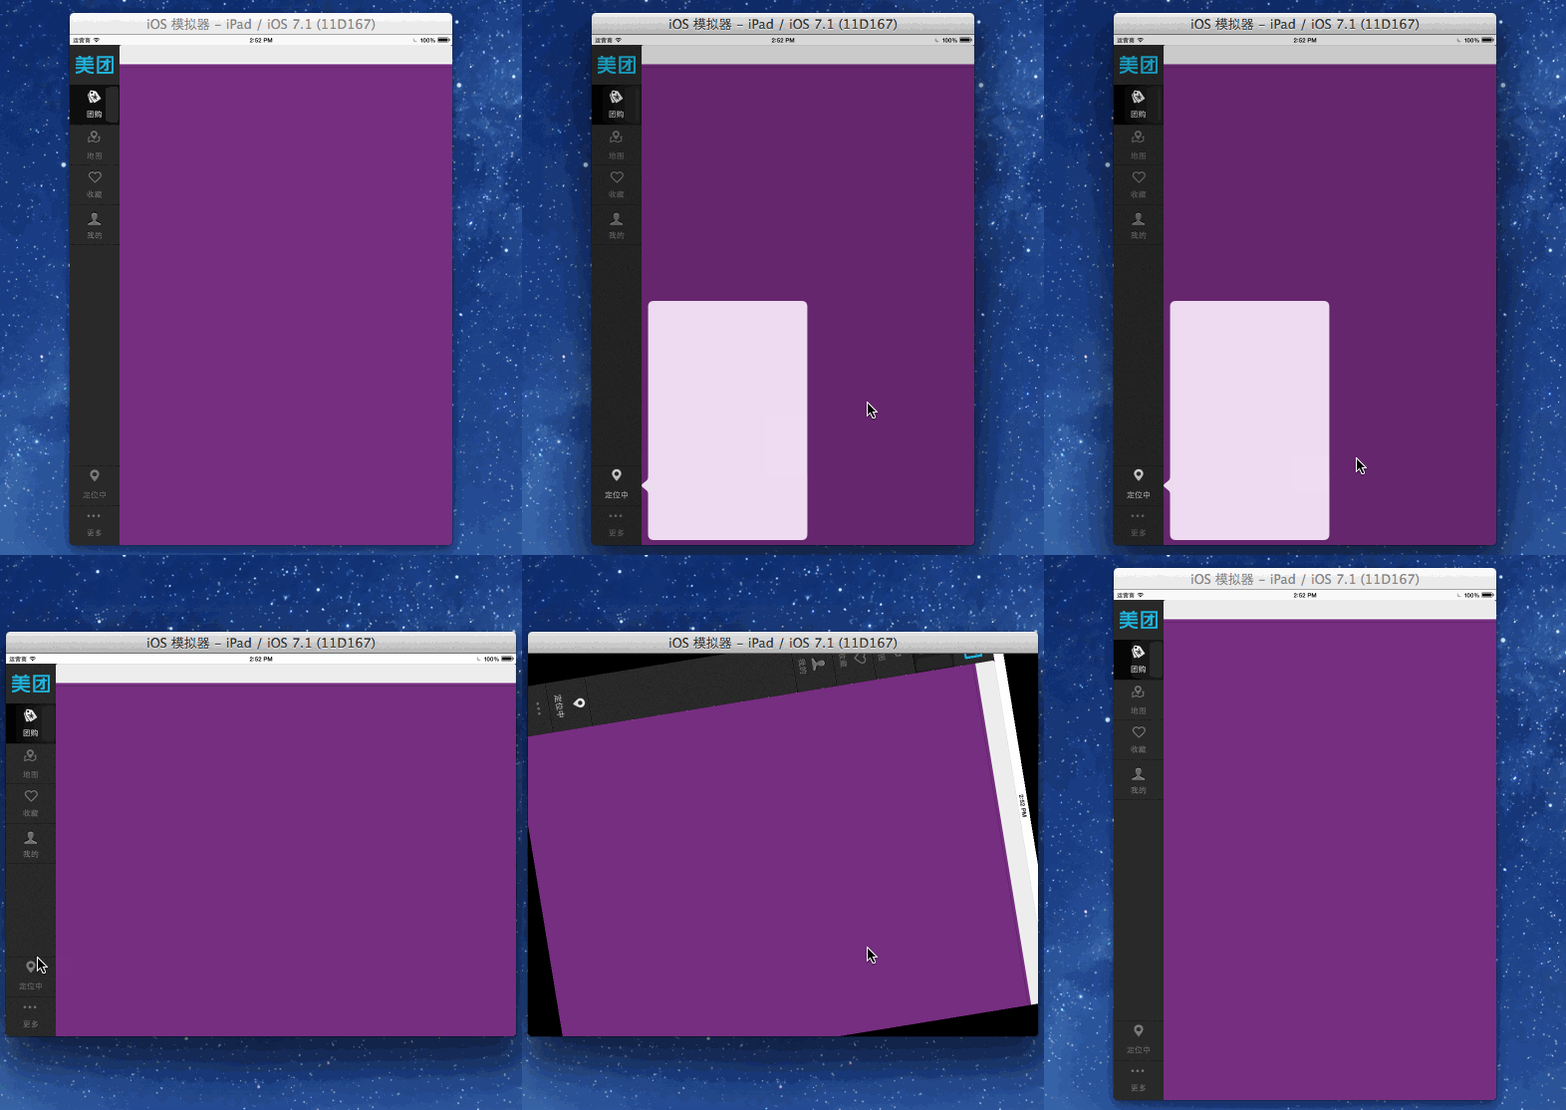
UIPopoverController 有個惱人的特性:螢幕旋轉後,彈出框指向的位置不會自動更新。解法是監聽方向變化的通知,在旋轉完成後重新 present 一次。以下為完整實作。
DockItemLocation.m
//
//  DockItemLocation.m
//  帥哥_團購
//
//  Created by beyond on 14-8-13.
//  Copyright (c) 2014年 com.beyond. All rights reserved.
//

#import "DockItemLocation.h"
// 點擊 dock 上的 locationBtn 後彈出的 Popover,上方是搜尋欄,下方是 tableView
#import "CityLocationController.h"

// 按鈕上方是圖片、下方是文字,這是圖片佔的高度比例
#define kImageHeightRatioInBtn 0.5

@interface DockItemLocation ()<UIPopoverControllerDelegate> {
    // popover 必須用成員變量記住。若宣告為局部變量,btnClick 方法一執行完就會被銷毀,後續無從顯示
    UIPopoverController *_popoverCtrl;
}
@end

@implementation DockItemLocation

- (id)initWithFrame:(CGRect)frame {
    self = [super initWithFrame:frame];
    if (self) {
        // 1. 呼叫父類方法設定內部的圖片
        [self setIcon:@"ic_district.png" selectedIcon:@"ic_district_hl.png"];

        // 2. 自動伸縮
        self.autoresizingMask = UIViewAutoresizingFlexibleTopMargin;

        // 3. 設定預設文字
        [self setTitle:@"定位中" forState:UIControlStateNormal];
        self.titleLabel.font = [UIFont systemFontOfSize:16];
        self.titleLabel.textAlignment = NSTextAlignmentCenter;
        [self setTitleColor:[UIColor whiteColor] forState:UIControlStateDisabled];
        [self setTitleColor:[UIColor grayColor] forState:UIControlStateNormal];

        // 4. 設定圖片屬性
        self.imageView.contentMode = UIViewContentModeCenter;

        // 5. 監聽點擊,彈出 Popover
        [self addTarget:self action:@selector(locationBtnOnDockClicked) forControlEvents:UIControlEventTouchDown];
    }
    return self;
}

// 點擊 Location 按鈕,彈出 Popover
- (void)locationBtnOnDockClicked {
    // 短暫停用,避免連續點擊重複彈出
    self.enabled = NO;

    CityLocationController *cityVC = [[CityLocationController alloc] init];
    _popoverCtrl = [[UIPopoverController alloc] initWithContentViewController:cityVC];
    _popoverCtrl.popoverContentSize = CGSizeMake(320, 480);
    _popoverCtrl.delegate = self;

    [self showPopoverCtrl];

    // 螢幕旋轉後 popover 的指向位置會錯位,因此要監聽方向變化
    // 先移除舊監聽,保證健壯性
    [[NSNotificationCenter defaultCenter] removeObserver:self
                                                   name:UIDeviceOrientationDidChangeNotification
                                                 object:nil];
    [[NSNotificationCenter defaultCenter] addObserver:self
                                             selector:@selector(screenDidRotated)
                                                 name:UIDeviceOrientationDidChangeNotification
                                               object:nil];
}

// 抽取出來的公共方法,首次顯示與旋轉後重新顯示都要用到
- (void)showPopoverCtrl {
    // 目標 view 是 self 自己時用 bounds,因為 bounds 的原點才相對自己
    // 目標 view 是 self.superview 時用 frame,因為 frame 的原點才相對父視圖
    [_popoverCtrl presentPopoverFromRect:self.bounds
                                  inView:self
                        permittedArrowDirections:UIPopoverArrowDirectionAny
                                    animated:YES];
}

// 螢幕旋轉完成後的處理
- (void)screenDidRotated {
    if (_popoverCtrl.popoverVisible) {
        // 1. 先關閉原本位置上的 popover
        [_popoverCtrl dismissPopoverAnimated:NO];
        // 2. 稍等一下再重新顯示,避免在旋轉動畫中定位先算錯
        [self performSelector:@selector(showPopoverCtrl) withObject:nil afterDelay:0.5];
    }
}

#pragma mark - UIPopoverControllerDelegate

- (void)popoverControllerDidDismissPopover:(UIPopoverController *)popoverController {
    // 關閉後恢復可點擊
    self.enabled = YES;
    // popover 已銷毀,此時移除方向監聽
    [[NSNotificationCenter defaultCenter] removeObserver:self
                                                   name:UIDeviceOrientationDidChangeNotification
                                                 object:nil];
}

#pragma mark - 銷毀時移除監聽,避免野指標

- (void)dealloc {
    [[NSNotificationCenter defaultCenter] removeObserver:self];
}

#pragma mark - 覆寫圖片與文字在按鈕中的位置

- (CGRect)imageRectForContentRect:(CGRect)contentRect {
    CGFloat btnW = contentRect.size.width;
    CGFloat imgH = contentRect.size.height * kImageHeightRatioInBtn;
    return CGRectMake(0, 0, btnW, imgH);
}

- (CGRect)titleRectForContentRect:(CGRect)contentRect {
    CGFloat btnW = contentRect.size.width;
    CGFloat textH = contentRect.size.height * (1 - kImageHeightRatioInBtn);
    // 文字在下方,圖片在上方
    CGFloat textY = contentRect.size.height - textH;
    return CGRectMake(0, textY, btnW, textH);
}

@end
幾個設計上的要點
成員變量的必要性:_popoverCtrl 一定要用成員變量持有。UIPopoverController 不像 Modal 那樣由系統幫你保活,若宣告成區域變量,方法一結束就会被釋放,畫面上什麼都不會出現。
bounds 與 frame 的選擇:presentPopoverFromRect 傳入的 rect 座標系取決於 inView。傳 self 時要用 bounds,傳 superview 時要用 frame,這一點搞錯就會看到指針位置整體偏移。
通知的註冊與移除要成對:這裡在每次點擊時先 remove 再 add,popOver 關閉與 dealloc 時也都做清理,可以避免因重複註冊導致同一個 selector 被呼叫多次。
若是在新專案上實作,Apple 已提供 UIPopoverPresentationController 取代 UIPopoverController,並內建了 adaptivePresentationStyle 與旋轉時自動重新定位的能力,能省下這裡大半的手動處理。
- 上一篇文章: iOS 取不到 deviceToken 的三種常見原因
- 下一篇文章: iOS 頁面跳轉的三種方式與五類資料傳遞方案